(日本語は下の方にあります)
【English】
I decided to introduce a hardware wallet for the first time in order to manage my bitcoins myself, which until now have only been on exchanges and web wallets. I decided to create my own Seedsigner, an open source wallet device, and would like to introduce it to you. I thought it would not be a good idea to expose this on my blog, but I feel that the Seedsigner project is a great one, and I hope it will be of some help to those who view this.
✈︎What is a SeedSigner!
SeedSigner is a project aimed at reducing the cost and complexity of using bitcoin multi-signature wallets. To achieve this goal, it allows anyone to create their own air-gapped stateless bitcoin signature device using inexpensive components.
✈︎Reasons for choosing SeedSigner
I would like to write about my reasons for choosing Seedsigner for my hardware wallet installation.
First of all, I was not comfortable ordering from an overseas manufacturer, exposing my personal information and having the product sent to me through unfamiliar channels. Therefore, I was interested in Seedsigner, which can be produced by combining electronic components that are commercially available in Japan by myself without associating bitcoin too much with others.
And the second reason, which is the most important one, is that I wanted to increase my knowledge and awareness of cryptography by using Seedsigner. Although I believe that I need to improve my understanding of cryptography to some extent in order to self-manage my bitcoins, there are many difficult terms related to cryptography that are difficult to get my head around just by reading the words. Entropy, mnemonic phrase, seed, secret key...hmmm, it's difficult, isn't it? Even if I understand the explanation of each word, it is difficult to visualize the connection between them and understand them as a whole. From my past experiences, I felt that I could only learn by actually experiencing them, and since SeedSigner is based on the premise of air-gapped operations, I thought it would be possible to connect to my own understanding while practicing, without omitting any important processes in wallet creation and signing.
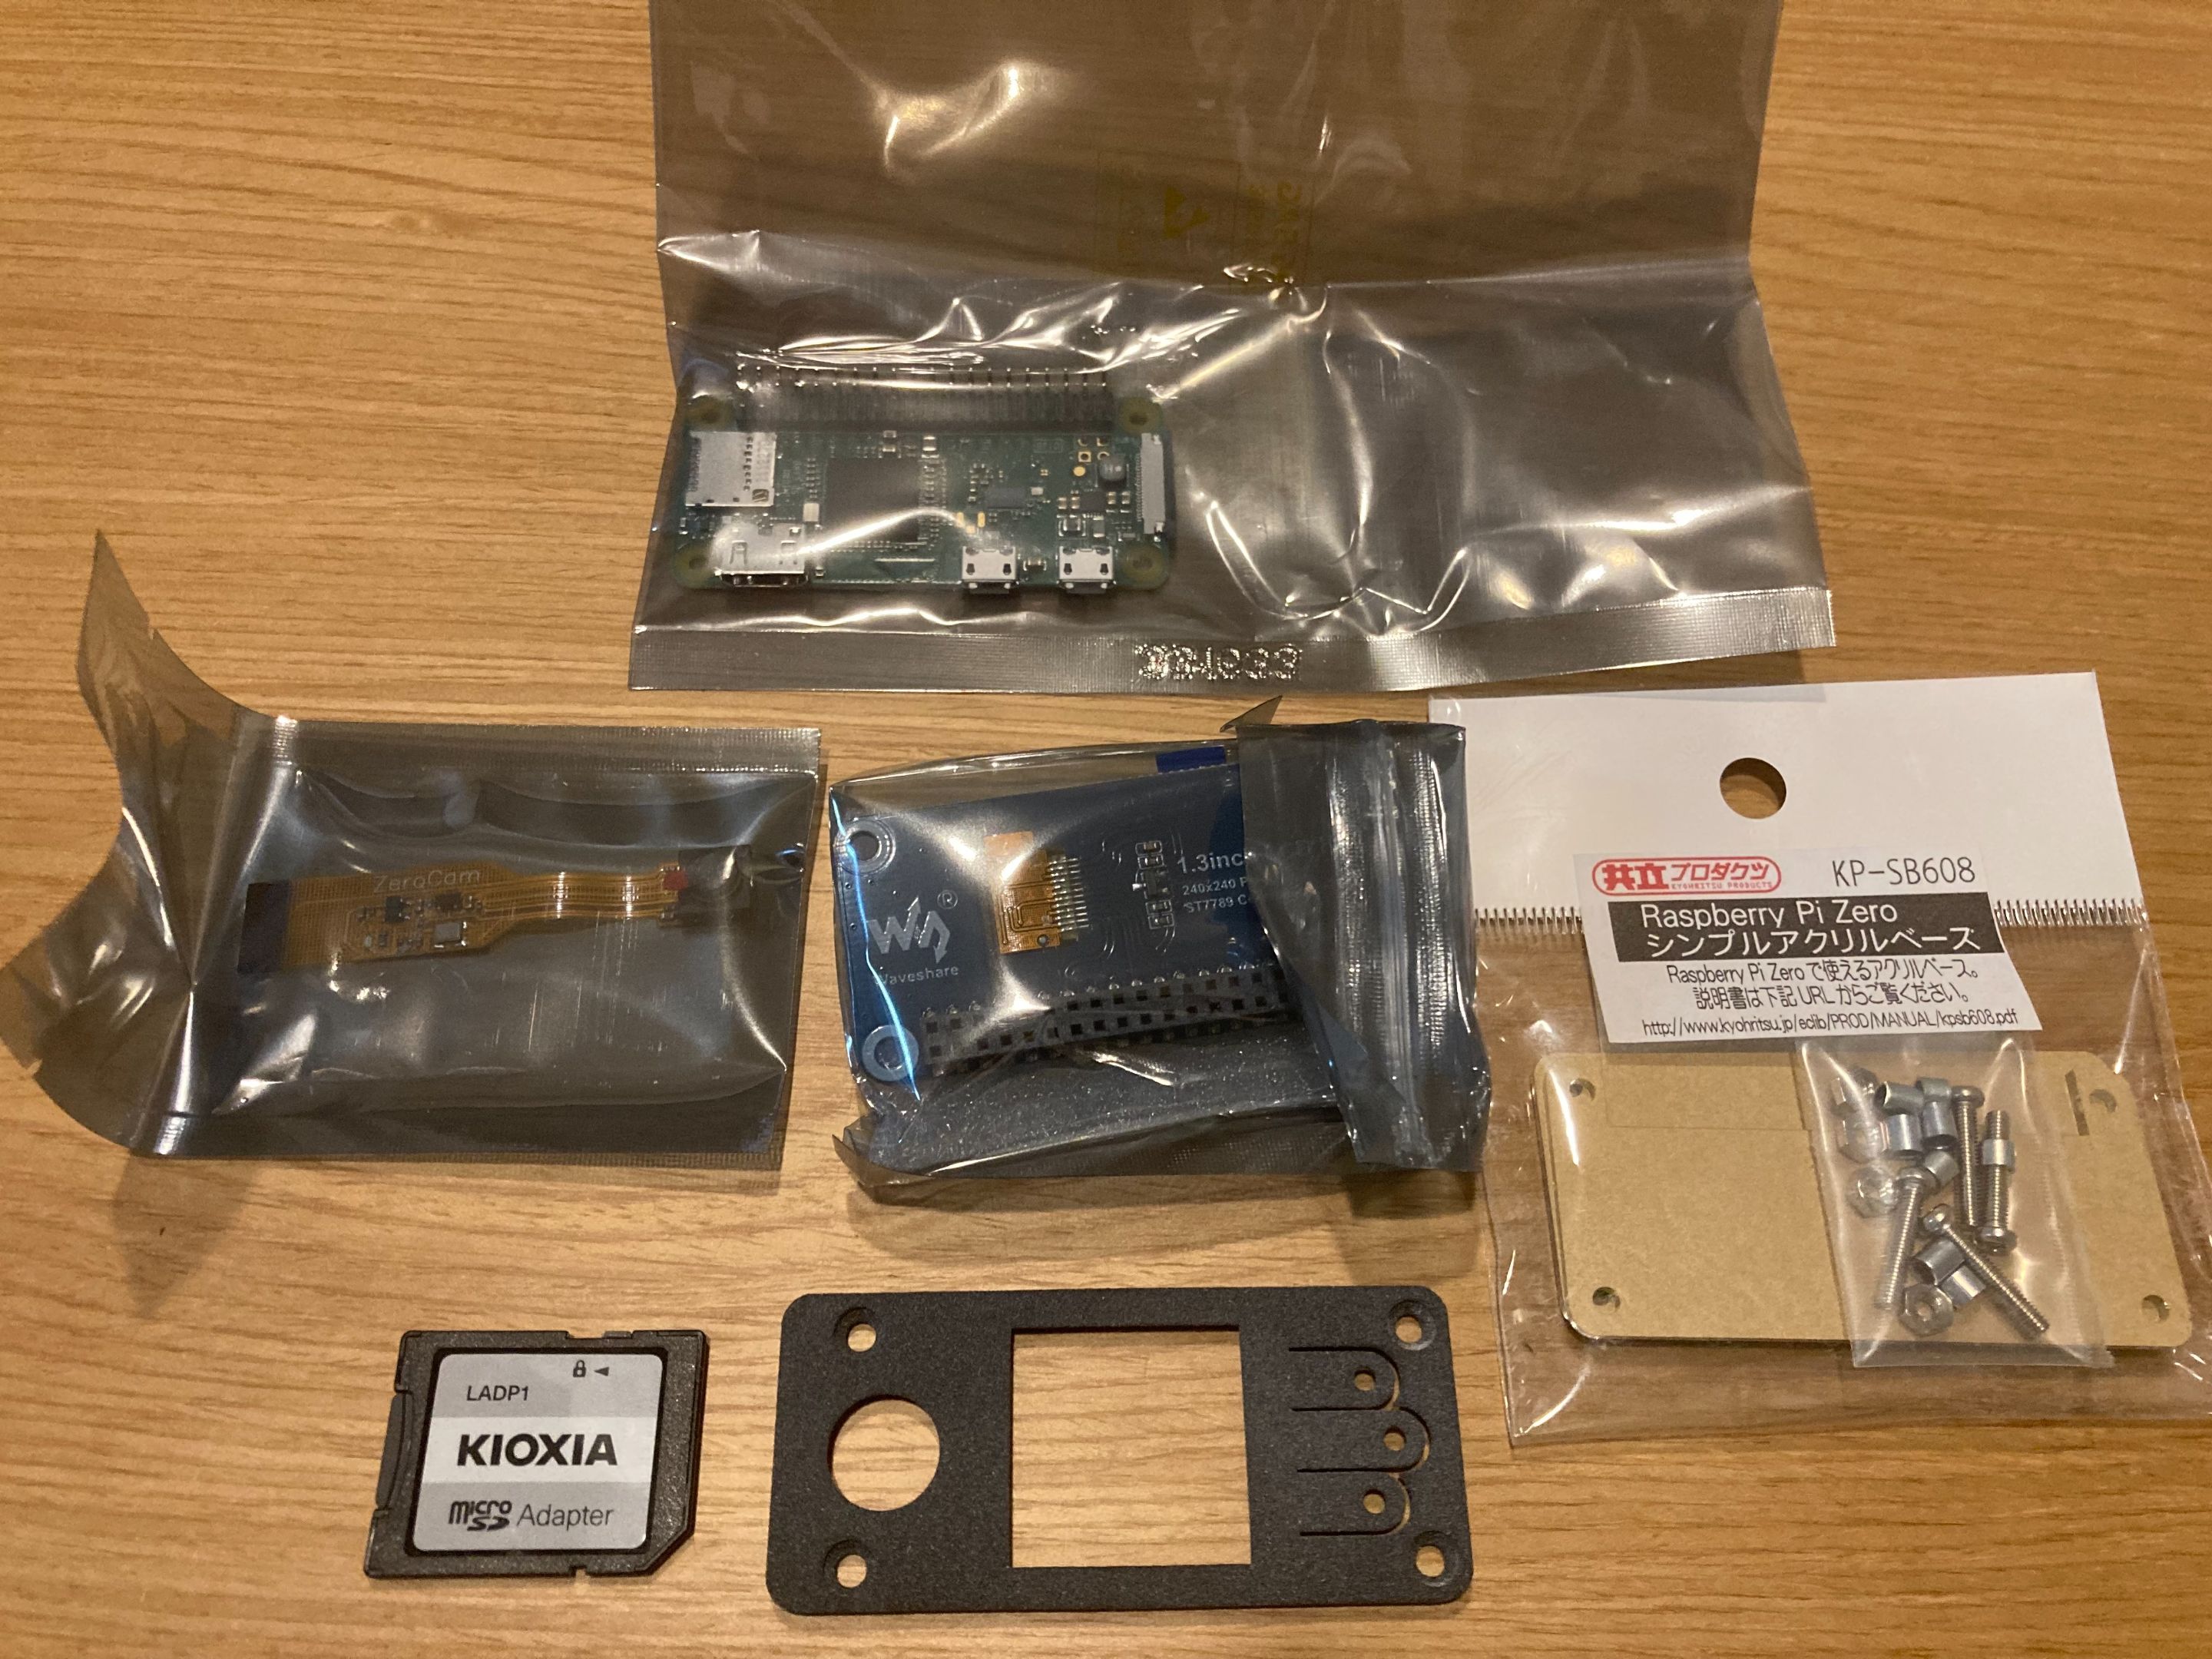
✈︎SeedSigner fabrication parts
There are ready-made products available overseas, but of course I will proceed to create my own! My production is as of February 2025, so be sure to check the official GitHub SeedSigner page for the latest information. My production will also follow this official page.
・Official GitHub SeedSigner page
https://github.com/SeedSigner/seedsignerThe parts used and rough prices are listed below. All parts were gathered online. They may be a little expensive because I gathered them with an emphasis on speed.
Officially, Raspberry Pi Zero v1.3 without WiFi/Bluetooth functionality is recommended, but I processed the Raspberry Pi Zero WH to remove WiFi/Bluetooth functionality and used it. Red circle in the image, I took this ↓.
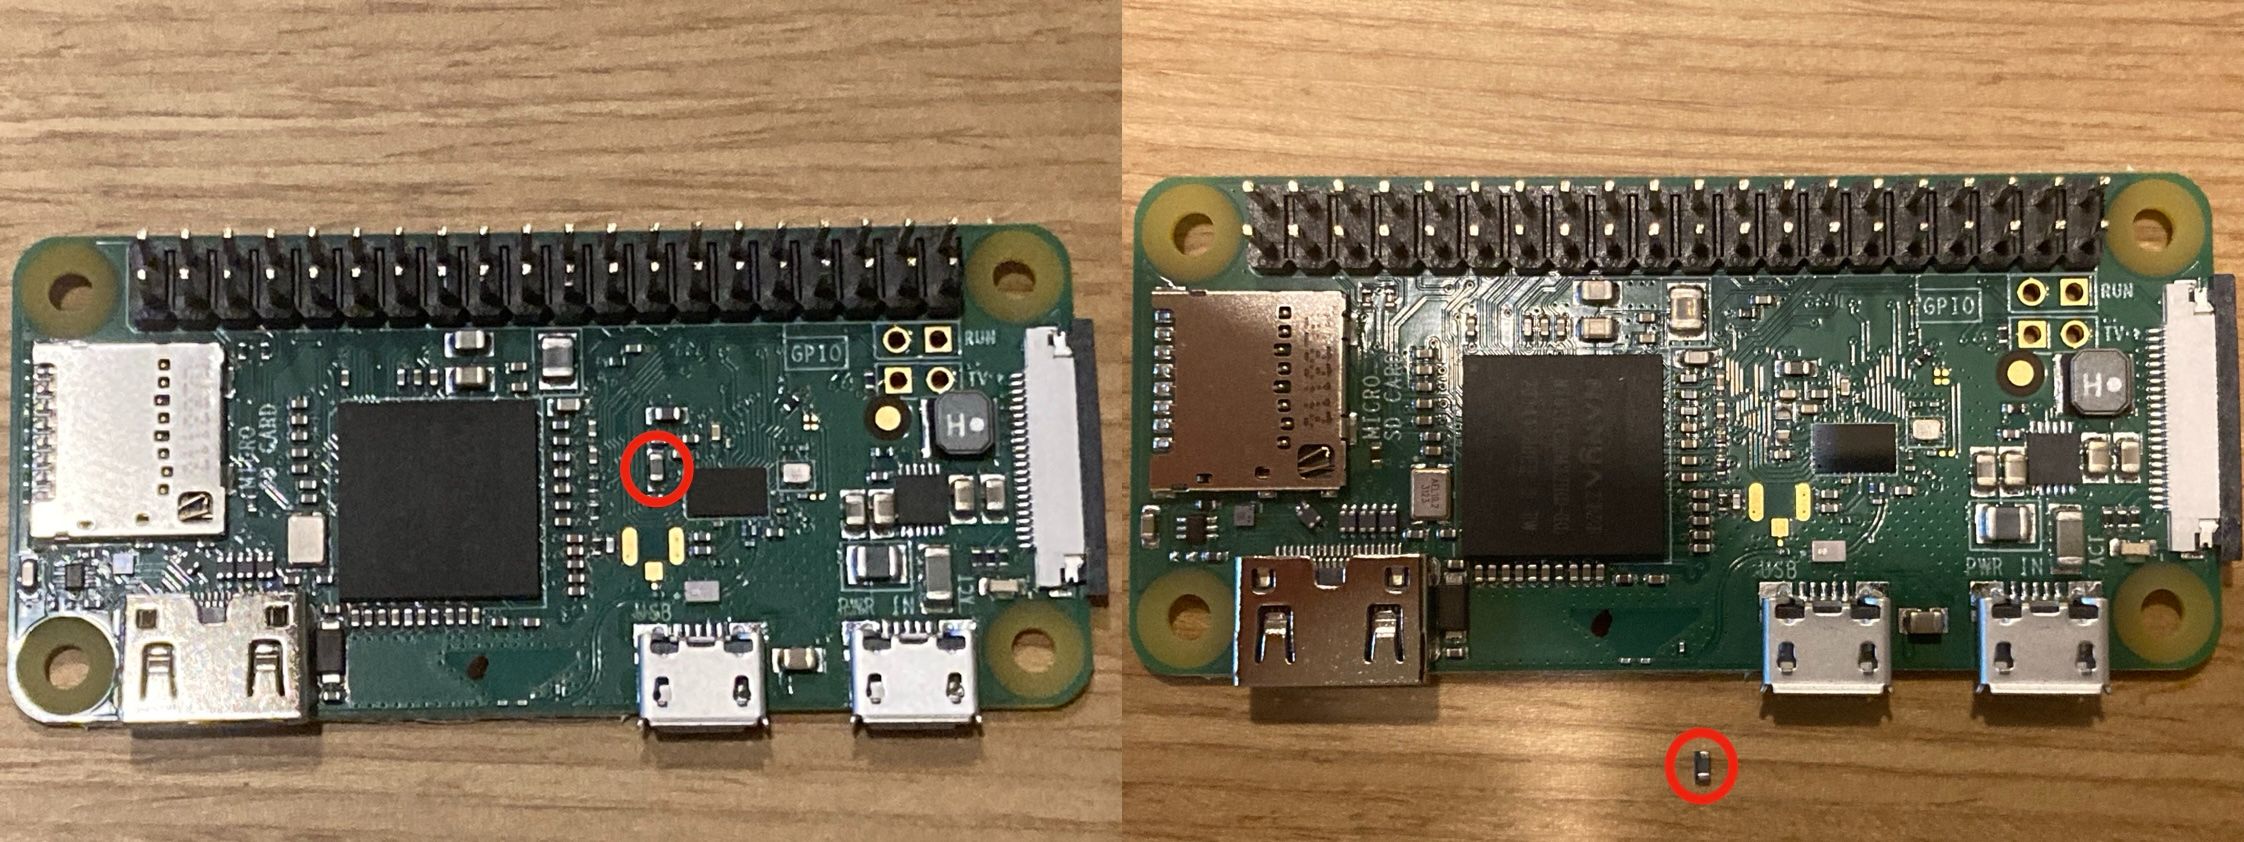
Please refer to the following sites for details at your own risk.
https://github.com/DesobedienteTecnologico/rpi_disable_wifi_and_bt_by_hardwareThe top cover was created by a 3D printing service after downloading data from Cults, which shares 3D data! The texture turned out better than I expected.
・Cults Coverplate for WaveShare 1.3 inch LCD 240x240
https://cults3d.com/en/3d-model/various/seedsigner-coverplate-for-waveshare-1-3-inch-lcd-hat-with-240x240-pixel-display?srsltid=AfmBOoqn8bratHMNlG5KX3iMuyAYPY6lk2WjcLYIr4hzDix2JJPjmk4x✈︎ software validation
Then download the software that runs SeedSigner.
Installing the software is easy, just download the software that adapts to your adopted Raspberry Pi from the GitHub page mentioned earlier and write it to the microSD. However, the major hurdle for me here is the verification process of the software to be written to the microSD. I need to make sure that the software I downloaded is legitimate and has not been modified. The official page describes how to do this to some extent, but it says that it assumes you understand how to run the commands on a computer with GPG and shasum already installed and on a terminal. No, I don't know. But I want and need to verify this thoroughly because in the past I have had bitter experiences!
So, let's start with understanding the unfamiliar terminology. You won't know unless you try, so I think it's okay to just kind of go with it.
・GPG
GPG (GNU Privacy Guard) is a tool for encrypting and digitally signing data, primarily used to secure files and emails.
・shasum
shasum is a tool that calculates the SHA256 hash value of a file and does not need to be installed, as it comes standard with any Mac OS.
✈︎GPG Installation
The quickest way to install GPG seems to be to install the GPG tool package. If you want to install only GnuPG, the command line tool, please refer to the installation instructions such as via Homebrew.
Open a terminal on your Mac and enter the following first line of command, and if the output is similar to the display that follows, the GPG installation is complete.
・GPGTools
https://gpgtools.org/gpg --version
gpg (GnuPG) 2.4.7
libgcrypt 1.11.0
Copyright (C) 2024 g10 Code GmbH
Finally, you are ready. Now it is time for verification, but here is a summary of the necessary files and their purpose. The OS image file downloaded from the official page and the two verification data have been compiled in the seedsigner folder on the desktop.
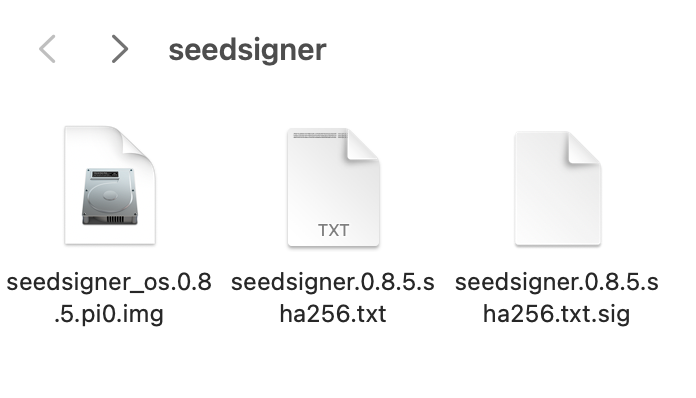 ・seedsigner_os.0.8.5.pi0.img
This is the OS image file to be written to the DS card. Make sure this file is legitimate and has not been modified.
・seedsigner.0.8.5.sha256.txtThe hash value calculated from the above OS image file is recorded. Confirm that the hash value calculated from the image file matches the hash value recorded in the text.
・seedsigner.0.8.5.sha256.txt.sigThe SeedSigner project signs the hash value text with GPG's private key. The public key is used to verify that this signature is legitimate.
Purpose of Validation
I understand that if the hash value of the OS image recorded in the text signed by the correct person matches the hash value of the actual OS image to be installed, then the OS has not been modified and there is no problem.
Step 1: Verify that the signed text file (.sig) is authentic
Get the public key for the SeedSigner project from keybase, which allows you to securely share GPG public keys.
Enter the following command in the terminal.
gpg --fetch-keys https://keybase.io/seedsigner/pgp_keys.asc
Execution Result
If the last line is imported or unchanged, the public key acquisition is complete.
gpg: requesting key from 'https://keybase.io/seedsigner/pgp_keys.asc'
gpg: key C7EF709007260119: "seedsigner <btc.hardware.solutions@gmail.com>" not changed
gpg: Total number processed: 1
gpg:              unchanged: 1
Next you will apply the verification against the text file (.sig), but first you need to tell it the location of the text file (.sig). (The official page does not elaborate here.) It is the seedsigner folder of Desktop, so enter the following.
cd Desktop/seedsigner
There is no change, but continue to enter the verification command.
gpg --verify seedsigner.0.8.5.sha256.txt.sig
Execution Result
gpg: assuming signed data in 'seedsigner.0.8.5.sha256.txt'
gpg: Signature made Wed Feb  5 01:40:40 2025 JST
gpg:                using RSA key 46739B74B56AD88F14B0882EC7EF709007260119
gpg: Good signature from "seedsigner <btc.hardware.solutions@gmail.com>" [unknown]
gpg: WARNING: This key is not certified with a trusted signature!
gpg:          There is no indication that the signature belongs to the owner.
Primary key fingerprint: 4673 9B74 B56A D88F 14B0  882E C7EF 7090 0726 0119
If “Good signature” is displayed, you know that the signature in the text file (.sig) is the correct signature corresponding to the public key used for verification. You can also check if the public key used for verification is correct by looking at the number of the primary key fingerprint, which should match the fingerprint on the official SeedSigner account on X or on the keybase from which you obtained the public key.
・Keybase
https://keybase.io/seedsigner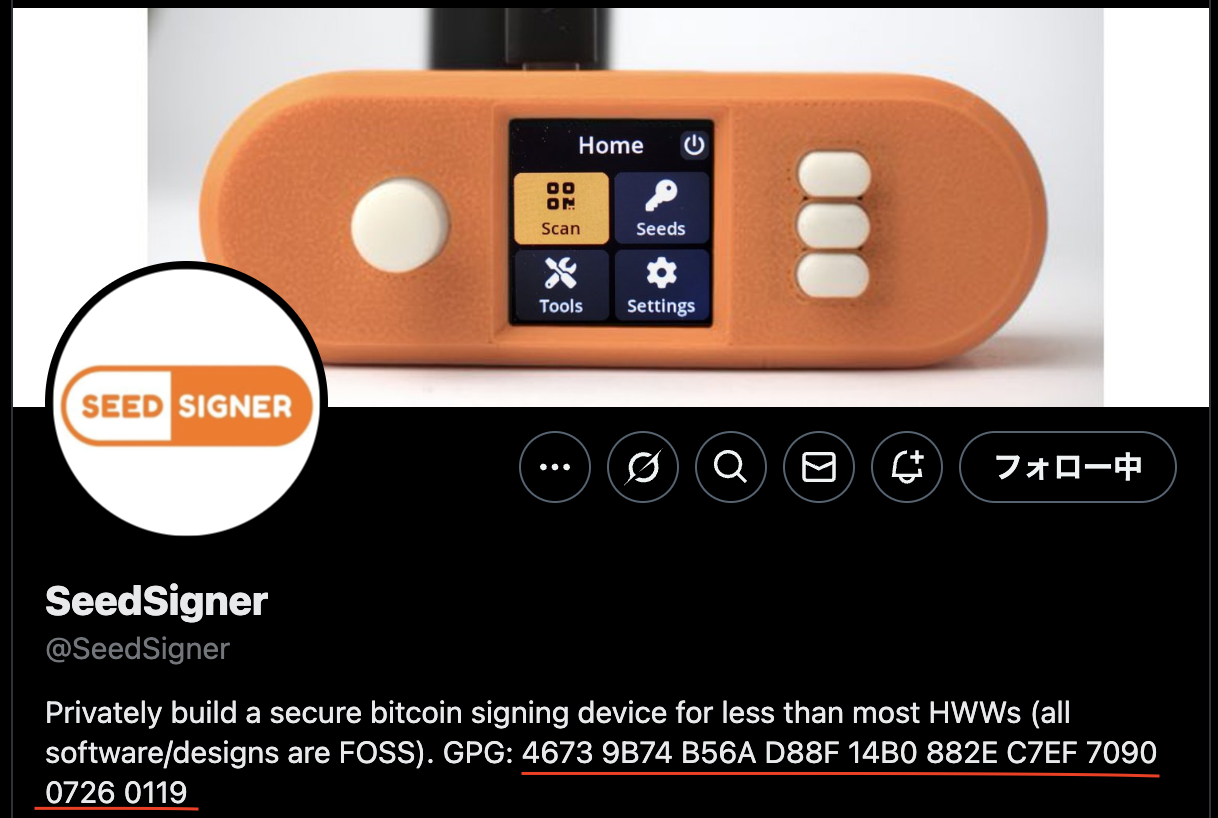
You can now confirm that seedsigner.0.8.5.sha256.txt.sig is legitimate from the SeedSigner project.
Step 2: Verify that the OS image file is authentic
The last step is to verify the OS image file to be installed: check if the hash value in seedsigner_os.0.8.5.pi0.img matches the hash value recorded in seedsigner.0.8.5.sha256.txt.
Enter the following verification command.
shasum -a 256 --ignore-missing --check seedsigner.0.8.5.sha256.txt
Execution Result
seedsigner_os.0.8.5.pi0.img: OK
The result is OK, which confirms that the OS image file is genuine.
✈︎Write software to MicroSD card
Write the OS image file, which I verified to be authentic, to the SD card. It says there are several options, but I used Balena Etcher. It is possible to write with the same feeling as normal file operations.
・Balena Etcher
https://etcher.balena.io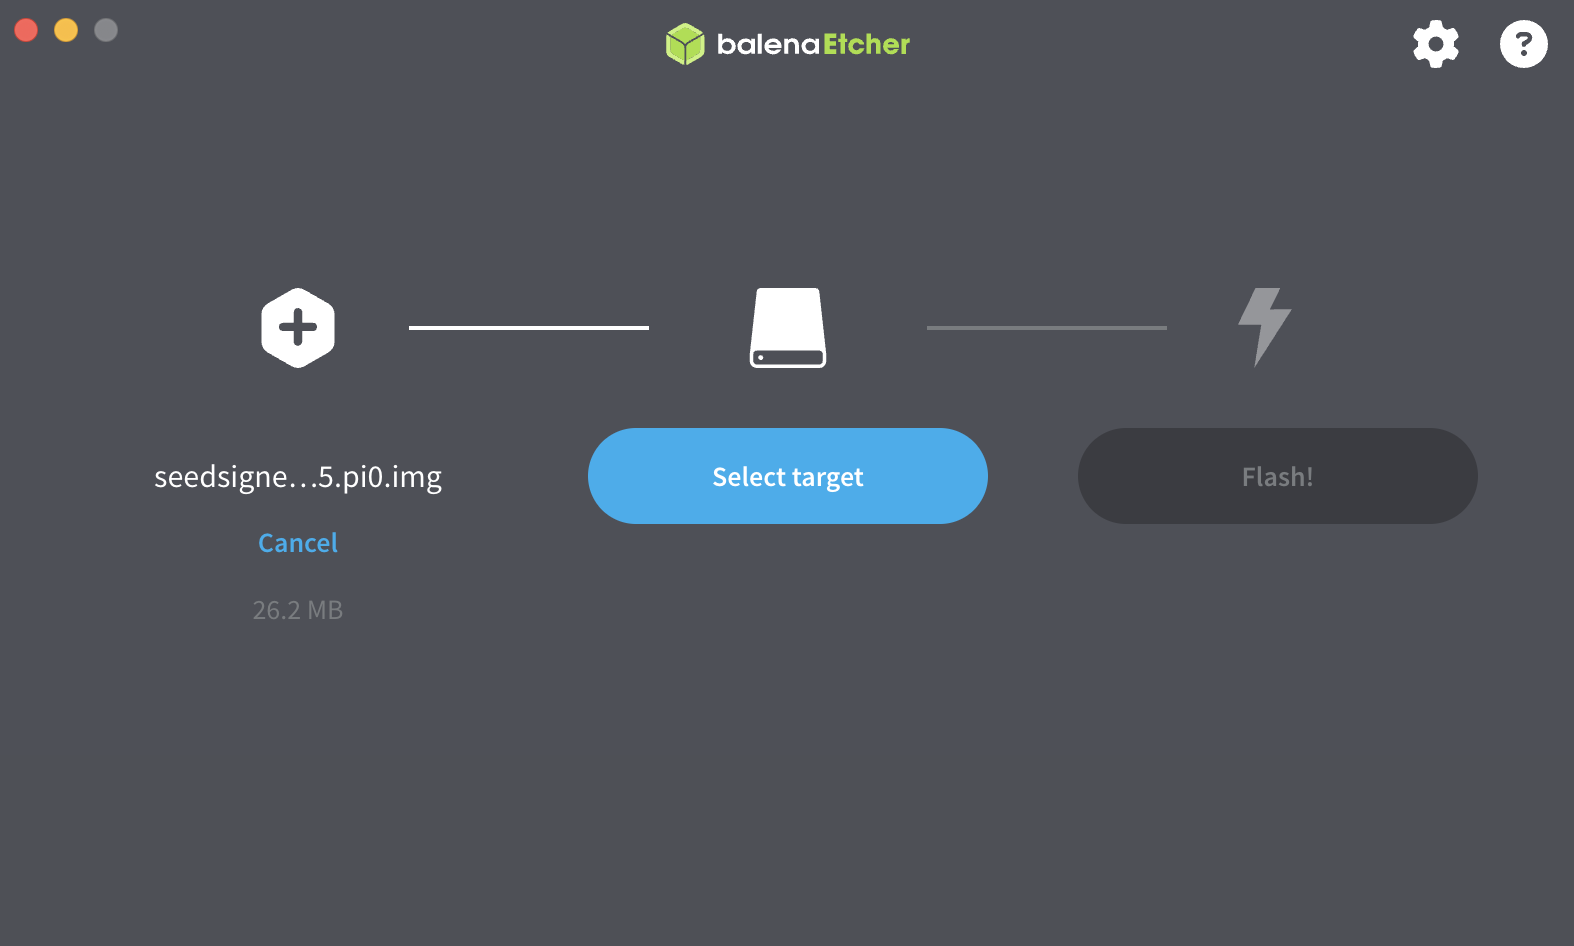
Simply select the OS image file and target microSD, and press Flash!
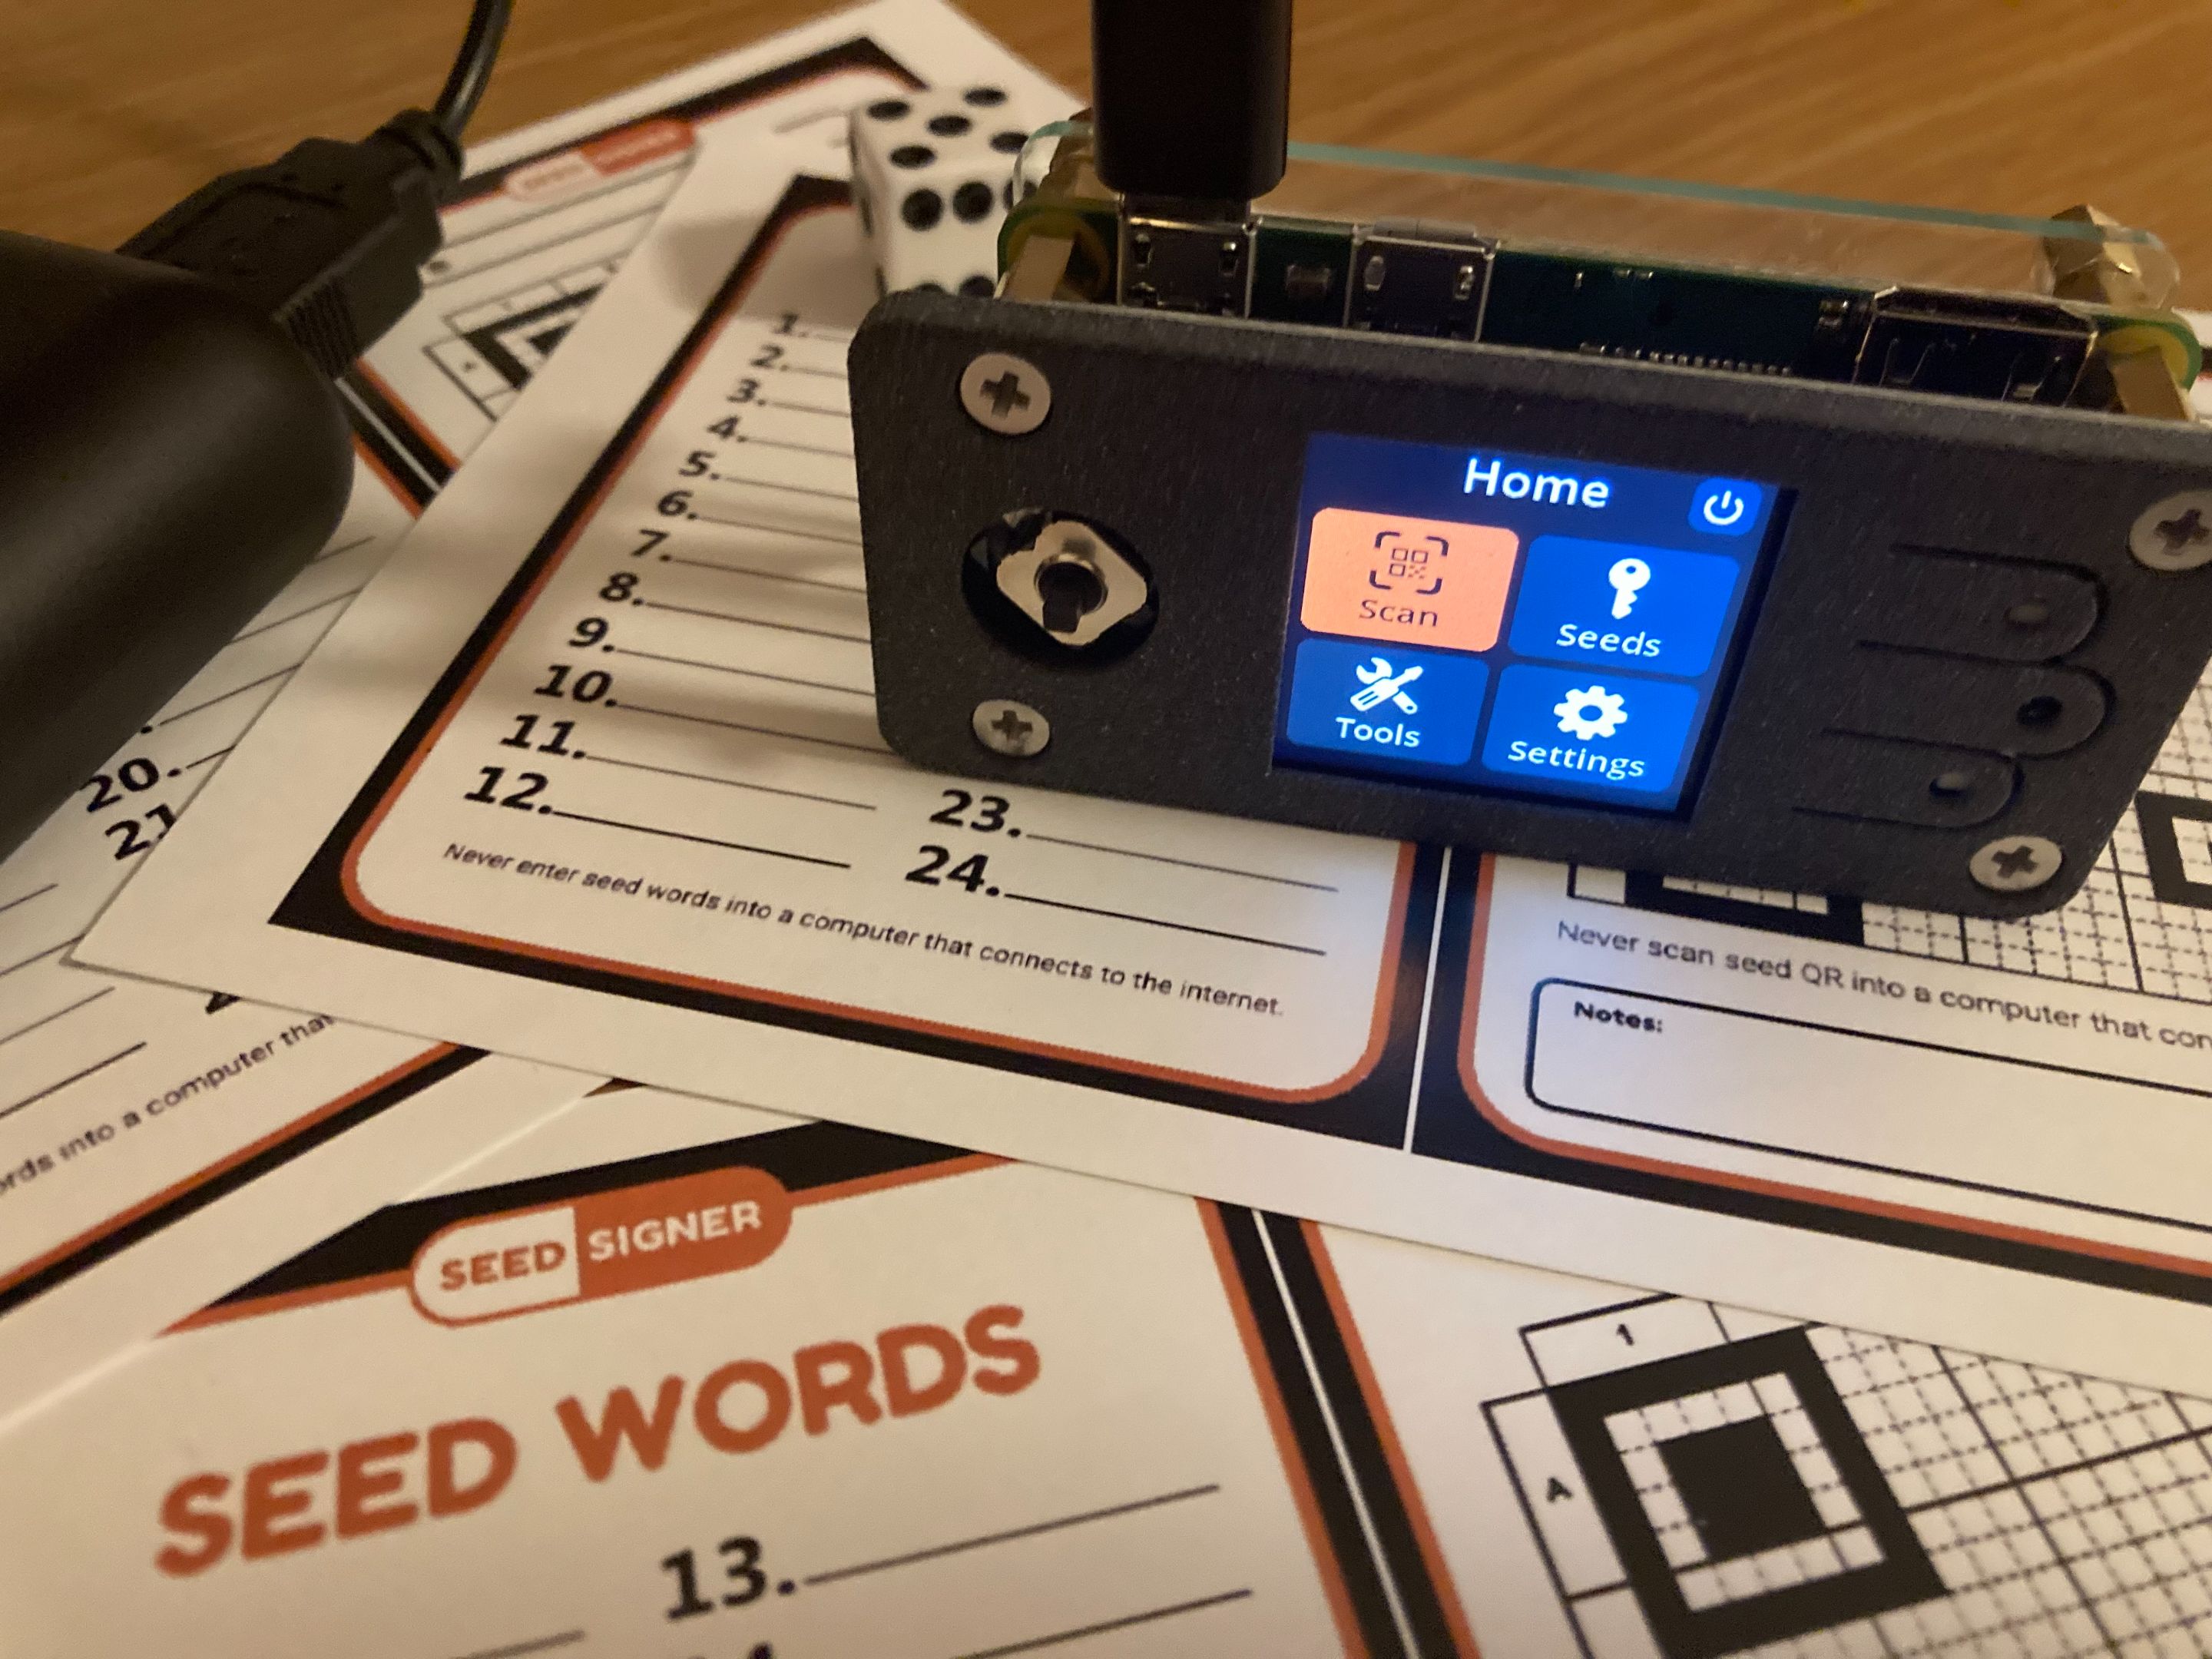
You can say that SeedSiner is now complete. Thank you for your hard work.
✈︎Assemble the SeedSigner
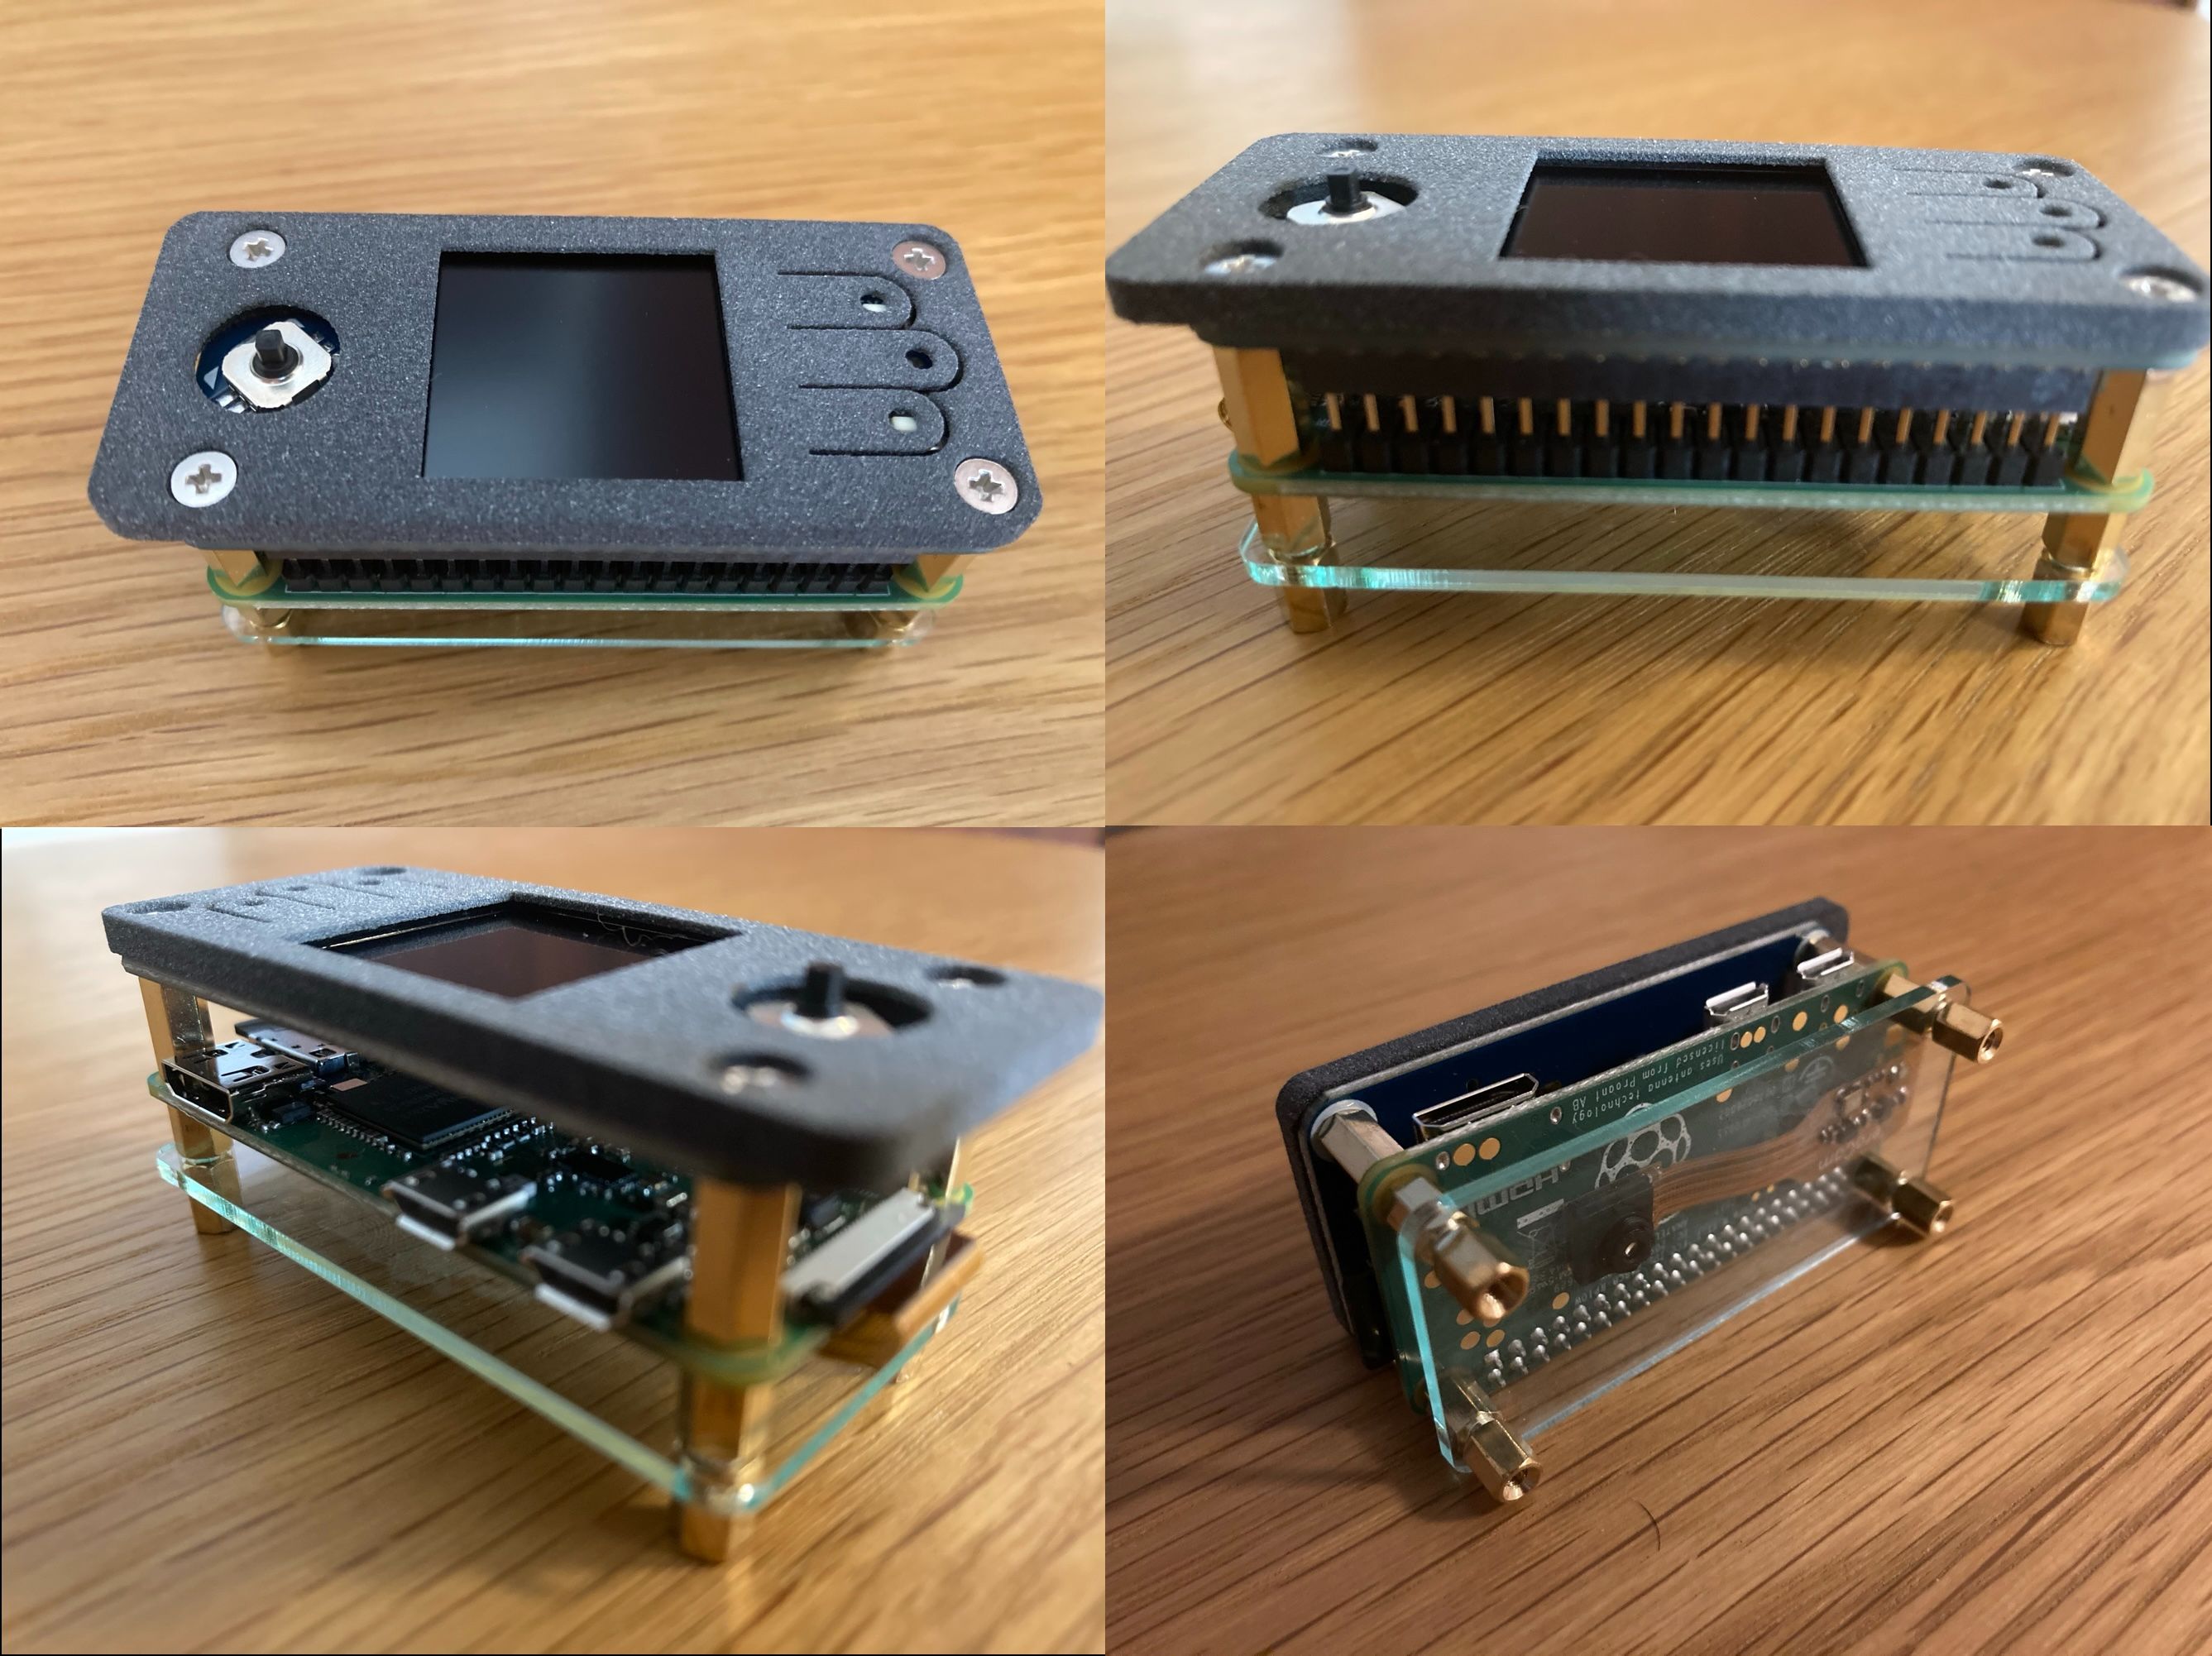
Now all that's left is to assemble the parts and start up.
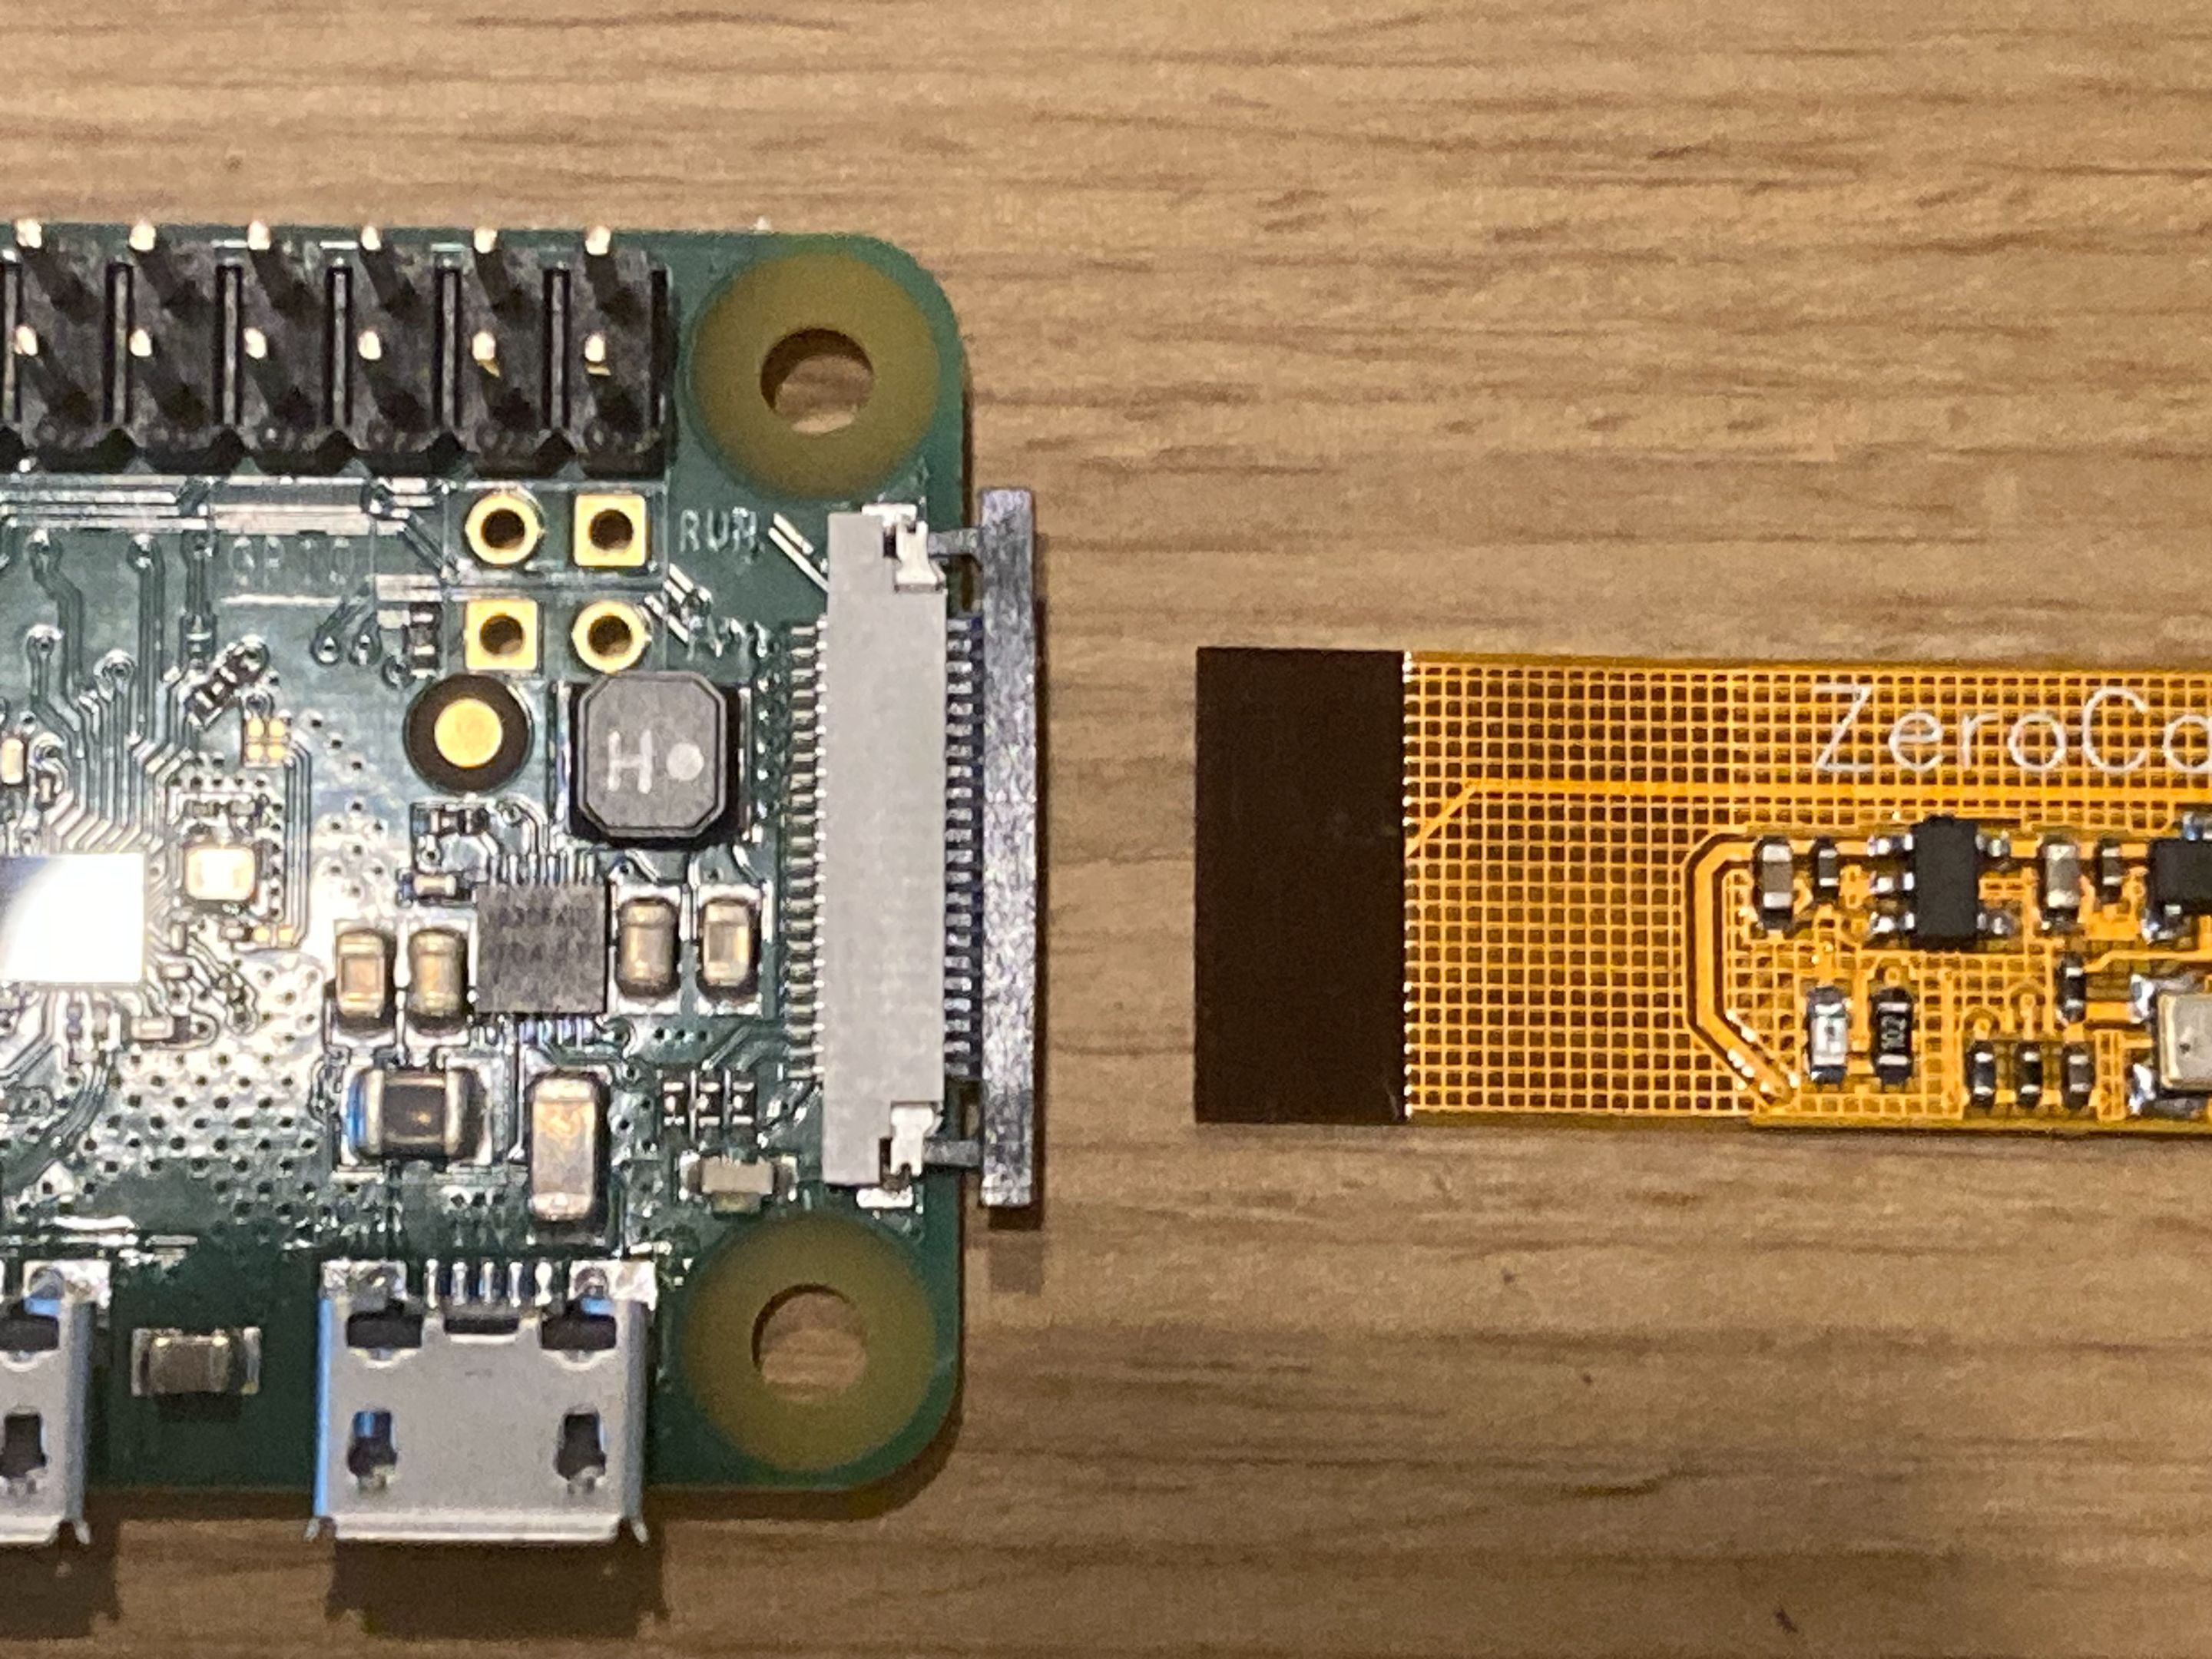
The camera connection is confusing, but simply pull out the Raspberry Pi connection claw a little, insert the connection on the camera side, and put the claw back in.
✈︎ after finishing the production.
Although I did not use a soldering iron, it was very interesting to work with electronic components after a long time. I had a hard time understanding what the software verification was doing, but I feel that there was a lot to be gained by actually doing it. I asked ChatGPT a lot of questions about detailed questions and the meaning of commands. They answered everything, which I really appreciated. As I mentioned at the beginning of this article, SeedSigner is based on the premise of multisig operation, so one device is not enough. I have a lot of things to think about and I don't think I'll ever have enough material, but that's all for this article.
【日本語】
これまで取引所やウェブウォレットにしかなかったビットコインを自分でしっかり管理していこうと思い、初めてハードウェアウォレットを導入することにしました。ウォレットって色々あって迷いますが、今回、オープンソースのウォレットデバイスであるSeedSignerを自分で作成することにしたので、紹介したいと思います。これをブログで晒すのはいかがなものかと考えましたが、Seedsignerのプロジェクトが素晴らしいものだなと感じるので、少しでもこれを見る方々の参考になればと思っています。
✈︎SeedSignerってなに!?
SeedSignerは、ビットコインのマルチシグウォレットの利用コストと複雑さを軽減することを目的としたプロジェクトです。この目的を達成するために、誰でも安い部品を使って、エアギャップ型のステートレスなビットコイン署名デバイスを自分で製作できるようにしています。SeedSignerの特徴として、デバイスにシードを保存せず、一時的に利用するステートレス設計を採用しています。通電が切れるとデバイス内部のシードはクリアされるため、電源を入れるたびにQRコードを使用してシードを取り込みます。
✈︎SeedSignerを選択した理由
今回私がハードウェアウォレットを導入するにあたり、Seedsignerを選択した理由を書いておこうと思います。
まず海外メーカーに注文して個人情報を晒したり、よく分からない経路で製品が送られてくるのに抵抗感を感じていました。そこで、ビットコインをあまり連想させず、日本でも市販されている電子部品を自分で組み合わせることで製作可能なSeedsignerに興味を持ちました。
そして二つ目の理由が大きいのですが、Seedsignerを使うことで、暗号技術に関する知識や認識を高めたいと考えたからです。ビットコインを自己管理する上で暗号技術に関する理解をある程度高める必要があると考えているものの、暗号技術に関しては難しい用語が多く、文字だけではなかなか頭に入ってきません。エントロピー、ニーモニックフレーズ、シード、秘密鍵、うーん難しいですよね。それぞれ言葉の説明は分かっても、なかなかその繋がりがイメージできず、全体として理解できない。これまでの経験から実際に体験してみないと身につかないと感じていました。SeedSignerはエアギャプ運用が前提となっていて、ウォレット作成や署名における重要なプロセスを省略することがなく、実践しながら自身の理解に繋げることができると考えました。
✈︎SeedSignerの製作部品
海外では既製品も販売されているようですが、もちろん自分で製作を進めていきます!私の製作は2025年2月時点のものなので、必ず公式のGitHub SeedSignerのページで最新の情報を確認してください。私の製作もこの公式ページに沿って進めます。
・GitHub SeedSignerの公式ページ
https://github.com/SeedSigner/seedsigner使用した部品とざっくりの値段を以下に記載ておきます。部品は全てネットで揃えました。スピード重視で集めたので少し高いかもしれません。
公式にはWiFi/Bluetooth 機能のないRaspberry Pi Zero v1.3が推奨されていますが、Raspberry Pi Zero WHのWiFi/Bluetooth機能を殺す処理をして使用しました。画像の赤丸、これをとった↓
詳細は以下のサイトを参考によく確認してください。こんなことまで調べててすごい!
https://github.com/DesobedienteTecnologico/rpi_disable_wifi_and_bt_by_hardwareトップカバーは3Dデータを共有しているCultsからデータをダウンロードし、3Dプリントサービスで作成しました。3Dプリントしたのは初めてなので、商品が届くまでドキドキ!思ったより質感のいいものが出来上がりました。
・Cults Coverplate for WaveShare 1.3 inch LCD 240x240
https://cults3d.com/en/3d-model/various/seedsigner-coverplate-for-waveshare-1-3-inch-lcd-hat-with-240x240-pixel-display?srsltid=AfmBOoqn8bratHMNlG5KX3iMuyAYPY6lk2WjcLYIr4hzDix2JJPjmk4x✈︎ソフトウェアの検証
続いてSeedSignerを動かすソフトウェアをダウンロードします。
ソフトウェアのインストールは簡単で、自分が採用したRaspberry Piに適応するソフトウェアを先ほどのGitHubのページからダウンロードし、microSDに焼き付けるだけです。ただ、ここで私にとって大きなハードルとなったのが、microSDに焼き付けるソフトウェアの検証作業です。ダウンロードしたソフトウエアが正規のもので、改変されていないか確認する必要があります。公式ページにある程度やり方は書いてあるのですが、GPGとshasumがすでにインストールされているコンピュータでコマンドを実行し、ターミナル上での操作方法を理解していることを前提と書かれてる。いや知らないんだよな。でも過去に苦い経験をしたことがある私としてはしっかり検証しておきたい、する必要があります!
ということで、よく分からない用語の理解から。やってみないと分からないので何となくでいいと思います。
・GPGとは?
GPG(GNU Privacy Guard) は、データの暗号化やデジタル署名を行うためのツールで、主にファイルやメールのセキュリティを確保するために使われます。
・shasumとは?
shasumは、ファイルのSHA256ハッシュ値を計算するツールで、Macであれば標準装備されているのでインストールの必要はありません。
・GPGのインストールGPGのインストールはGPGツールのパッケージをインストールするのが手っ取り早いようです。コマンドラインツールであるGnuPGのみインストールしたい方はHomebrew経由などのインストール方法が解説されているので調べてみてください。Macのターミナルを開いて、以下の1行目のコマンドを入力し、続く表示と同様の内容が出力されれば、GPGが正しくインストールできています。
・GPGツール
https://gpgtools.org/ gpg --version
gpg (GnuPG) 2.4.7
libgcrypt 1.11.0
Copyright (C) 2024 g10 Code GmbH
やっと準備が整いました。これから検証になりますが、必要なファイルとその目的を整理しておきます。公式ページからダウンロードしたOSイメージファイルと2つの検証用データをデスクトップのseedsignerフォルダにまとめました。
・seedsigner_os.0.8.5.pi0.imgこれがDSカードに焼き付けるOSイメージファイルです。このファイルが正規なもので改変されていないことを確かめます。
・seedsigner.0.8.5.sha256.txt上記OSイメージファイルから求められたハッシュ値が記録されている。インストールするイメージファイルから算出するハッシュ値とテキストに記録されたハッシュ値が一致することを確認する。
・seedsigner.0.8.5.sha256.txt.sig上記ハッシュ値のテキストに対してSeedSignerプロジェクトがGPGの秘密鍵で署名したもの。公開鍵を使用し、この署名が正規なものであるか確認する。
・検証の目的
正しい者が署名したテキストに記録されているOSイメージのハッシュ値と実際にインストールするOSイメージのハッシュ値が一致すれば、そのOSは改変されておらず、問題ないということだと理解しています。
・ステップ1:署名されたテキストファイル(.sig)が本物であることの確認
安全にGPG公開鍵を共有できるkeybaseからSeedSignerプロジェクトの公開鍵を取得します。
以下のコマンドをターミナルに入力する。
gpg --fetch-keys https://keybase.io/seedsigner/pgp_keys.asc
実行結果
最後の行がimportedかunchangedなら公開鍵の取得完了。(これは取得後だったので、unchanged)
gpg: requesting key from 'https://keybase.io/seedsigner/pgp_keys.asc'
gpg: key C7EF709007260119: "seedsigner <btc.hardware.solutions@gmail.com>" not changed
gpg: Total number processed: 1
gpg:              unchanged: 1
次にテキストファイル(.sig)に対して検証をかけますが、最初にテキストファイル(.sig)の場所を教えてあげる必要があります。(公式のページにはここが詳しく書かれていない)Desktopのseedsignerフォルダなので以下の入力。
cd Desktop/seedsigner
特に変化はありませんが、続けて検証コマンドを入力。
gpg --verify seedsigner.0.8.5.sha256.txt.sig
実行結果
gpg: assuming signed data in 'seedsigner.0.8.5.sha256.txt'
gpg: Signature made Wed Feb  5 01:40:40 2025 JST
gpg:                using RSA key 46739B74B56AD88F14B0882EC7EF709007260119
gpg: Good signature from "seedsigner <btc.hardware.solutions@gmail.com>" [unknown]
gpg: WARNING: This key is not certified with a trusted signature!
gpg:          There is no indication that the signature belongs to the owner.
Primary key fingerprint: 4673 9B74 B56A D88F 14B0  882E C7EF 7090 0726 0119
Good signatureの表示が出れば、テキストファイル(.sig)の署名は検証に使った公開鍵に対応した正しい署名であり、テキストファイルも改変されていないことが分かる。そして検証に使った公開鍵が正しいかどうかはPrimary key fingerprintの数字から確認できる。XのSeedSigner公式アカウントや公開鍵を取得したkeybaseで確認できるfingerprintと一致していれば大丈夫。
・Keybase
https://keybase.io/seedsignerこれでseedsigner.0.8.5.sha256.txt.sigがSeedSignerプロジェクトからの正規なものであると確認できました。
・ステップ2:OSイメージファイルが本物であることの確認
最後にインストールするOSイメージファイルの検証です。seedsigner_os.0.8.5.pi0.imgのハッシュ値とseedsigner.0.8.5.sha256.txtに記録されたハッシュ値が一致するか確認します。
以下の検証コマンドを入力。
shasum -a 256 --ignore-missing --check seedsigner.0.8.5.sha256.txt
実行結果
seedsigner_os.0.8.5.pi0.img: OK
結果はOK、これでOSイメージファイルが本物であることが確認できました。
✈︎MicroSDカードにソフトウェアを書き込む
本物であることを確認したOSイメージファイルをSDカードに書き込みます。いくつかのオプションがあると書かれていますが、私はBalena Etcherを使用しました。通常のファイル操作と同じ感覚で書き込みが可能です。
・Balena Etcher
https://etcher.balena.ioOSイメージファイルとターゲットとなるmicroSDを選択して、Flash!を押すだけです。
もうこれでSeedSigner完成と言ってもいいでしょう。お疲れ様でした。
✈︎SeedSigner組み立て
あとはもう部品を組み立てて、起動するだけ。
カメラの接続が分かりづらいですが、ラズパイ接続部の爪を少し引き出し、カメラ側の接続部を挿入して、爪を元に戻すだけです。
✈︎製作を終えて
半田ごては使わなかったものの、久々に電子部品を使った工作はとても面白かったです。ソフトウェアの検証は何をしているのか理解するのに苦労しましたが、実際にやってみて得られるものがたくさんあった気がします。細かな疑問やコマンドの意味など、ChatGPTにいろいろ聞きながら進めました。何でも答えてくれるので、本当にありがたいですね。おそらくChatGPTがなければこの記事は完成していません。SeedSignerは冒頭にも紹介した通り、マルチシグ運用が前提にあったりするのでデバイス1台では足りないのだけど。いろいろ考えることがあってネタはつきそうにないですが、今回はここまでにしたいと思います。