Trick or Treat - Halloween Part II - Light Painting Photography [Eng. 🇬🇧 / Ger. 🇩🇪 ]

2023-10-31T10:21:00

Nikon D750 | ISO 100 | Sigma 28-70 mm @ f/16 | 218 sec exposure time

Hello Hive Community, as promised, today is the second part of my "Halloween Special". In the first part I already mentioned that I am not a fan of pumpkin kitsch, that will be no different in this post today. Missed a post? Click here: ⬇️

Hallo Hive-Community, wie versprochen gibt es heute den 2. Teil meines "Halloween-Special". Im ersten Teil erwähnte ich bereits, dass ich kein Fan von Kürbis-Kitsch bin, dass wird auch in diesem Beitrag heute nicht anders sein. Beitrag verpasst? Klick hier: ⬇️

The ugliest of all nuns

It's scary when the ugliest of all nuns visits your home. But she was quite nice and joined in almost all the fun. She just didn't want to get naked, which is perhaps better. Who knows what the nun looks like down below when her face is already so ugly.

Die hässlichste aller Nonnen

Schon unheimlich, wenn die hässlichste aller Nonnen bei Dir zuhause vorbeischaut. Aber sie ist ganz nett gewesen und hat fast jeden Spaß mitgemacht. Nur nackig wollte Sie sich nicht machen, was vielleicht auch besser ist. Wer weiß, wie die Nonne unten rum aussieht, wenn das Gesicht schon so hässlich ist.

Behind the scenes

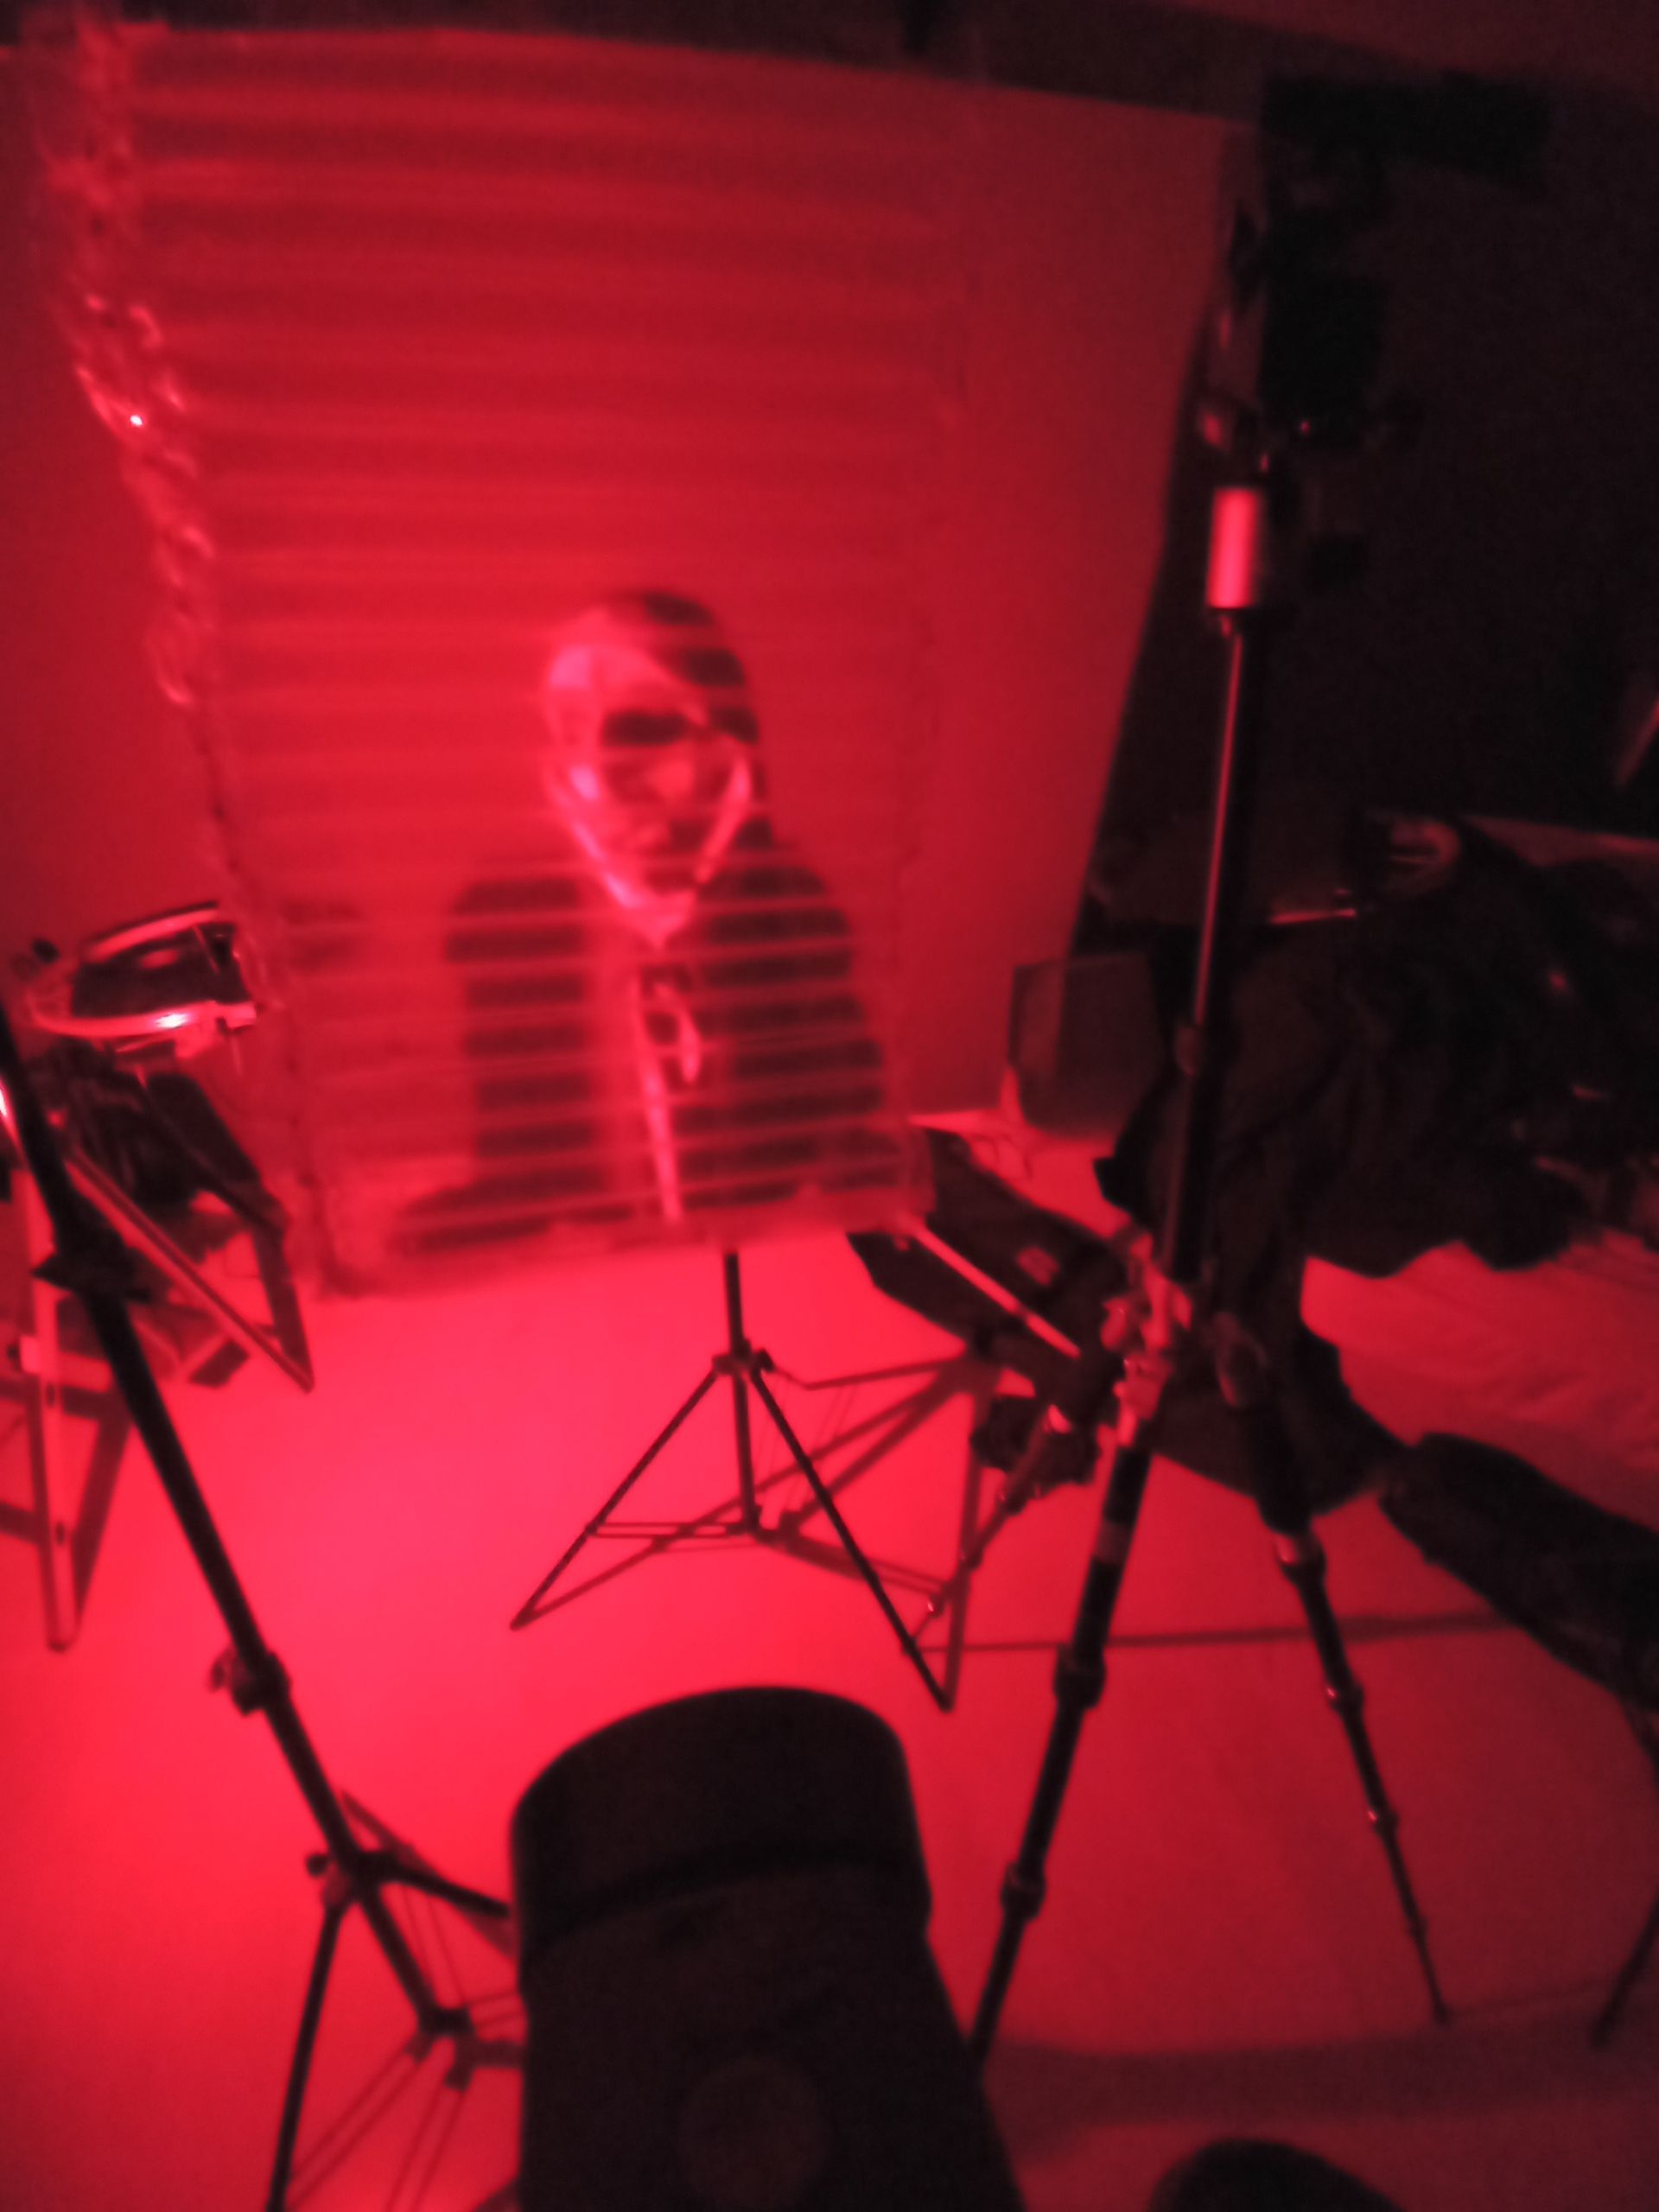
Here are two pictures of how I created the set for the cover image. I wanted to have some kind of "window" in the picture where the nun looks in. I first tried it with an old jalousie I found in the basement. Unfortunately, that didn't work out so well, because the slats of the jalousie, due to the closeness to the lens, took up too much space in the picture and the nun could hardly be seen reasonably. So out of necessity I used an air cushion. I liked the result much better.

Hier zwei Bilder, wie ich mir das Set für das Titelbild eingerichtet habe. Ich wollte eine Art von "Fenster" im Bild haben, wo die Nonne rein guckt. Ich habe es zunächst mit einer alten Jalousie probiert, die ich im Keller gefunden haben. Das hat leider nicht so funktioniert, da die Lamellen der Jalousie, durch die Nähe zum Objektiv, zu viel Raum im Bild eingenommen haben und die Nonne kaum noch vernünftig zu erkennen war. Also habe ich aus der Not heraus eine Luftpolster genutzt. Das Ergebnis gefiel mir viel besser.

Behing th scenes

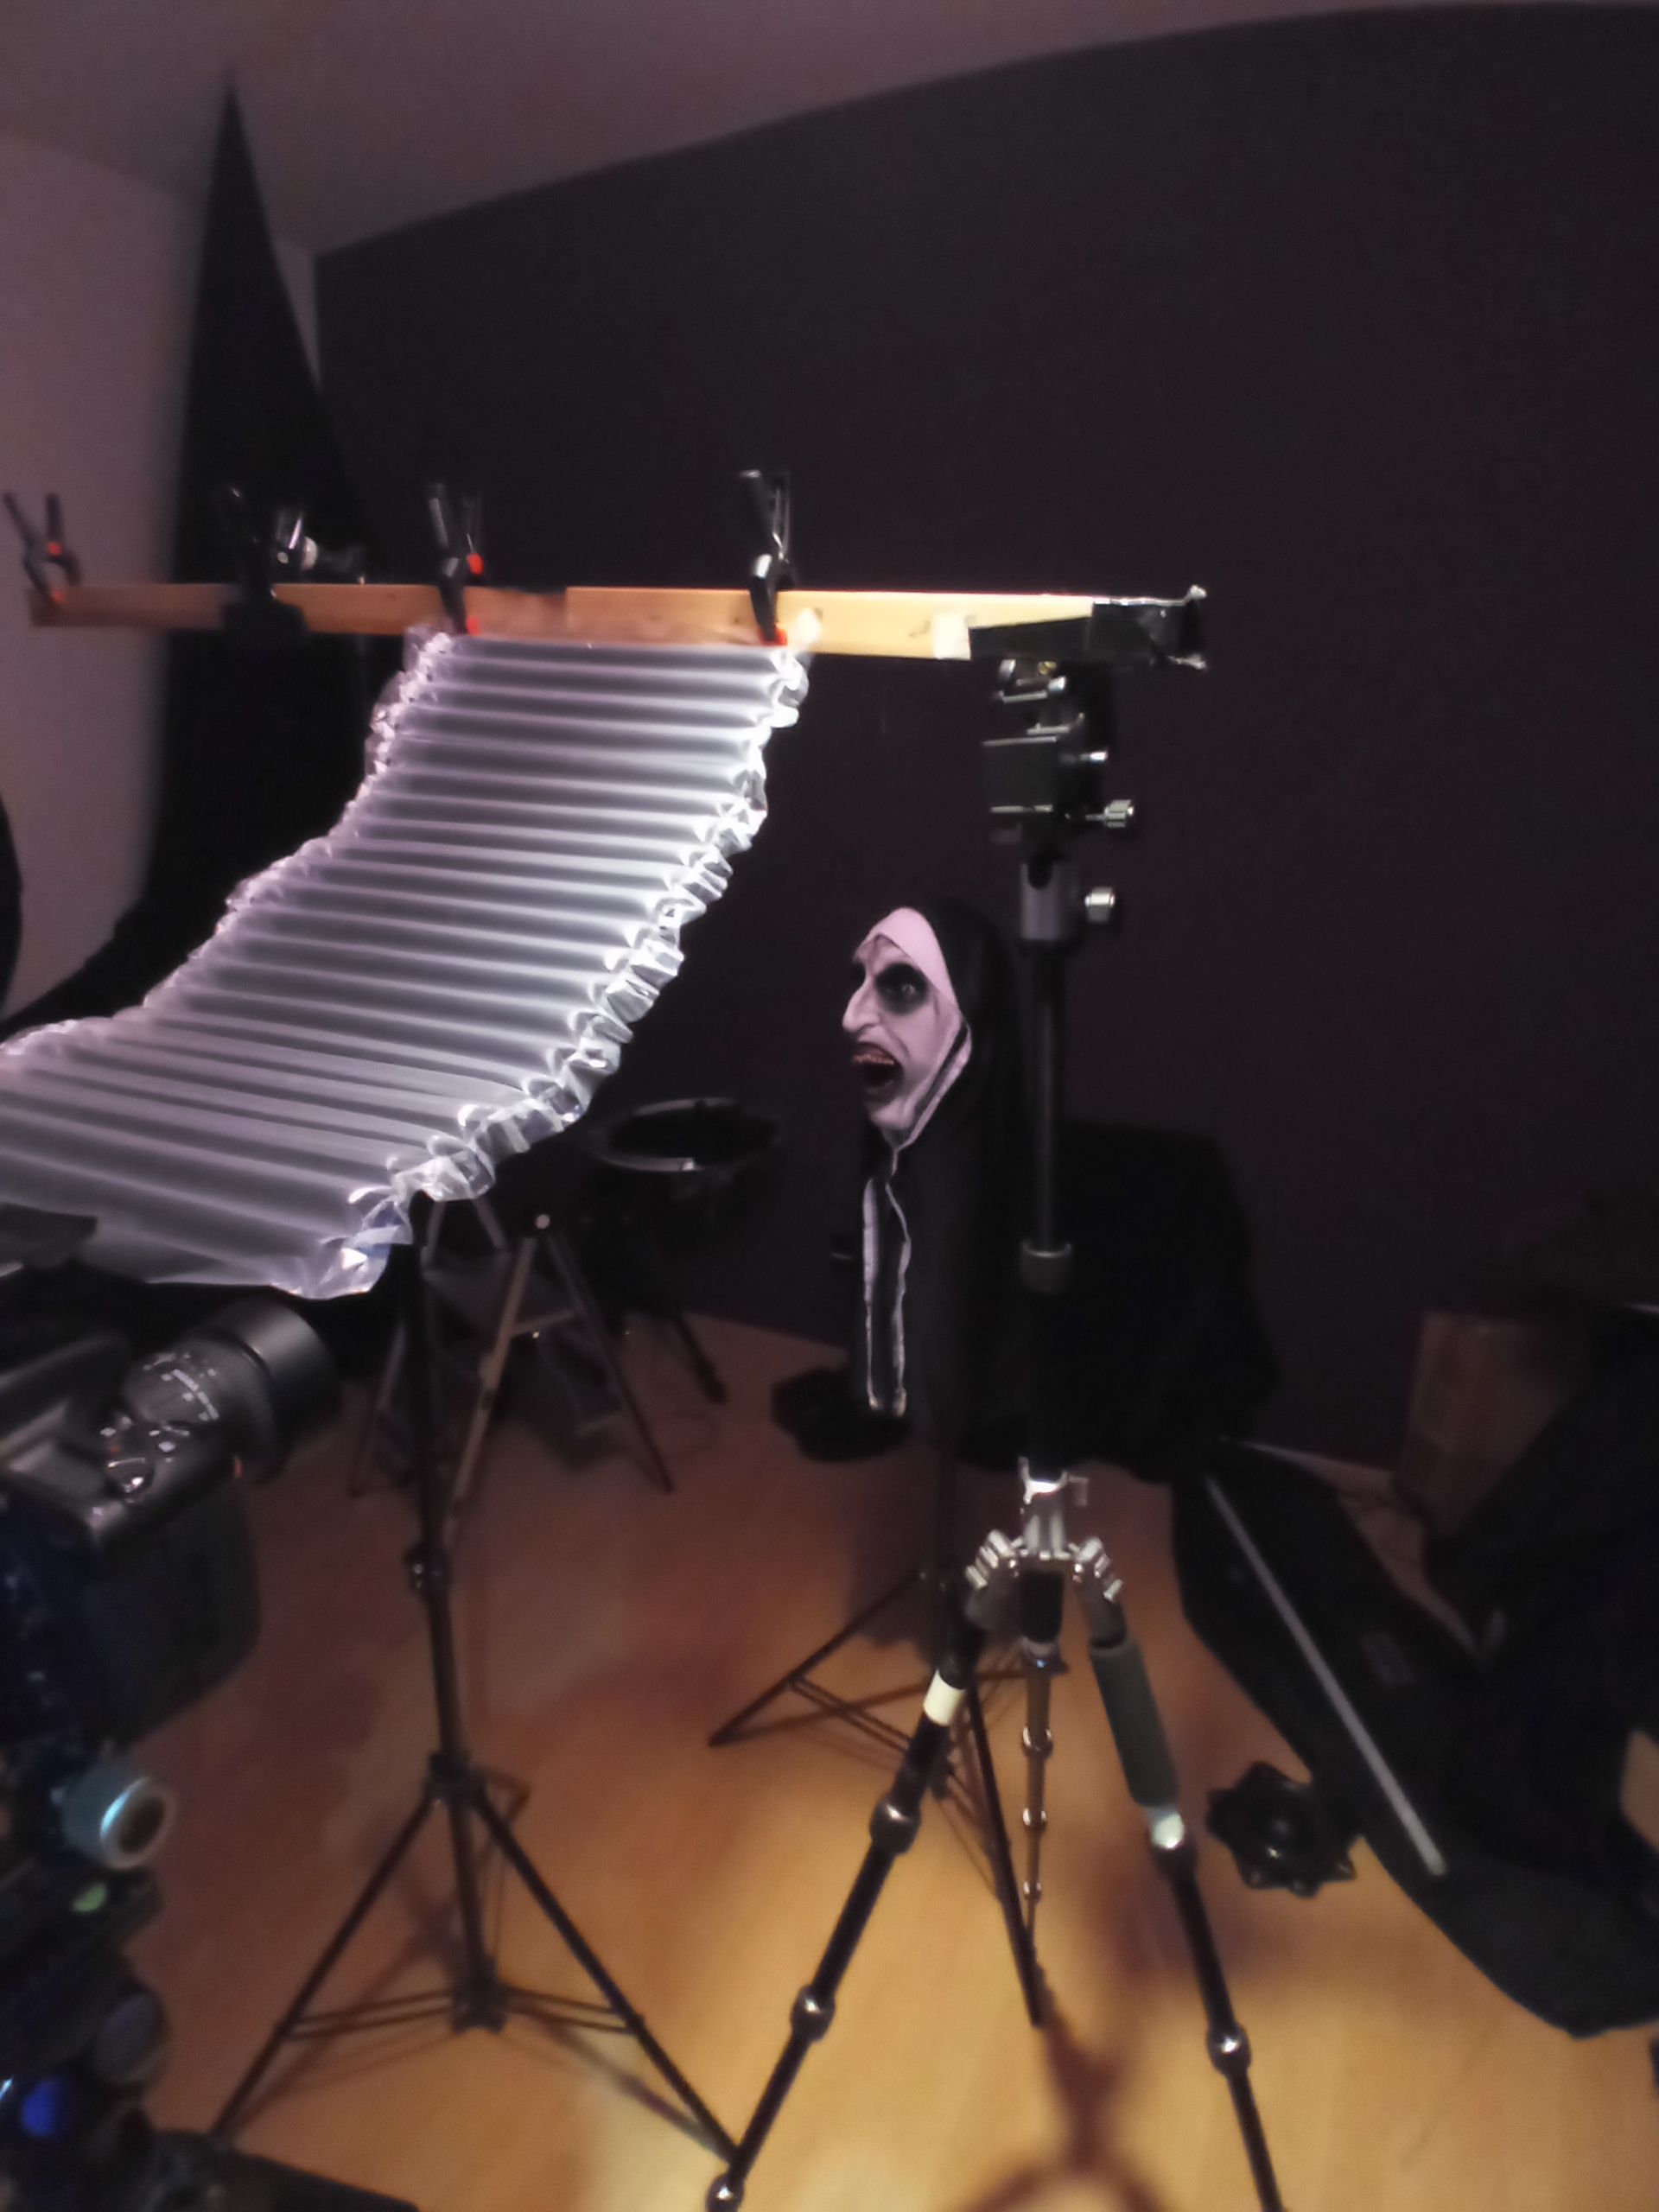
In the second set image you can see that the bubble wrap is folded upwards and the view of the nun is open.

The reason is quite simple. First, I painted the nun's eyes with a "light pen" in booger green in the eye socket. (in my last post I showed the "light pen"! see link above).
Then I used a red torch to shine the shadow of my hand on the wall. I exposed these two parts of the image through the " jalousie" (bubble wrap). Afterwards I folded up the foil to illuminate the left half of the face with a scanner (red). Then I switched the scanner to white and illuminated the right half of the face. This made the nun much more recognisable and all her ugliness became visible.
I did the first tests completely through the foil. The nun could only be guessed at as such. It didn't look good at all and I didn't like it at all.

Im zweiten Set-Bild sieht man, dass die Luftpolsterfolie nach oben geklappt ist und der Blick auf die Nonne frei ist.

Der Grund ist recht simpel. Als erstes habe ich die Augen der Nonne mit einem "Lichtstift" in Popel-grün in die Augenhöhle gemalt. (in meinem letzten Beitrag habe ich den "Lichtstift" gezeigt! siehe Link oben)
Danach habe ich den Schatten meiner Hand mit einer roten Taschenlampe an die Wand geleuchtet. Diese beiden Bildteile habe ich durch die "Jalousie" (Luftpolsterfolie) belichtet. Danach habe ich die Folie hoch geklappt, um anschließend mit einem Scanner (rot) die linke Gesichtshälfte zu beleuchten. Danach habe ich den Scanner auf weiß umgeschaltet und die rechte Gesichtshälfte beleuchtet. Die Nonne war dadurch viel besser erkennbar und ihre gesamte Hässlichkeit wurde sichbar.
Die ersten Tests habe ich komplett durch die Folie gemacht. Die Nonne war als solche nur noch zu erahnen. Sah überhaupt nicht gut aus und gefiel mir überhaupt nicht.

Nikon D750 | ISO 100 | Sigma 28-70 mm @f/ 4 & f/ 11 | 257 sec. exposure time

💀 DEAD HAND 💀

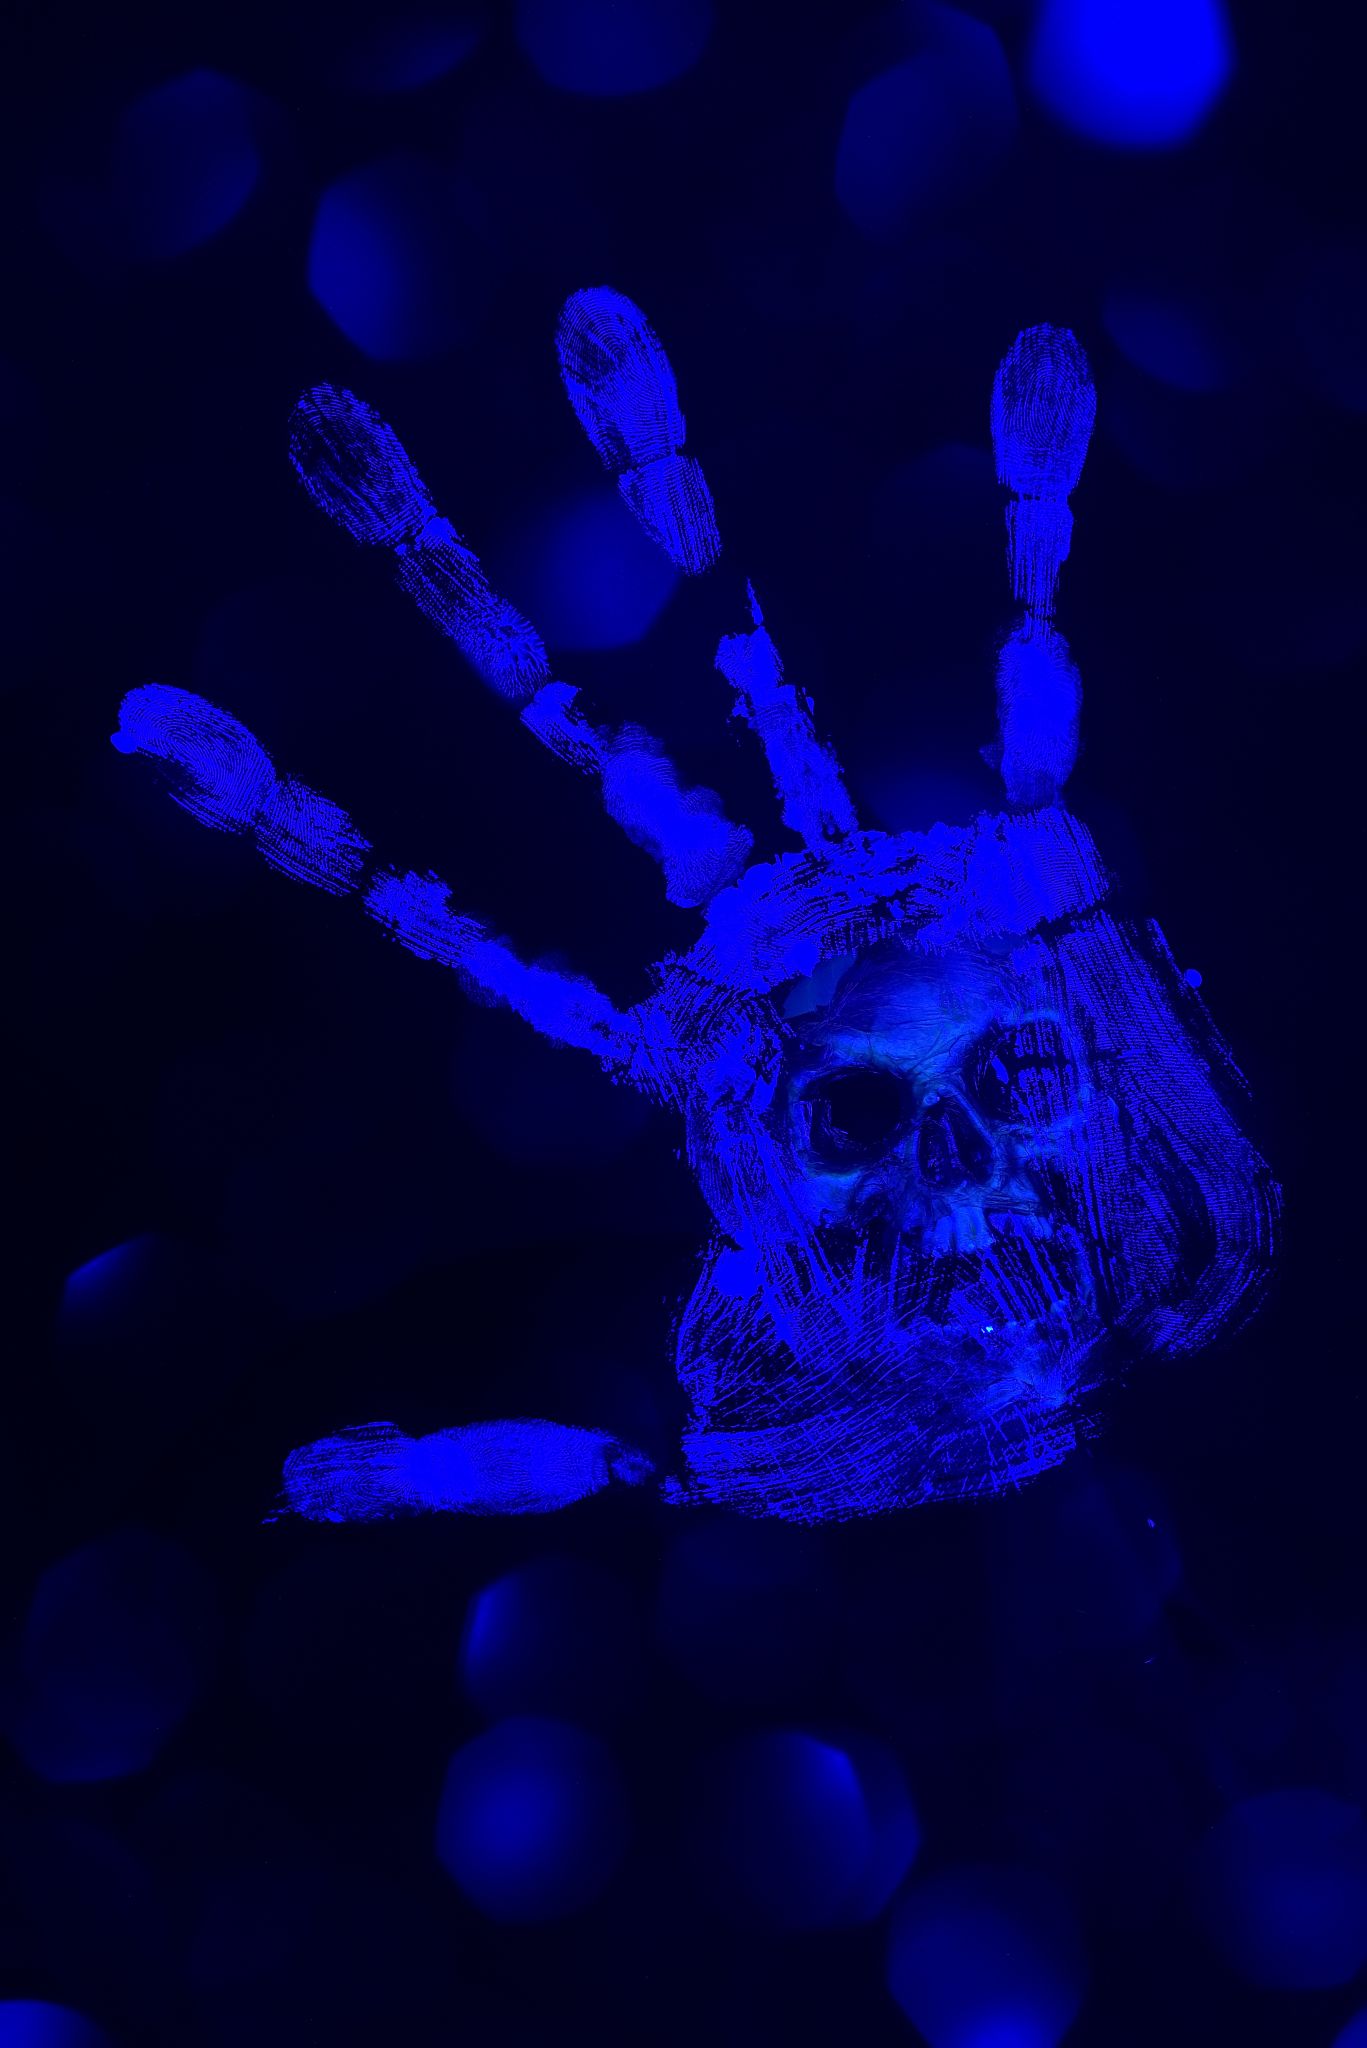
Making this image was a bit of a mess, but also a bit of fun.

**How to**
Set 1: First, I painted my hand with fluorescent body paint. It is skin-friendly and there is no rash. Then I made an impression of it on black cardboard. The print was then placed in the set with a clamp on the tripod and the camera aligned. A Convoy S2 UV torch was used in the exposure. (70 mm - f/11)
Set 2: Here I mounted "Udo the dead skull" in the set. Slightly slanted, because the handprint should not be straight in the later image. Udo was illuminated with a Convoy S2+ in light blue. (48 mm - f/11)
Set 3: The last step was the bokeh for the background. Here I used an A4 sheet of effect paper again, which I briefly side-lit with a Convoy S2+ blue.
(70 mm - f/ 4)
After all three sets / tripods were set up and the aperture, focal length and focus were set, I started the exposure and I worked through my "script". Unfortunately, after the first attempt, I realised that I had been sloppy in aligning and setting up one set. I corrected this carelessness and then started a second attempt, which was successful.

Dieses Bild umzusetzen war eine kleine Sauerei, hat aber auch ein wenig Spaß gemacht.

**Umsetzung**
Set 1: Als erstes habe ich meine Hand mit fluoreszierender Bodypainting-Farbe eingepinselt. Die ist hautverträglich und es gibt keinen Ausschlag. Anschließend habe ich auf schwarzem Karton einen Abdruck davon gemacht. Der Abdruck wurde dann im Set mit einer Klemme am Stativ platziert und die Kamera ausgerichtet. In der Belichtung kam eine Convoy S2 UV Taschenlampe zum Einsatz. (70 mm - f/11)
Set 2: Hier montierte ich "Udo den toten Totenkopf" im Set. Leicht schräg, da der Handabdruck im späteren Bild nicht gerade sein sollte. Udo wurde mit einer Convoy S2+ in hellblau beleuchtet. (48 mm - f/11)
Set 3: Der letzte Schritt war dann noch das Bokeh für den Hintergrund. Hier kam wieder ein A4 Blatt Effektpapier zum Einsatz , welches ich mit einer Convoy S2+ blau seitlich kurz beleuchtete.
(70 mm - f/ 4)
Nachdem alle drei Sets / Stative eingerichtet waren und Blende, Brennweite sowie Focus eingestellt waren, startete ich die Belichtung und ich arbeitete mein "Drehbuch" ab. Leider habe ich nach dem ersten Versuch gemerkt, dass ich bei dem ausrichten und einrichten eines Sets geschlampt habe. Ich korrigierte ich diese Nachlässigkeit und starte dann einen zweiten Versuch, der erfolgreich war.

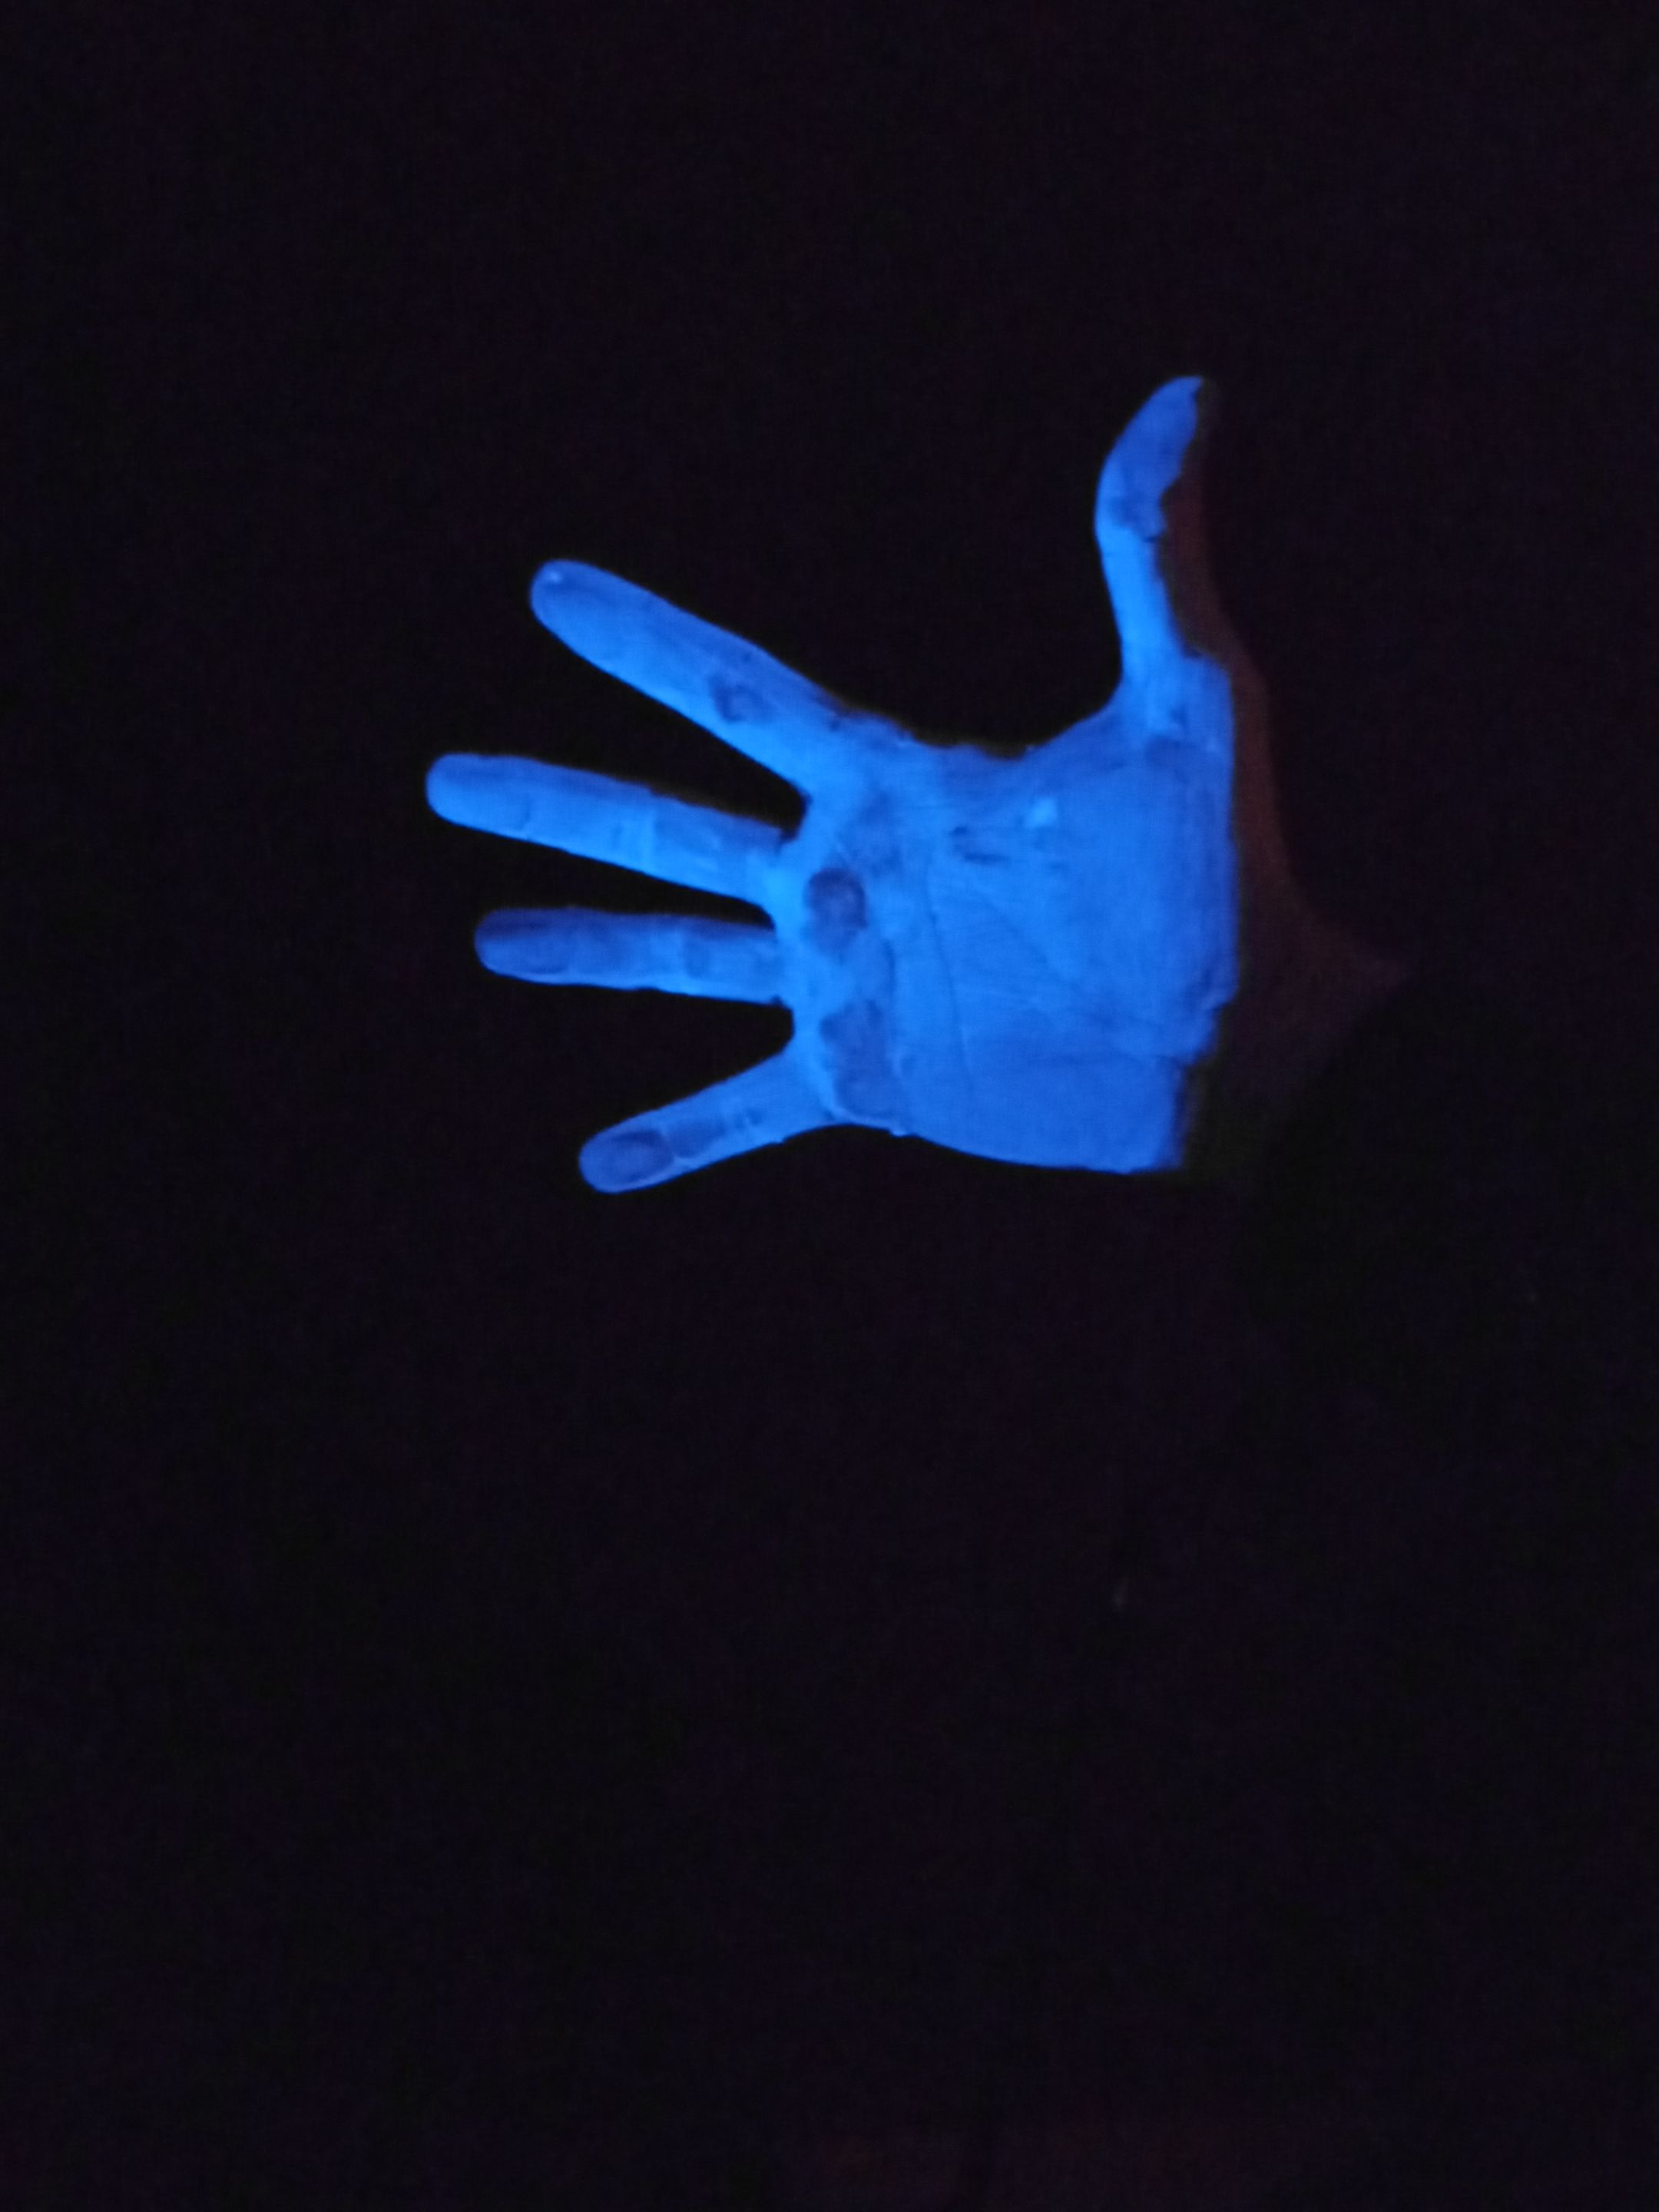
Behind the scenes - my hand painted with fluorescent body paint

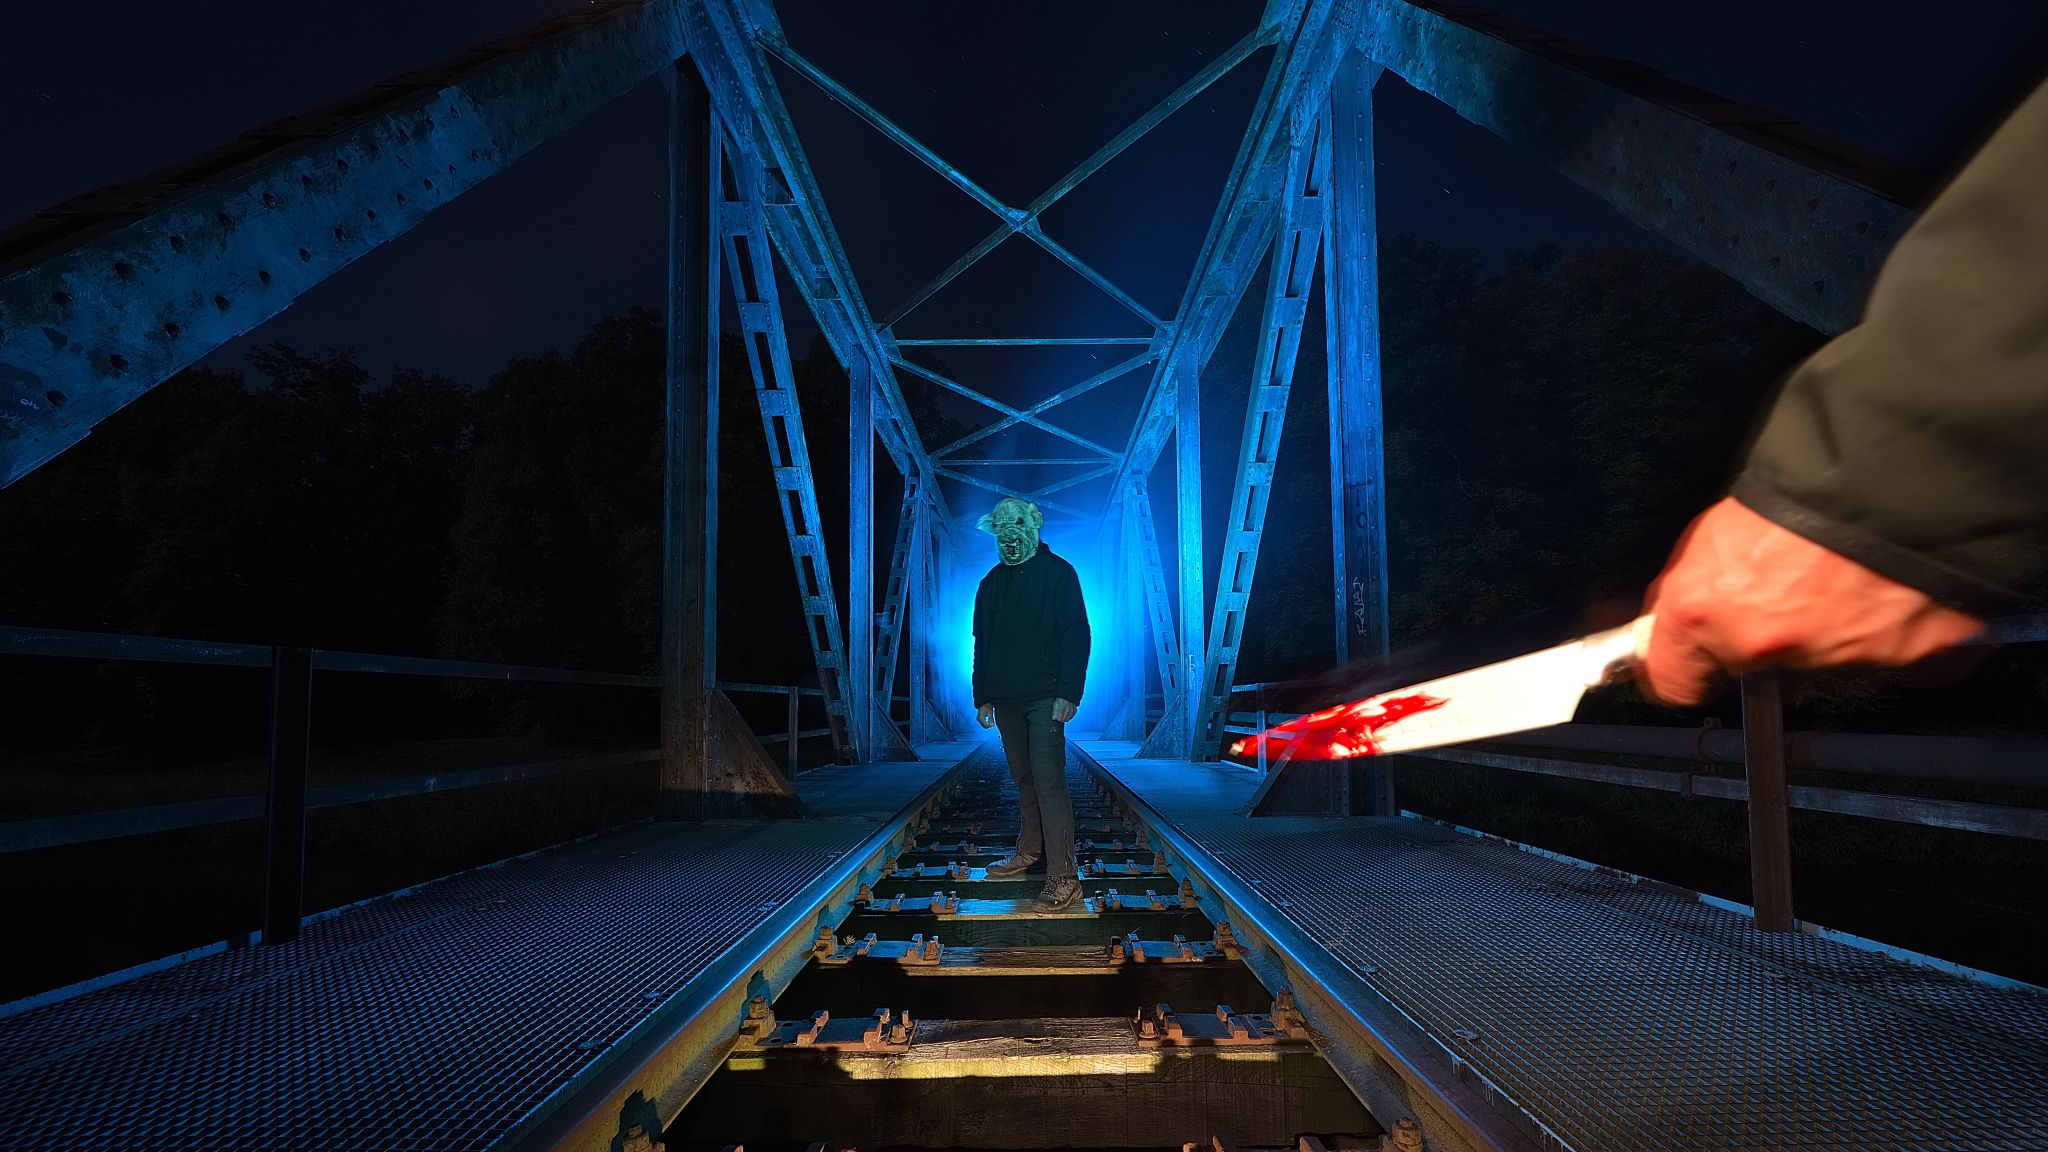
Nikon D750 | ISO 100 | Laowa 12 mm @f/ 8 | 168 sec. exposure time

Kill the pig 🔪 🐷
Whenever I look at this picture, it reminds me of a wonderful trip into the darkness with Sven @lichtkunstfoto , Ralf @lichtkunstfoto and Hans, who was the model (he is the pig) for this picture. Besides a lot of fun, we also made some serious light art pictures. The location, an old rusty railway bridge was discovered by @lichtkunstfoto
The visit took place at the beginning of October, when I was already in the Halloween mood. So I wanted to realise this image idea at night. I prepared a knife with fake blood and Ralf @lichtkunstfoto played the role of the killer.
Hans was kind enough to act as a pig and carefully positioned himself on the railway sleepers. It was not without danger, as we went directly into the water between the sleepers. But Hans is a professional.
Sven @lichtkunstfoto handled the camera and started the exposure. I first created a silhouette behind the pig with some fog and a Convoy S2+ light blue and also gave the bridge some of the light.
Then I illuminated the pig from the front with a scanner.
Ralf with the bloody knife in his hand was also illuminated with the scanner and finally the railway sleepers in the foreground got some light.
On the first try, the silhouette was a bit messed up and the knife was not really successful. I repeated the process, but not the "mistakes" and was very pleased with the result.
The night was still young and we realized more image ideas from Sven, Ralf and Hans, which was no less fun. A great night that I remember with pleasure.

**Tötet die Sau** 🔪 🐷
Immer wenn ich mir dieses Bild anschaue, erinnnert es mich an einen wunderbaren Ausflug in die Dunkelheit mit Sven @lichtkunstfoto , Ralf @lichtkunstfoto und Hans, der sich für dieses Bild als Model (er ist die Sau) zur verfügung gestellt hat. Neben ganz viel Spaß haben wir auch noch ernsthafte Lichtkunst Bilder umgesetzt. Die Location, eine alte, rostige Eisenbahnbrücke hat @lichtkunstfoto entdeckt.
Der Besuch fand Anfang Oktober statt, wo ich bereits in Halloween Stimmung war. Also wollte ich diese Bildidee in der Nacht umsetzen. Mit Kunstblut habe ich ein Messer präpariert und Ralf @lichtkunstfoto spielte die Rolle des Killers.
Hans stellte sich freundlicherweise als Sau zur Verfügung und brachtevsich vorsichtig auf den Bahnschwellen in Position. Nicht ganz ungefährlich, da es zwischen den Schwellen direkt ins Wasser ging. Aber Hans ist Profi.
Sven @lichtkunstfoto bediente die Kamera und startete die Belichtung. Ich habe zuerst hinter der Sau mit etwas Nebel und einer Convoy S2+ hellblau eine Silhouette erzeugt und der Brücke noch etwas von dem Licht abgegeben.
Danach habe ich die Sau von vorne mit einem Scanner eingeleuchtet.
Ralf mit dem blutigen Messer in der Hand wurde anschließend ebenfalls mit dem Scanner eingeleuchtet und zum Schluß haben die Bahnschwellen im Vordergrund noch etwas Licht verpasst bekommen.
Beim ersten Versuch war die Silhouette etwas verunglückt und das Messer war nicht wirklich gelungen. Ich wiederholte den Durchgang, aber nicht die "Fehler" und war sehr zufrieden mit dem Ergebnis.
Die Nacht war noch jung und wir setzten noch weitere Bildideen von Sven, Ralf und Hans um, was nicht weniger spaßig war. Eine tolle Nacht, an die ich mich gerne erinnere.

Nikon D750 | ISO 100 | Sigma 28-70 mm | 221 sec. exposure time

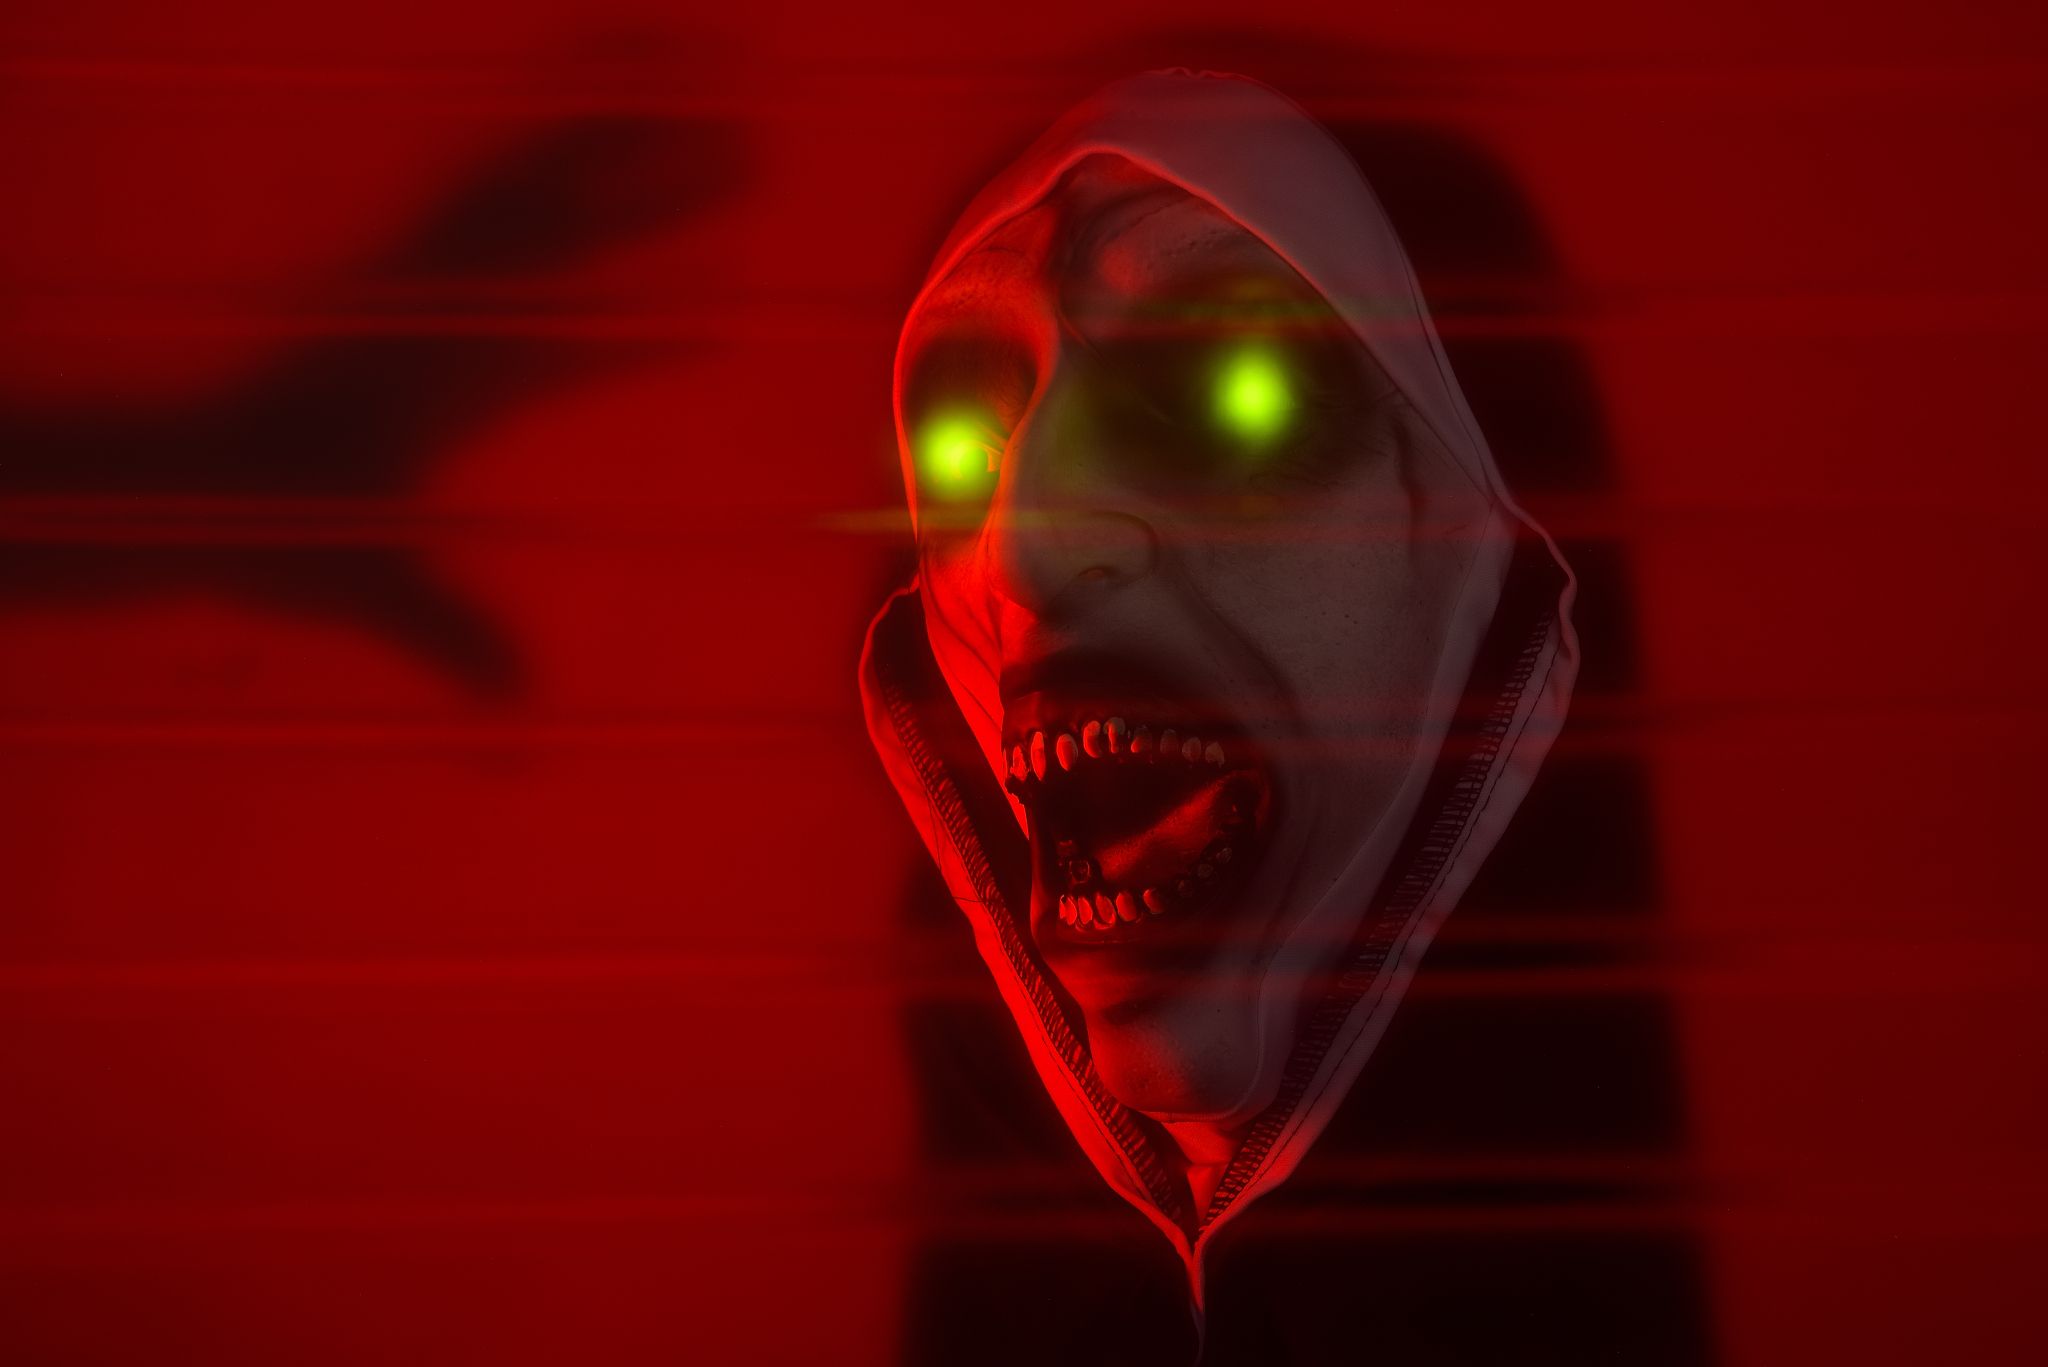
The fellow, the "smiling grimace" knows the one or the other certainly from my last post. As I mentioned, we have become buddies, so I made another picture with my new buddy.

Here I changed the set a bit. I used a different prism. A "halo prism" which creates a kind of distortion. I taped the center with a piece of black cardboard, so that I can put the zoomed grimace in the center later on a second tripod.
The grimace mask was sideways in the frame and my camera was mounted on my Camera Rotation Tool. After I lit the grimace the first time, the camera was rotated 180° and the process repeated. This makes the grimace appear quite upside down in the finished image.
After that part of the image was in the box, I covered the lens (exposure continued, but no light reached the sensor) and swapped to the second tripod to additionally illuminate the grimace from below with orange light. I turned the zoom from 70 mm to 50 mm and then again to 35 mm. Whenever the focal length was changed, I covered the lens again to avoid creating light trails. If you want this "effect" in the image, you can also zoom "open". However, I did not want to have it in this case and image.
After I had realized, without stupid mistakes all steps, the picture was ready.

Den Kollegen, die "grinsende Fratze" kennt der ein oder anderen sicherlich aus meinem letzten Beitrag. Wie ich bereits erwähnte sind wir Kumpels geworden, also machte ich mit meinem neuen Kumpel noch ein weiteres Bild.

Hier habe ich das Set etwas verändert. Ich habe ein anderes Prisma verwendet. Ein "Halo-Prisma" was eine Art Verzerrung erzeugt. Die Mitte habe mit einem Stück schwarzer Pappe zugeklebt, damit ich später auf einem zweiten Stativ die gezoomte Fratze in die Mitte setzen kann.
Die Fratzen-Maske stand seitlich im Bild und meine Kamera war auf meinem Camera Rotation Tool montiert. nachdem ich die Fratze das erste Mal eingeleuchtet hatte, wurde die Kamera um 180° gedreht und der Vorgang wiederholt. Dadurch erscheint die Fratze im fertigen Bild recht auf dem Kopf.
Nachdem der Teil des Bildes im Kasten war, deckte ich das Objektiv ab (die Belichtung lief weiter, es kam aber kein Licht auf den Sensor) und wechselt auf das zweite Stativ, um die Fratze zusätzlich von unten mit orangenen Licht zu beleuchten. Den Zoom drehte ich von 70 mm auf 50 mm und dann nochmal auf 35 mm. Immer wenn die Brennweite verändert wurde, deckte ich das Objektiv wieder ab, um keine Lichtspuren zu erzeugen. Wenn man diesen "Effekt" im Bild haben möchte, kann man auch "offen" zoomen. Wollte ich in diesem Fall und Bild aber nicht haben.
Nachdem ich, ohne dumme Fehltritte alle Schritte umgesetzt hatte, war das Bild fertig.

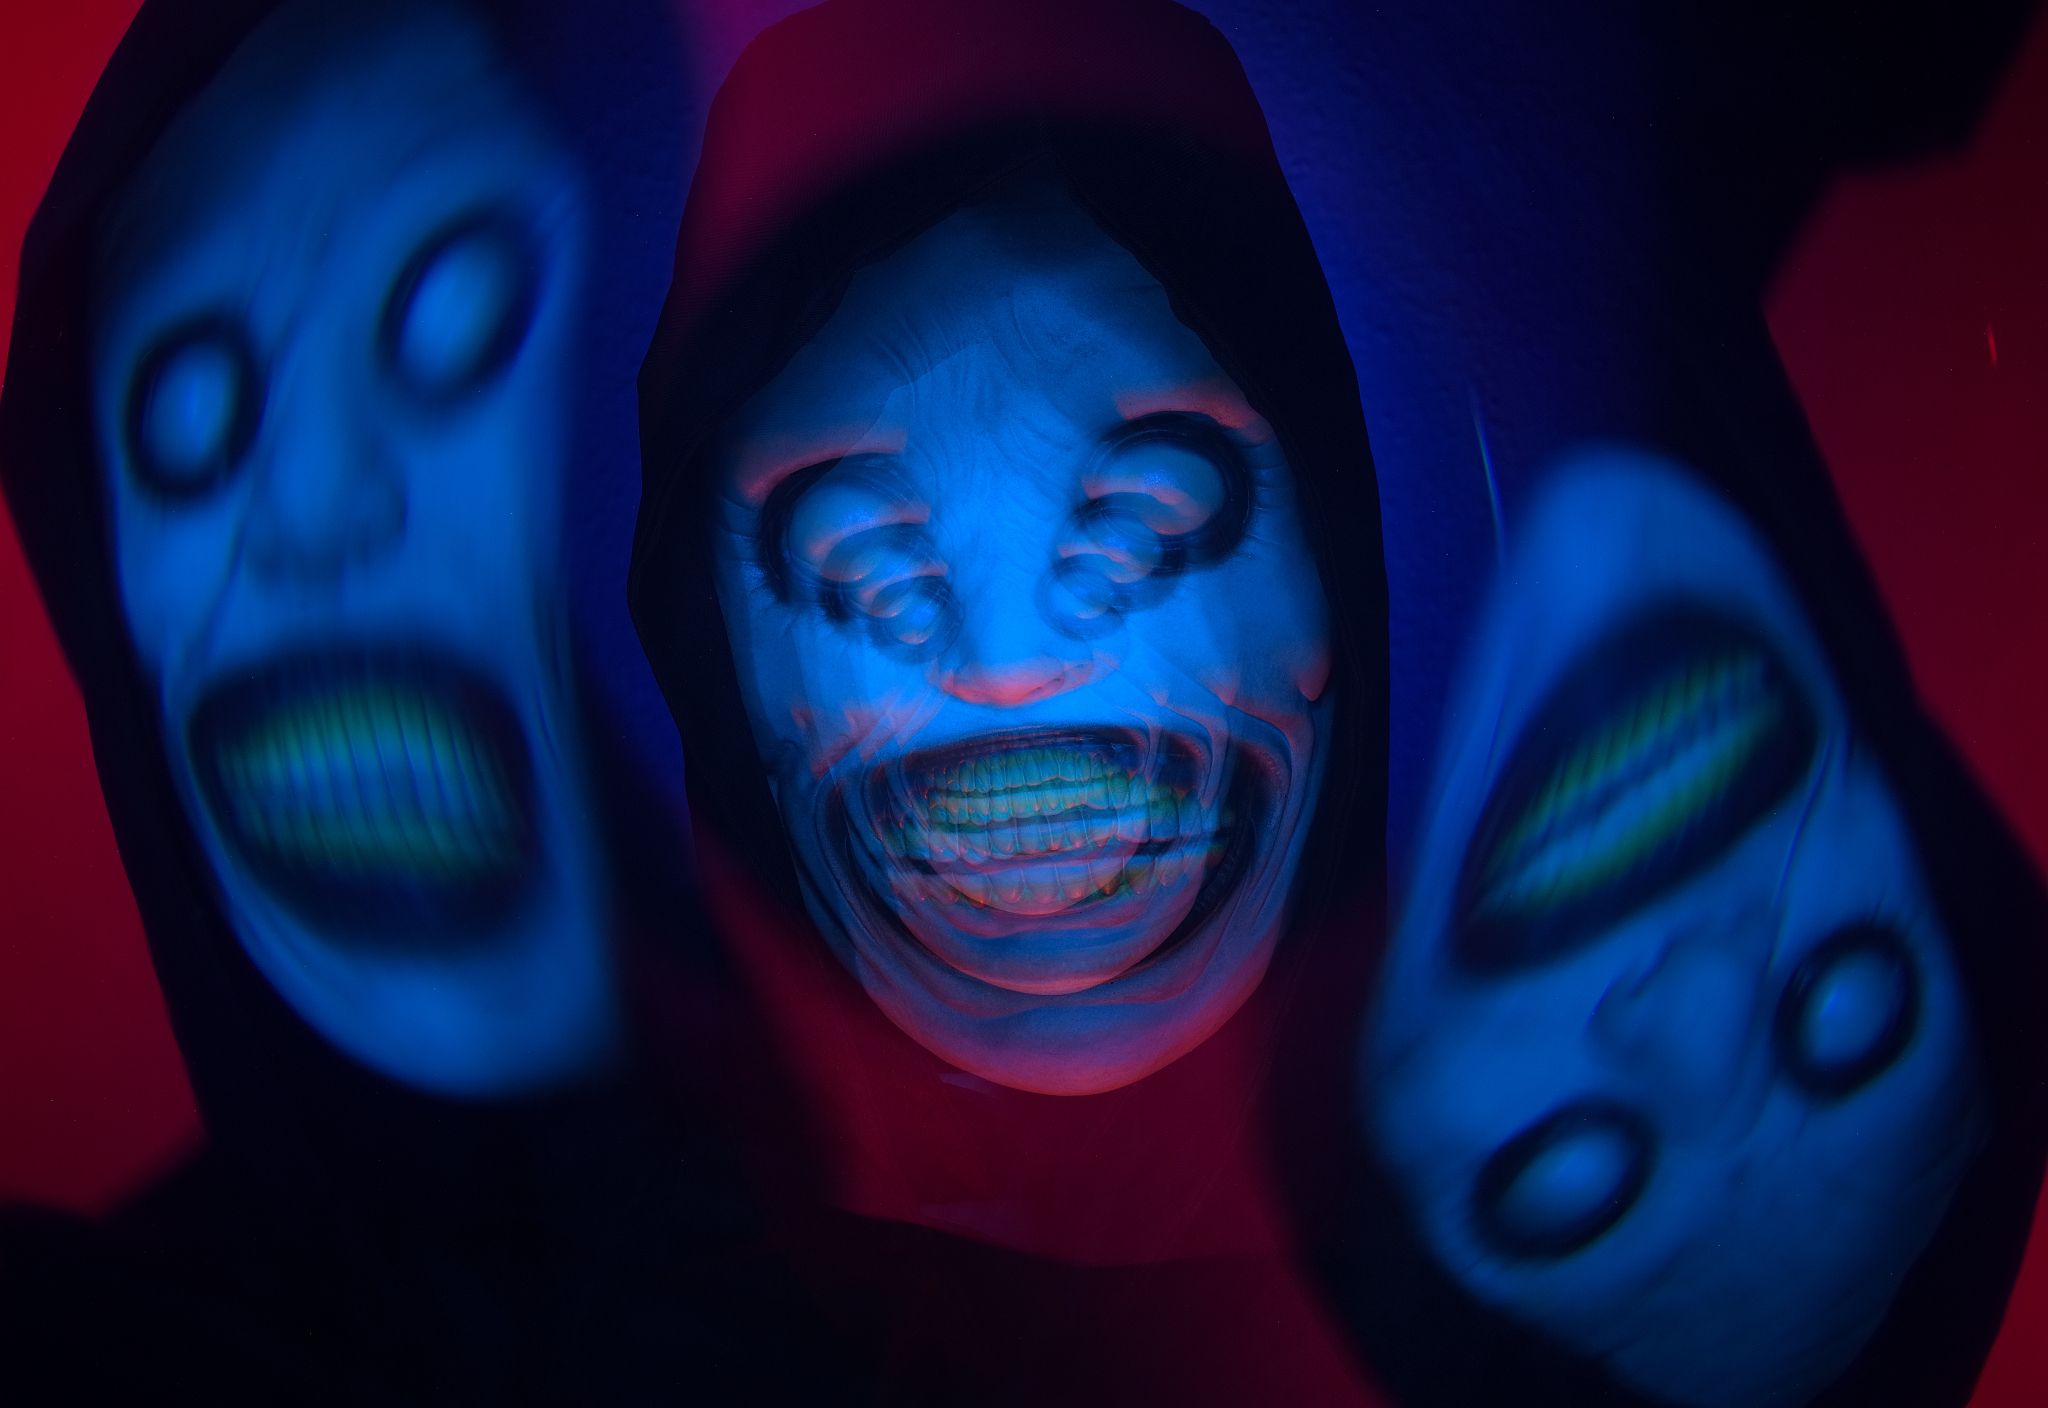
Behind the scenes - "Halo-Prisma"

Nikon D750 | ISO 100 | Sigma 28-70 mm @40 mm f/ 18 & @40 mm F/ 8 348 sec. exposure time

# TOXIC ☠️

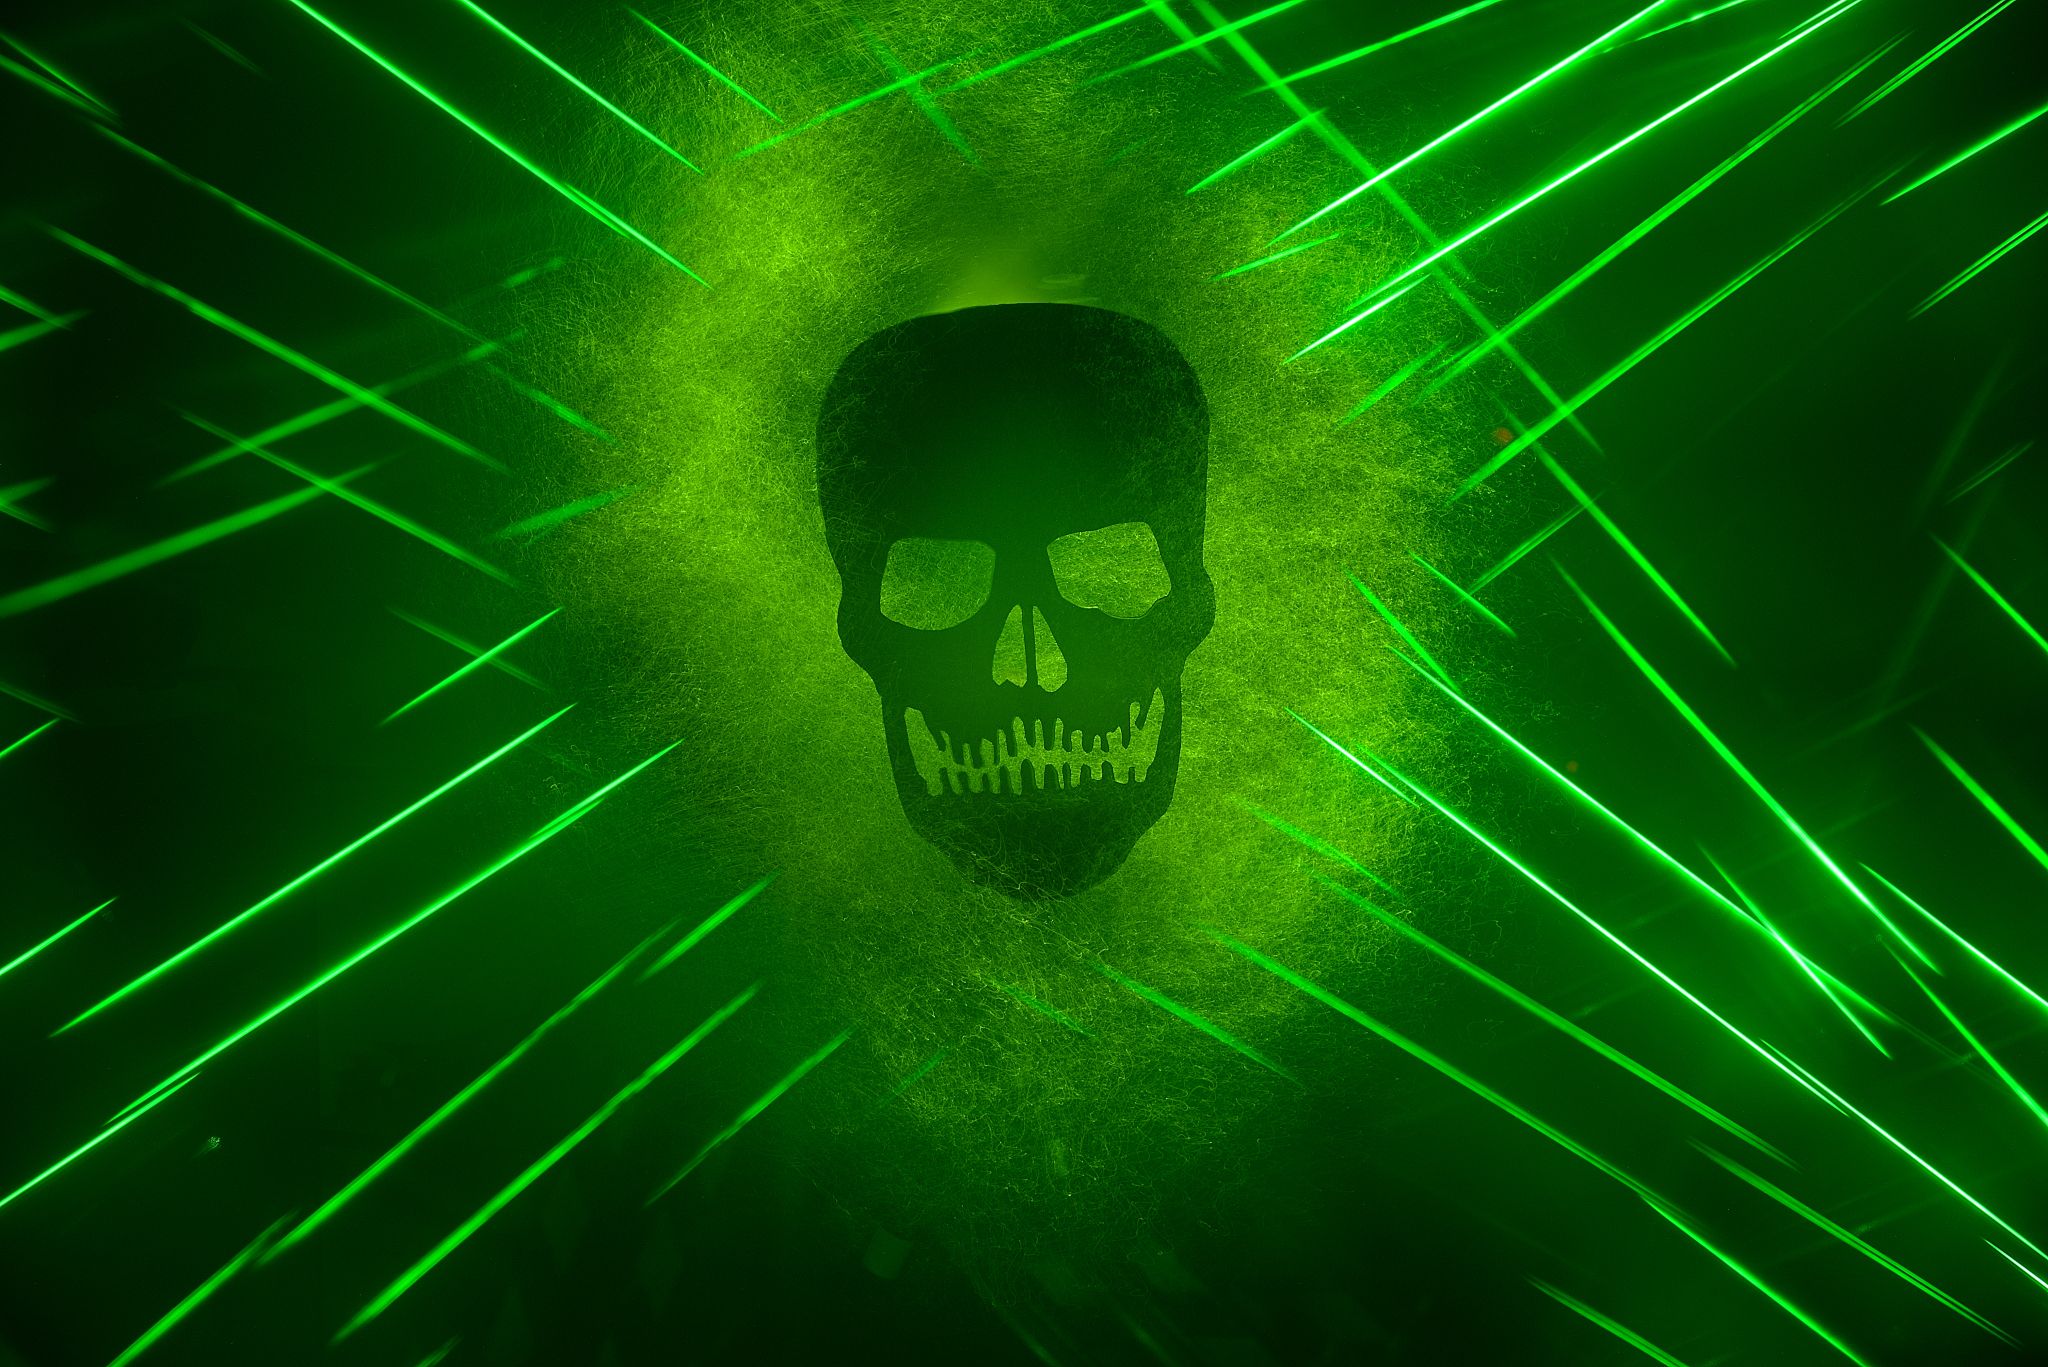
A really toxic green image where a prism was also used. I do not want to go into great detail. The post contains so much text by now, no one can read it.

Prism, Camera Rotation Tool, fog, DIY skull stencil, fiberglass duster black (only the tips glow), flashlight with poison-green color filter and fast strobe frequency, 2 tripods are the tools used for this toxic shot.
When lining up prism, camera and laser I recommend lots of good humor, patience and concentration, it's really no fun or as one of my favorite lightpainters @lichtkunstfoto likes to say: "Lightpainting is no pony farm".

Ein wirklich giftig-grünes Bild, wo ebenfalls ein Prisma genutzt wurde. Ich will gar nicht groß ins Detail gehen. Der Beitrag enthält inzwischen so viel Text, das kann ja kein Mensch lesen.

Prisma, Camera Rotation Tool, Nebel, DIY Totenkopf-Schablone, Glasfaserwedel schwarz (nur die Spitzen leuchten), Taschenlampe mit gift-grünen Farbfilter und schneller Stroboskopfrequenz, 2 Stative sind die eingesetzten Werkzeuge für dieses toxische Bild.
Bei der Ausrichtung von Prisma, Kamera und Laser empfehle ich jede Menge gute Laune, viel Geduld und Konzentration, das ist echt kein Spaß oder wie einer meiner Lieblings-Lightpainter @lichtkunstfoto gerne sagt: "Lightpainting ist kein Ponyhof".

Behind the Scenes - Laser & Prism

At the end of my 2-part Halloween special still a picture where I just shut up and write nothing further. Gladly I read opinions in the comments.

Thanks for reading, the post has become a bit longer.

Zum Abschluss meines 2-teiligen Halloween Specials noch ein Bild wo ich einfach die Klappe halte und gar nichts weiter schreibe. Gerne lese ich Meinungen in den Kommentaren.

Danke fürs lesen, der Beitrag ist dann doch etwas länger geworden.

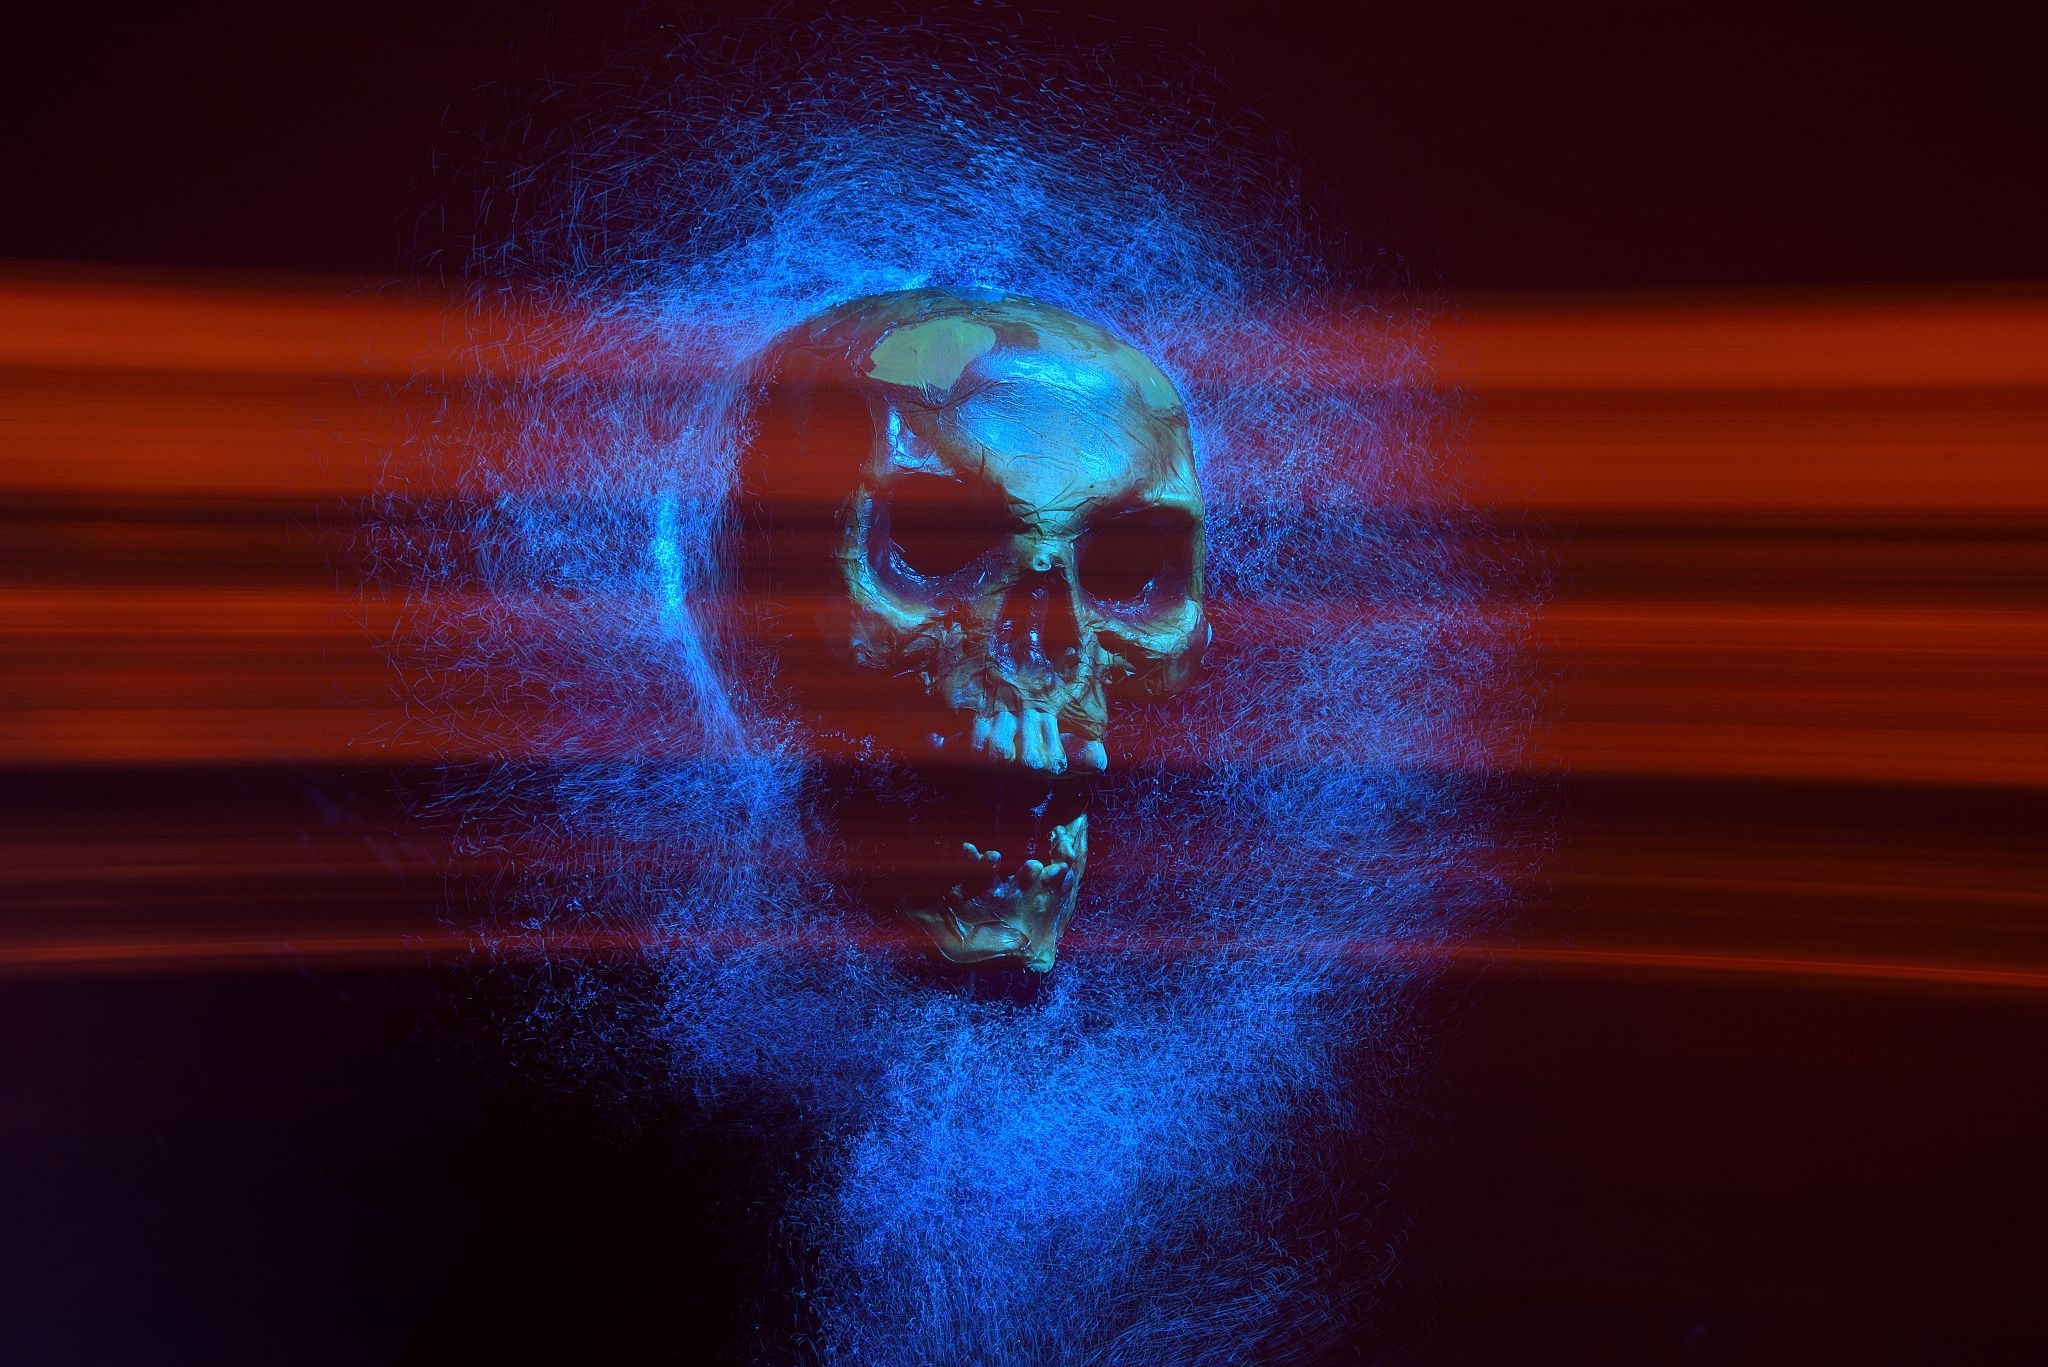
Nikon D750 | ISO 100 | Sigma 28-70 mm | 105 sec. exposure time

Created in real time captured to the camera in one single photographic frame. Nothing is added or removed in post processing. #nophotoshop #AIfree

PA050072

Stepko Light Painting Photography

My Name is Stefan aka Stepko, I am a Lightpainting Artist, currently based in Hannover, Germany. I am a Lightjunkie since 2017.
Darkness is my canvas and I love to create artworks out of light.
If you like my art you can join me on
Facebook , Flickr and Twitter for more Light Painting Photography.
You like the art of light painting and want to see more amazing shots and the magic of light? ⬇️
Then visit these Artists, they will blow your mind: @fadetoblack @fadetoblack @fadetoblack @fadetoblack @fadetoblack @fadetoblack @fadetoblack @fadetoblack @fadetoblack @fadetoblack @fadetoblack @fadetoblack-hoho @fadetoblack @fadetoblack @fadetoblack @fadetoblack @fadetoblack and follow them and/or give them an upvote.

We are Light Painters

To help and support the LightPainters community here on Hive I would appreciate your delegation of HivePower. Any amount is appreciated. It does not require much to get started, we are happy for any gesture.
How to delegate?
Delegate 50HivePower, [50HP]
Delegate 250HivePower, [250HP]
Delegate 500HivePower, [500HP]
Delegate 1000HivePower, [1000HP]
All the Hive Power will help to upvote the artist's contribution as part of the LightPainters community.
785
29
29.92
29 Replies