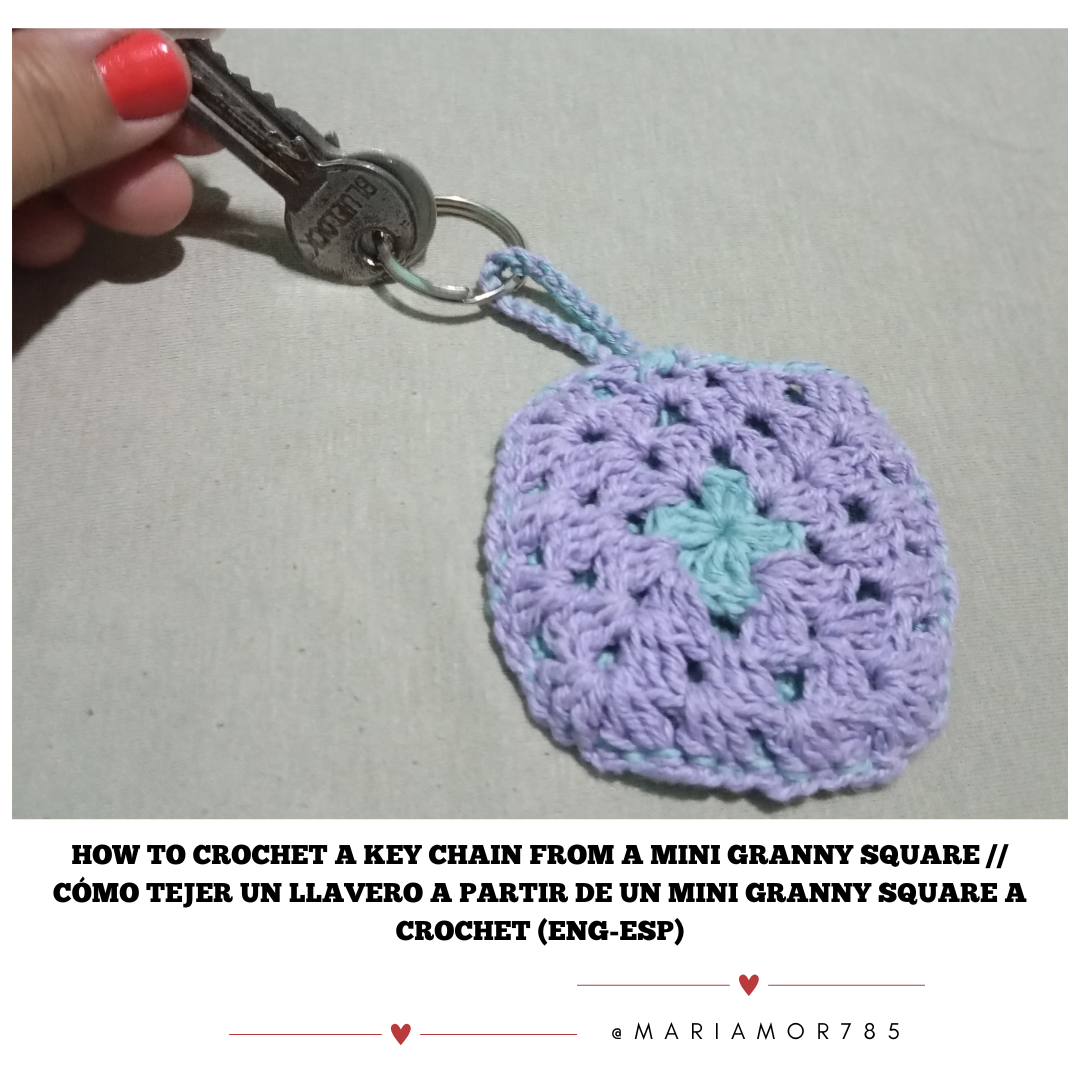
Hello!!! 🫂 Today I share with you a nice project of a beautiful keychain purse in crochet with the grannys technique It is exciting to see how the fabric grows in each turn, I enjoy them to the fullest my favorite hobby of knitting and activate creativity, it is a precision technique that helps us to quickly memorize the turns and stitches, in my free time or when I can't sleep, I go to my room and look for my basket of threads🧶, I sit in the living room, needle and threads 🧶 in my hands, listen to good music, and start knitting, this time I will show you how to make a dual purpose keychain, for that reason I liked to make it, a purse keychain.
In this craft I will use pabilo yarn is a cotton yarn, also the colors fascinate me, I personally like them because of the economical compared to other types of yarns used for crochet.
¡¡Hola!! 🫂 Hoy les comparto un lindo proyecto de un bello llavero monedero en crochet con la técnica de grannys Es emocionante ver cómo va creciendo el tejido en cada vuelta, yo los disfruto al máximo mi hobby favorito de tejer y activar la creatividad, es un técnica de precisión que nos ayuda a memorizar rápidamente las vueltas y puntos, en mis ratos libres o cuanto no logro conciliar el sueño, me voy al cuarto y busco mi cesta de hilos🧶, me siento en la sala, aguja e hilos 🧶 en manos, oír una buena música, y a tejer,en esta oportunidad le demostrare como hacer un llavero doble propósito, por tal razón me gustó realizarlo, un llavero monedero.
En esta manualidad usaré hilo pabilo es un hilo de algodón, además los colores me fascinan, a mí en lo personal me gustan por los económico comparado con otros tipos de hilos que se utilizan para el crochet.
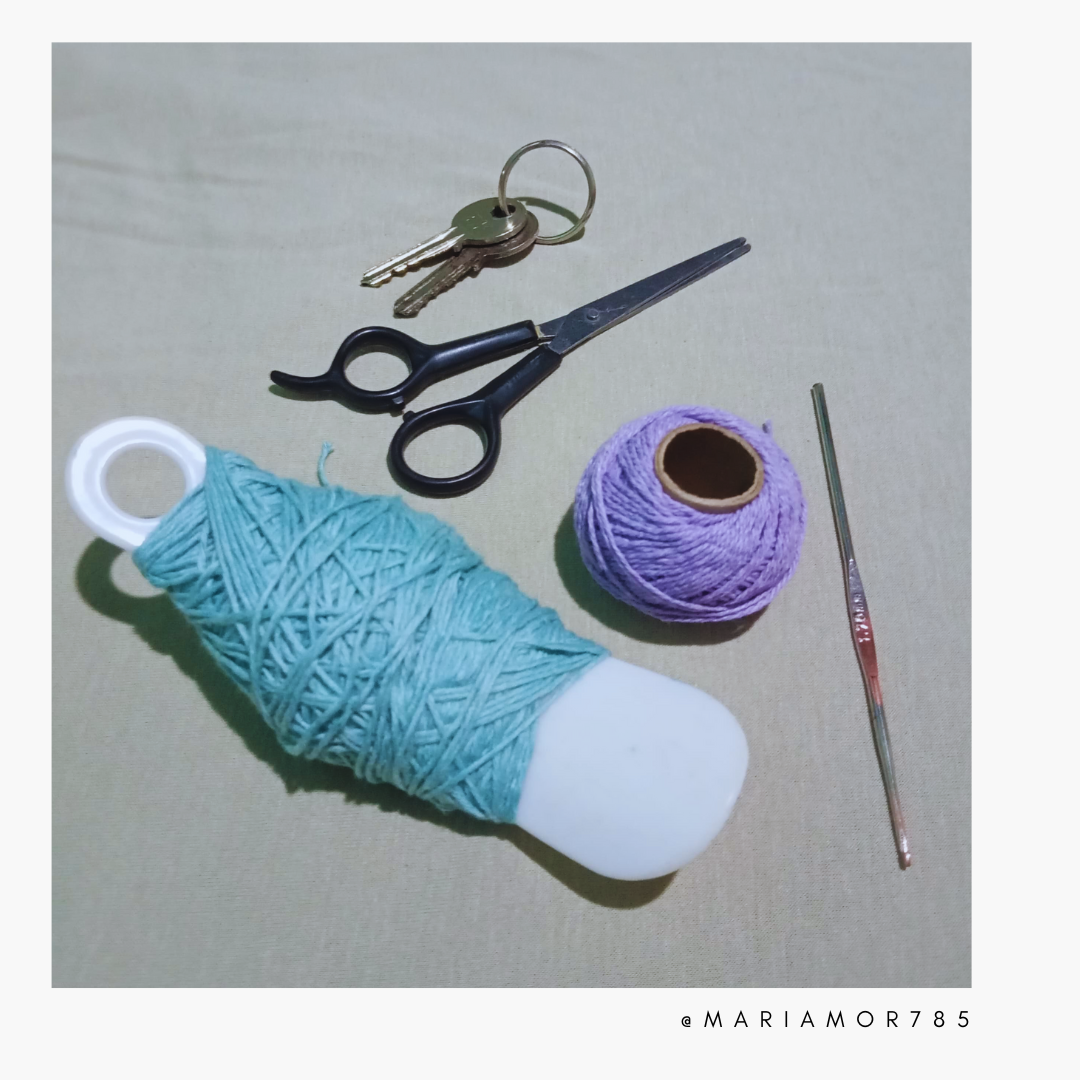
MATERIALS//MATERIALES
01 Purple wick thread.
01 Water green wick thread.
01 Scissors
01 Needle N° 00.
01 Ring for the key ring.
02 Keys.
01 Hilo pabilo color morado.
01Hilo pabilo color verde agua.
01 Tijera
01 Aguja N° 00.
01 Argolla para el llavero.
02 Llaves.
STEP BY STEP//PASO A PASO.
Stitches used in this project:
Chain stitch
High stitch
Slipped stitch
Puntos utilizar en este proyecto:
Cadeneta
Punto alto
Punto deslizado
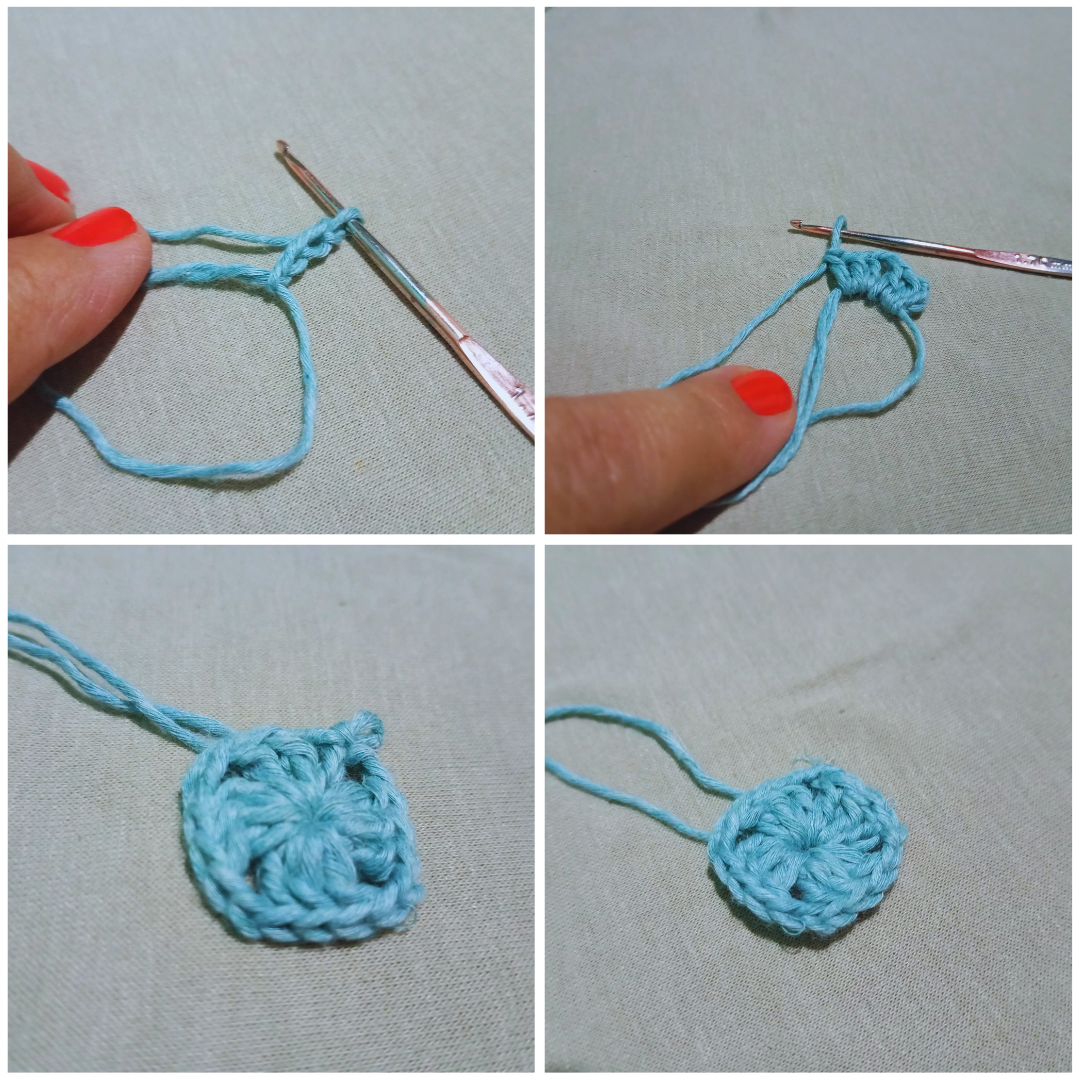
1.- We start with the aqua green color, make a magic ring, three chains, then two double crochets, two chains, make three double crochets plus two space chains, make four groups, inside the magic ring, close the ring pulling the yarn well, close in the third chain of the double crochet with a single crochet.
1.- Comezaremos con el color verde agua, realizar un aro mágico tres cadenetas, seguidamente dos puntos alto, dos cadenetas, realizar tres puntos altos mas dos cadenas de espacio, hacer cuatro grupos, dentro del anillo mágico, cerrar el anillo tirando bien del hilo, cerrar en la tercera cadena del punto alto con un punto raso.
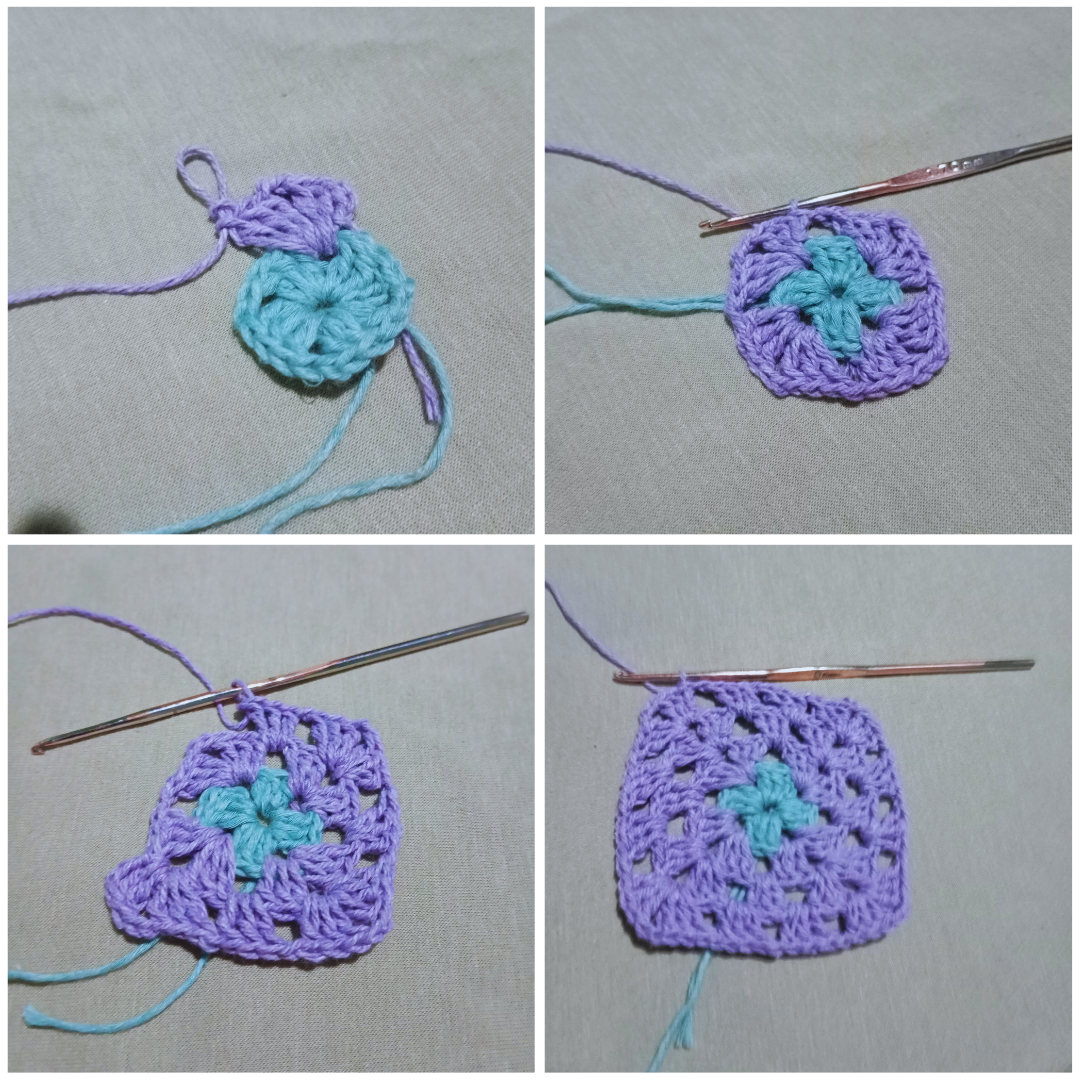
2.- In this round we will change the color of the yarn, to purple, join carefully make a chain and adjust, lift three stitches in the air and continue with two double crochet, two chain stitches and three double crochet, one space, and knit three double crochet and one space, we return to the loop and repeat the steps until the end of the round, with slip stitch.
3.- Third row, knit three slip stitches in each of the corners, knit two double crochet and two chain stitches and three double crochet, one chain stitch, three double crochet and knit one chain stitch, then in the middle loop knit three double crochet and one chain stitch, in the next loop knit three double crochet to complete the 4 stitches, close with a single crochet.
4.- Fourth row, knit three single crochet stitches, pick up three stitches in the air and two chains, three double crochet stitches, continue with one chain, three double crochet stitches, one space stitch and three double crochet stitches, one space stitch, and knit three double crochet stitches and one space stitch, back to the loop and repeat the steps until the end of the row, with slip stitch.
2.- En esta vuelta cambiaremos el color del hilo, al color morado, unir cuidadosamente hacer una cadena y ajustar, levantar tres puntos al aire y seguir con dos puntos altos, dos puntos de cadena y tres puntos altos, un espacio, y realizar tres puntos altos y un espacio, volvemos a llegar al bucle y repetir los pasos hasta terminar la vuelta, con punto deslizado.
3.- Tercera vuelta hacer tres puntos deslizados en cada una de las esquinas tejer dos puntos altos y dos cadenetas y tres puntos altos, una cadeneta, tres puntos altos y tejer una cadeneta, luego en el bucle del medio tejer tres puntos altos y una cadeneta, en el siguiente bucle tejer tres puntos altos hasta completar las 4 puntas, cerrar con un punto raso.
4.- Cuarta vuelta, realizar tres puntos rasos, levantar tres puntos al aire y dos cadenas, tres puntos altos,seguir con una cadena, tres puntos altos, un punto de espacio y tres puntos altos, un espacio, y realizar tres puntos altos y un espacio, volvemos a llegar al bucle y repetir los pasos hasta terminar la vuelta, con punto deslizado.
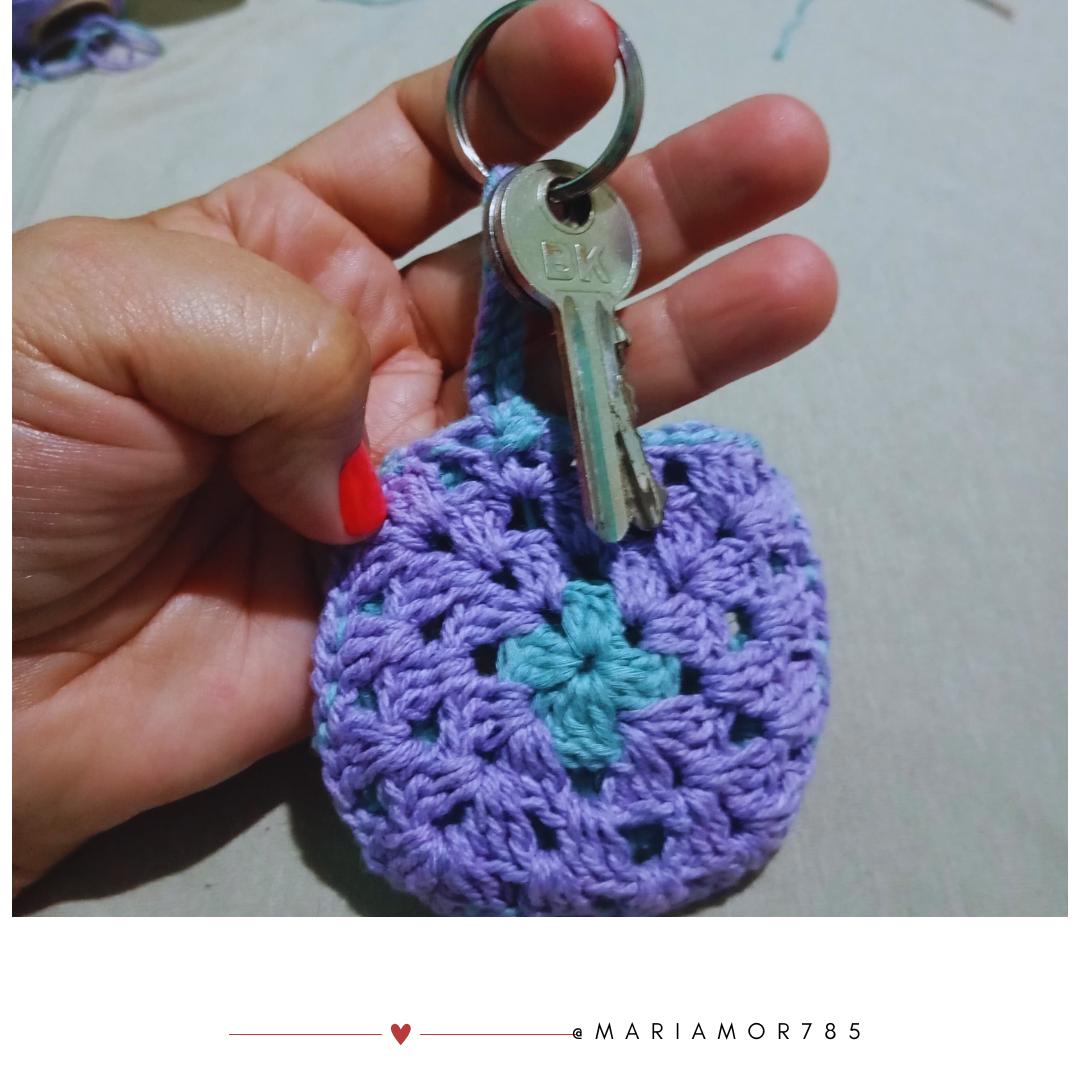
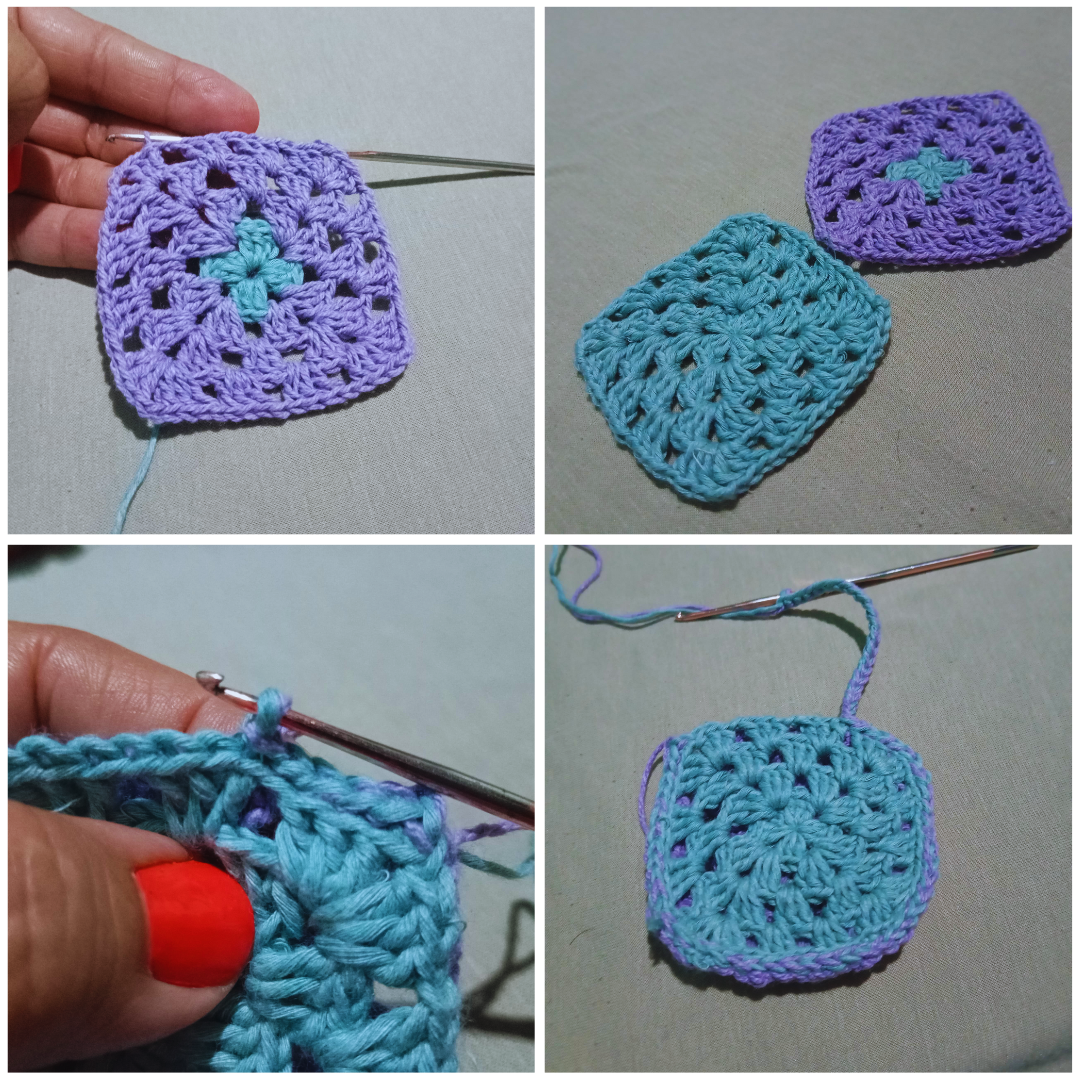
5.- We will make two pieces of grannys, one unicolor piece and the other combined, cut the excess threads, begin to join the pieces with single stitches, we will leave an opening, where we will raise about twenty chain stitches, and we will follow each side with single crochet and close, cut, and place the keys.
5.- Haremos dos piezas de grannys, una pieza unicolor y otra combinada, cortar los excedentes de los hilos, comenzar a unir con puntos rasos las piezas, dejaremos un abertura , donde levantaremos unos veinte puntos de cadenetas, y seguiremos cada lado con punto raso y cerrar, cortar, y colocar las llaves.
Work completed//Trabajo finalizado