This post is both in English and Spanish, you can go directly to english by clicking [HERE](#english)
¡Hola hivers!💜
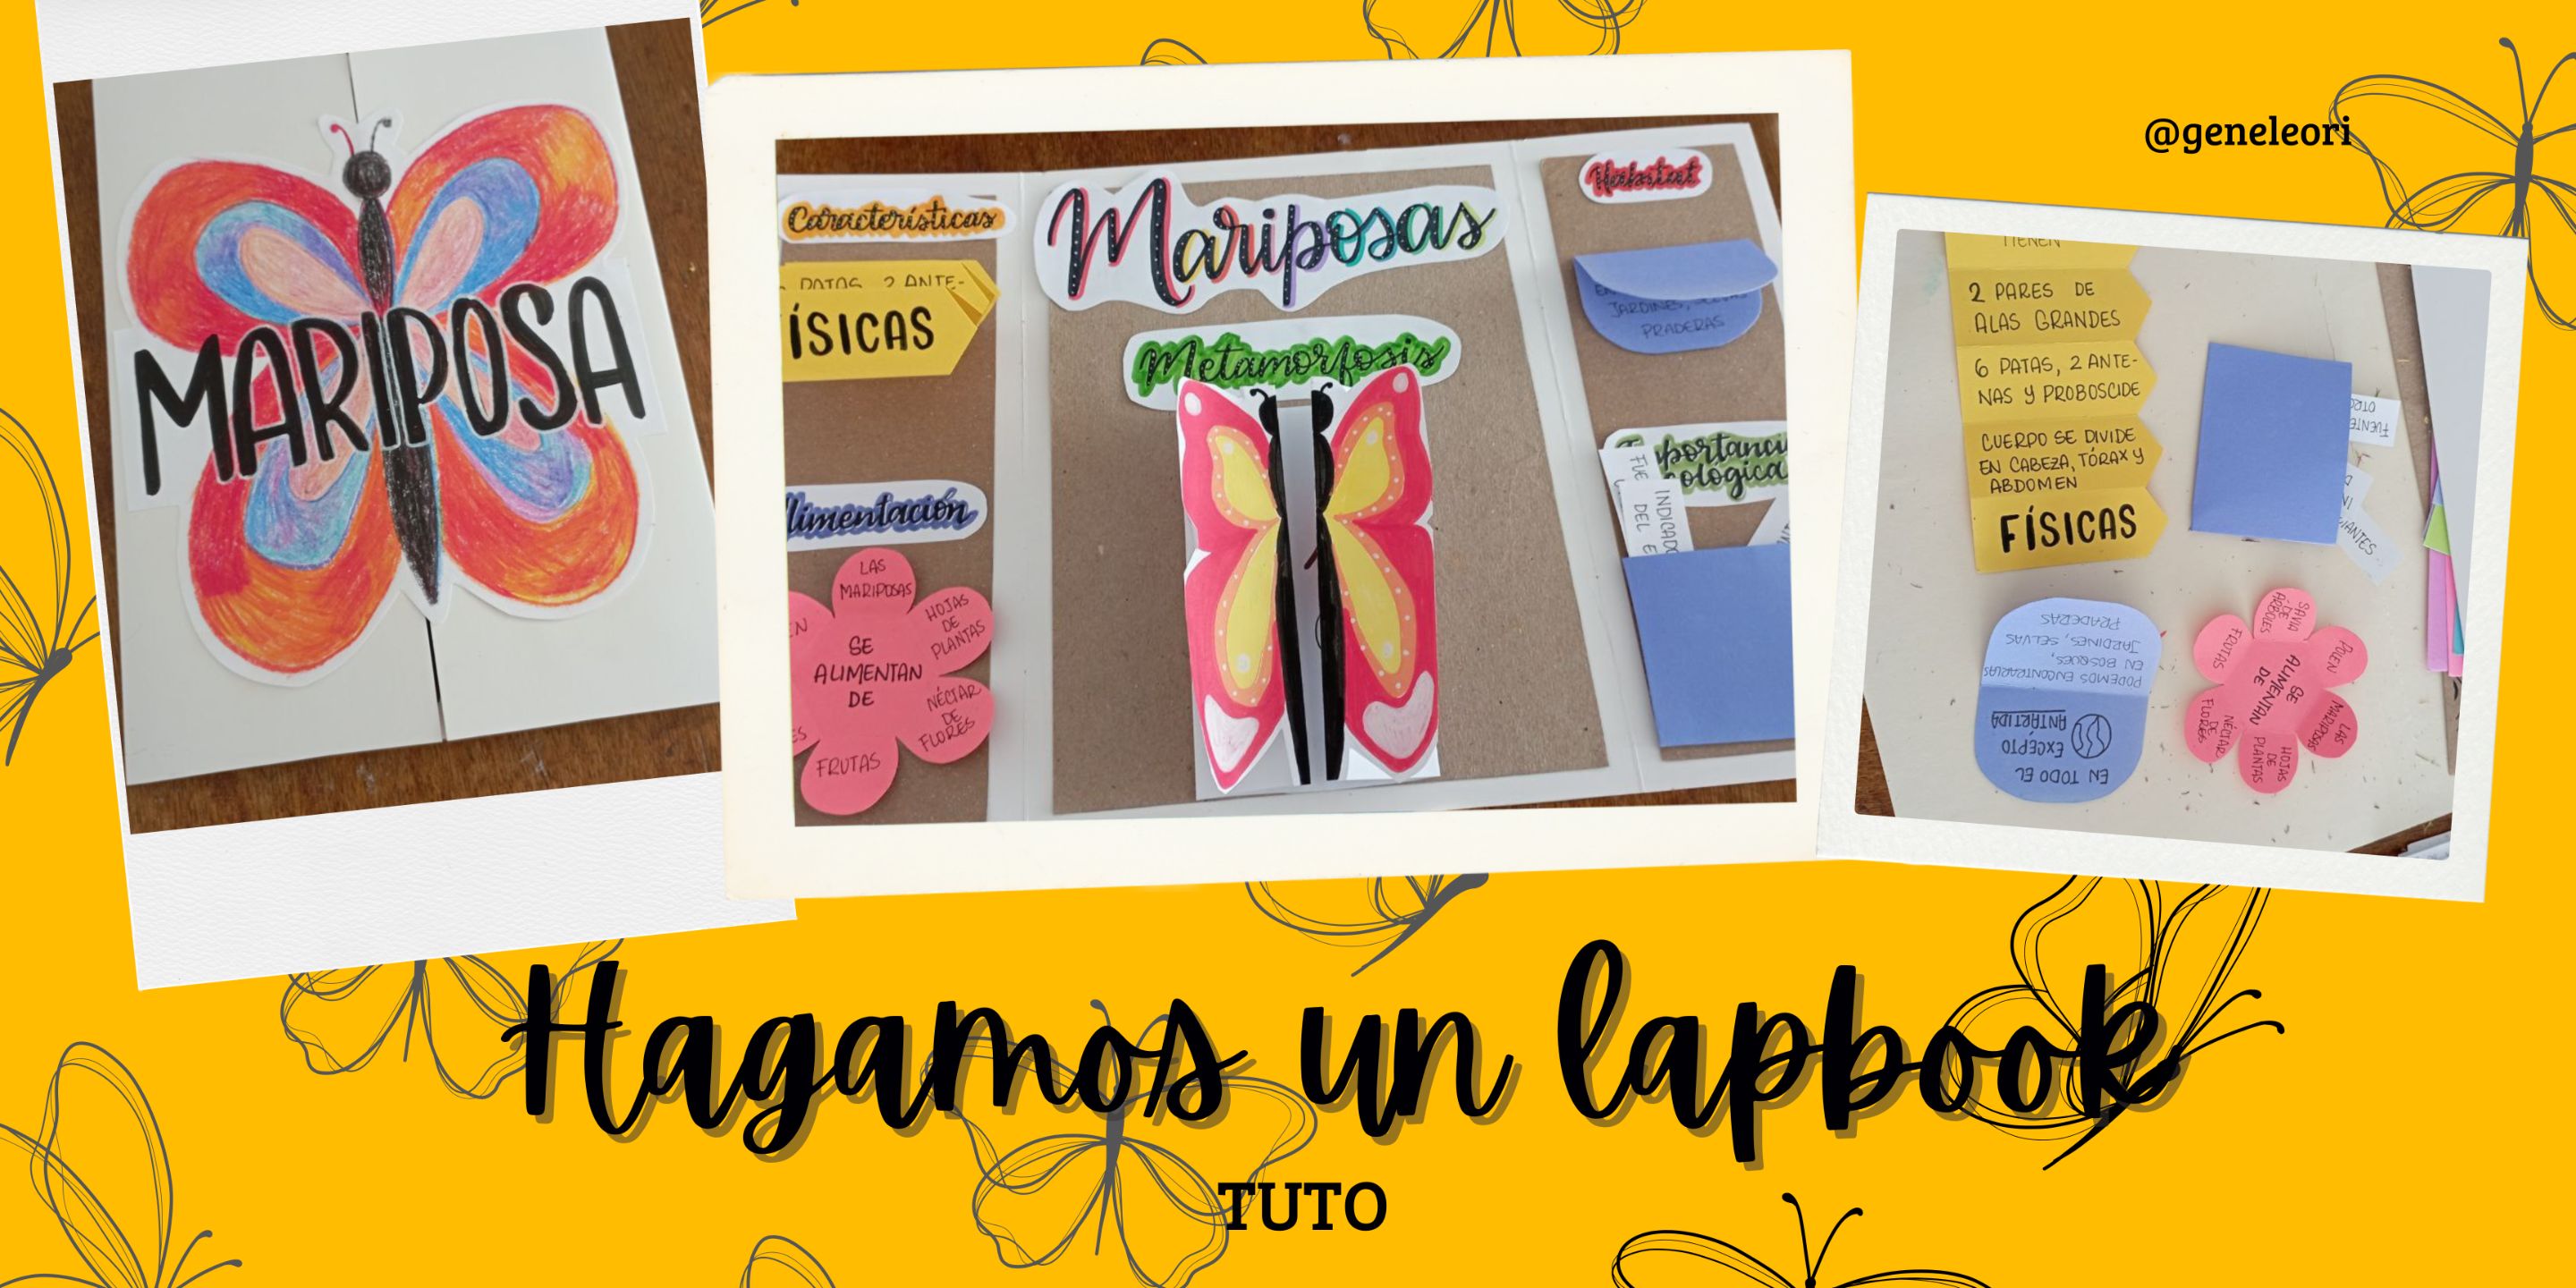
Espero que se encuentren bien y felices. En los colegios se ha puesto muy de moda hacer lapbook para presentar exposiciones de diversos temas. Me parece muy curioso lo genial que son, ya que hay muchas formas de decorarlos por lo que puedes encontrar desde el más sencillo al más complejo lleno de decoraciones y figuras desplegables. Me surgió la oportunidad de hacer uno sobre un tema bonito como lo son las mariposas, así que te cuento como fue el proceso:
**MATERIALES**
Cartulina sulfatada
Cartulina de colores
Tijera
Lápiz
Goma
Regla
Crayones, marcadores, colores o lo que tengas a la mano para dibujar
Marcador negro
Pega en barra o silicone frio
**PASO A PASO**
PASO 1
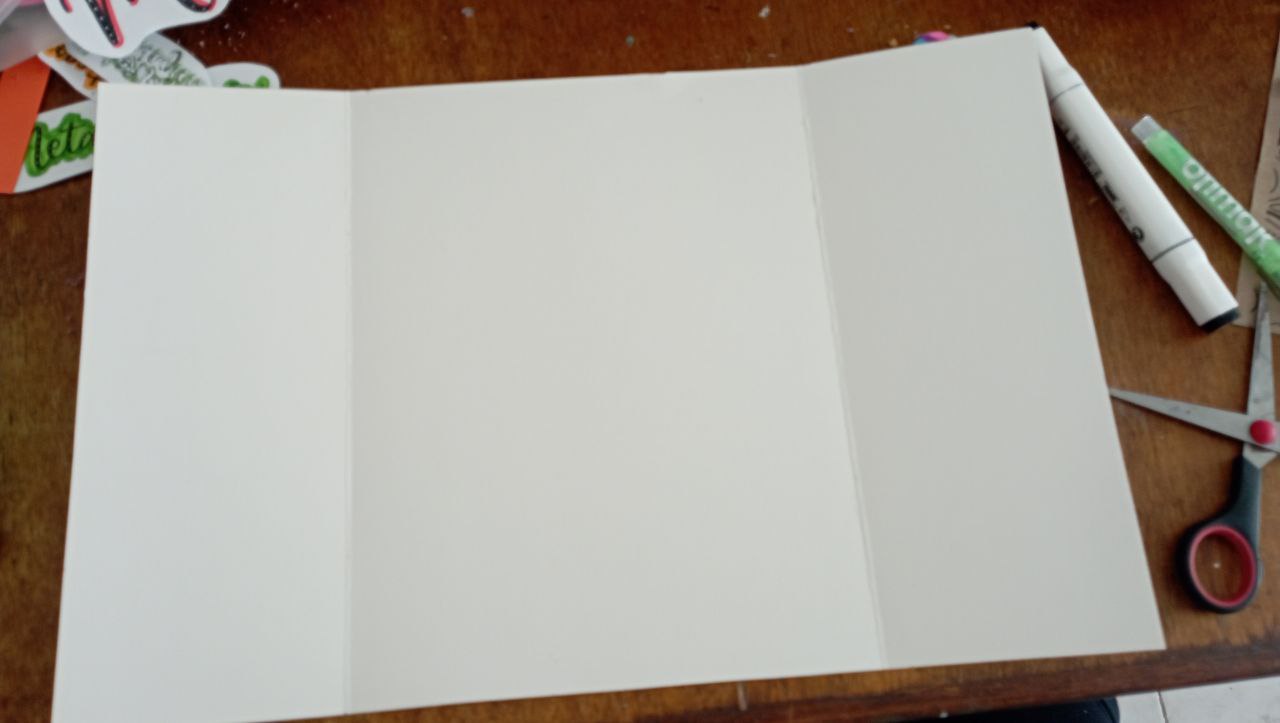
Lo primero es hacer la base. Para esto use la cartulina sulfatada cortándola con las medidas de 40 cm de ancho por 26 cm de alto. De una vez trace las divisiones de las solapas con la regla: 10 cm, 20 cm y 10 cm. Con ayuda de la misma regla doble las solapas y verifique que coincidieran en el centro cerrando así la parte central.
PASO 2
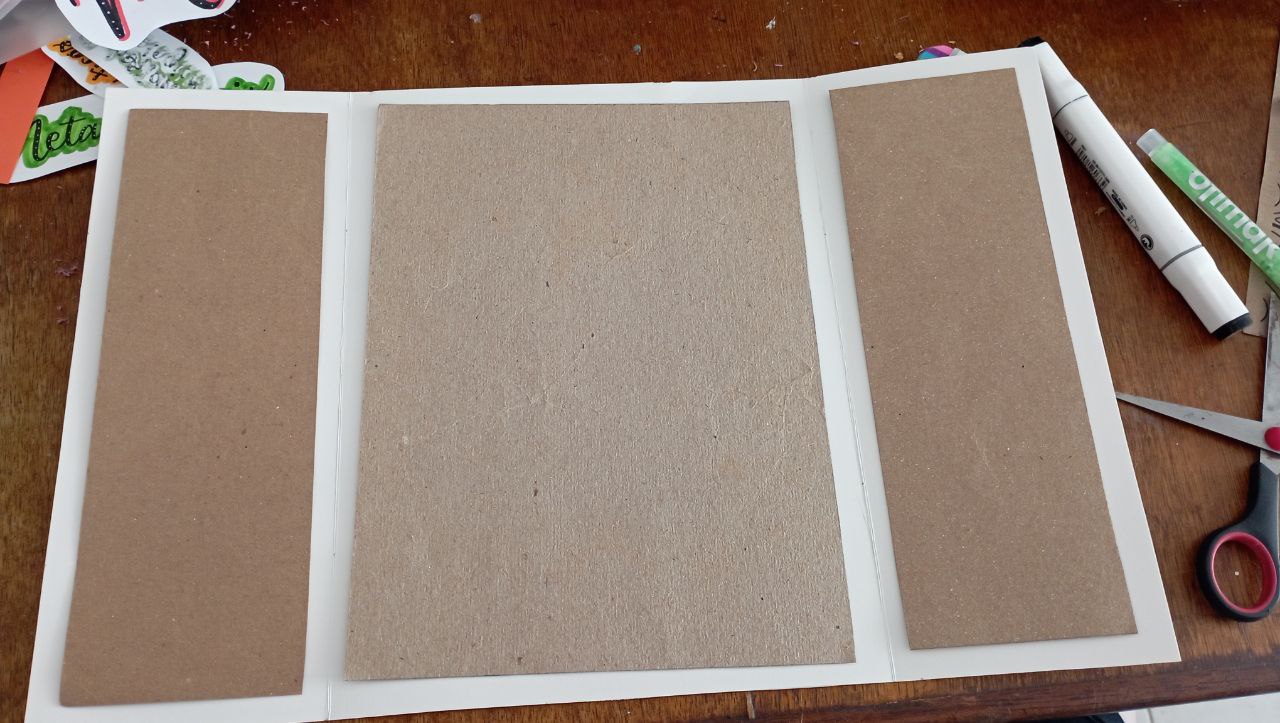
Como el fondo era blanco, decidí ponerle una cartulina de base a cada uno de los espacios. Encontré cartulina color kraft, así que corte 3 cartulinas: 2 de 8 cm de ancho x 24 de alto para las solapas y 1 de 18 cm de ancho por 24 cm de alto para la parte central. Las pegue en cada sitio.
PASO 3
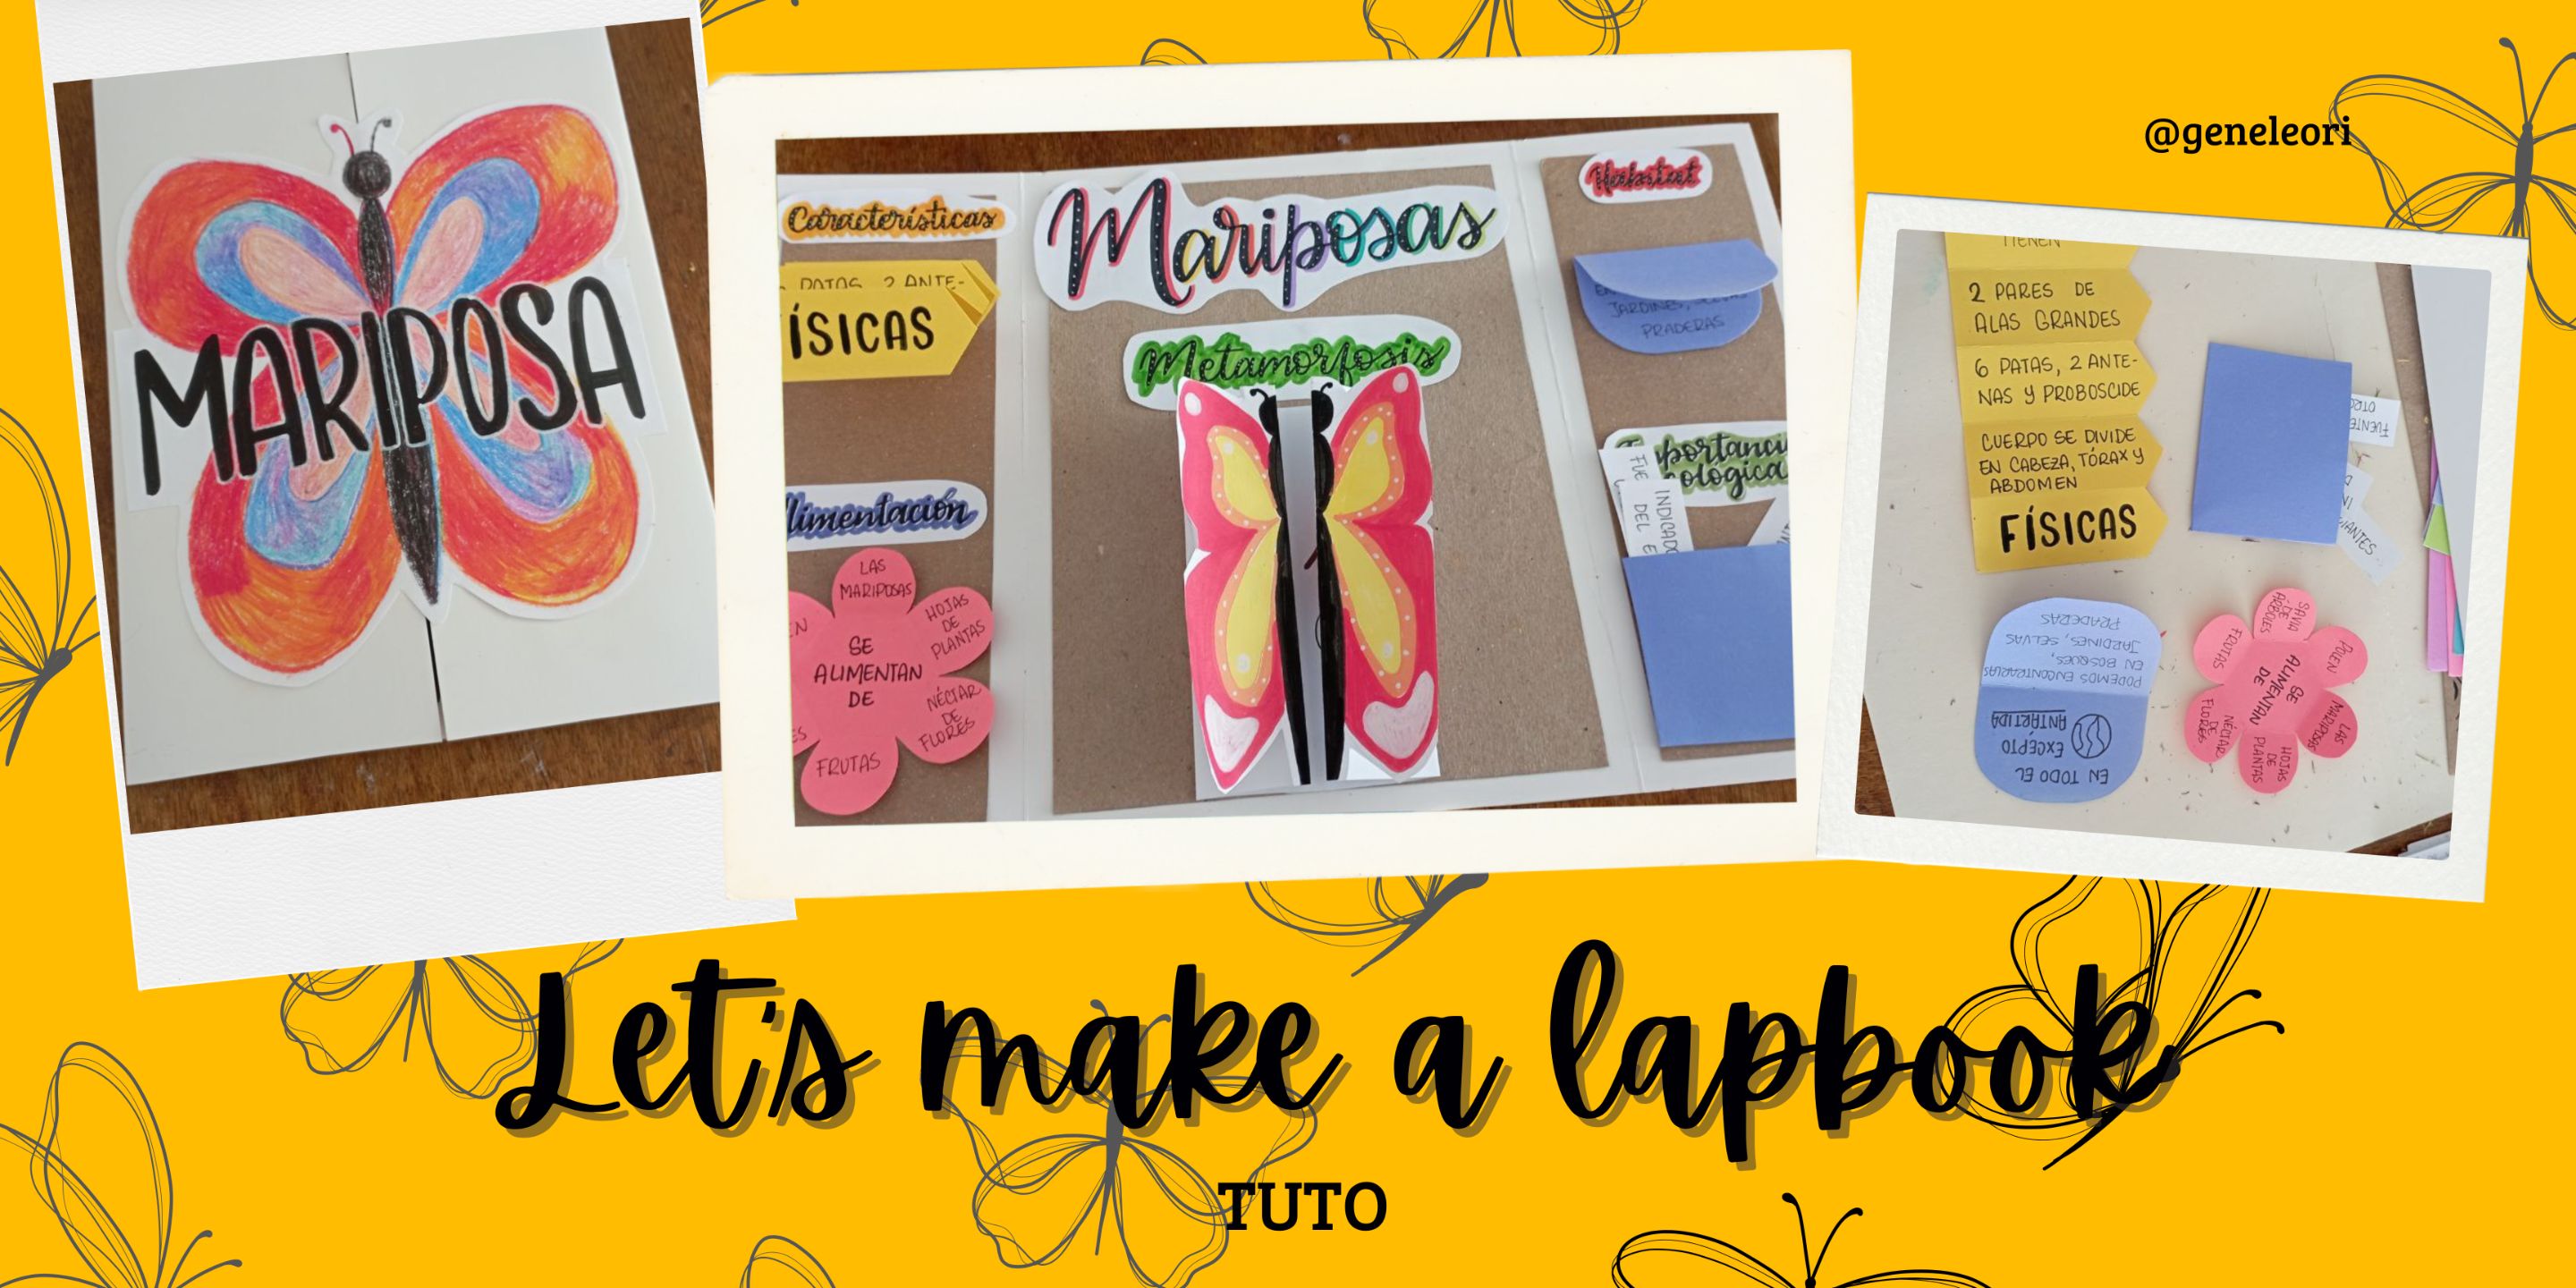
Hora de hacer los títulos y subtítulos internos. Para esto use cartulina blanca y marcadores. Me decidi por un estilo cursivo para todos los titulos y subtitulos, con la diferencia de que el titulo era de letras negras lo destaque con una sombra de multiples colores y puntos blancos, mientras que los subtitulos eran negros dentro de una nube de color, cada uno diferente para diferenciar cada subtitulo.
Una vez estuvieron listos, los recorte dejándoles un borde blanco y los pegue en su sitio.
PASO 4
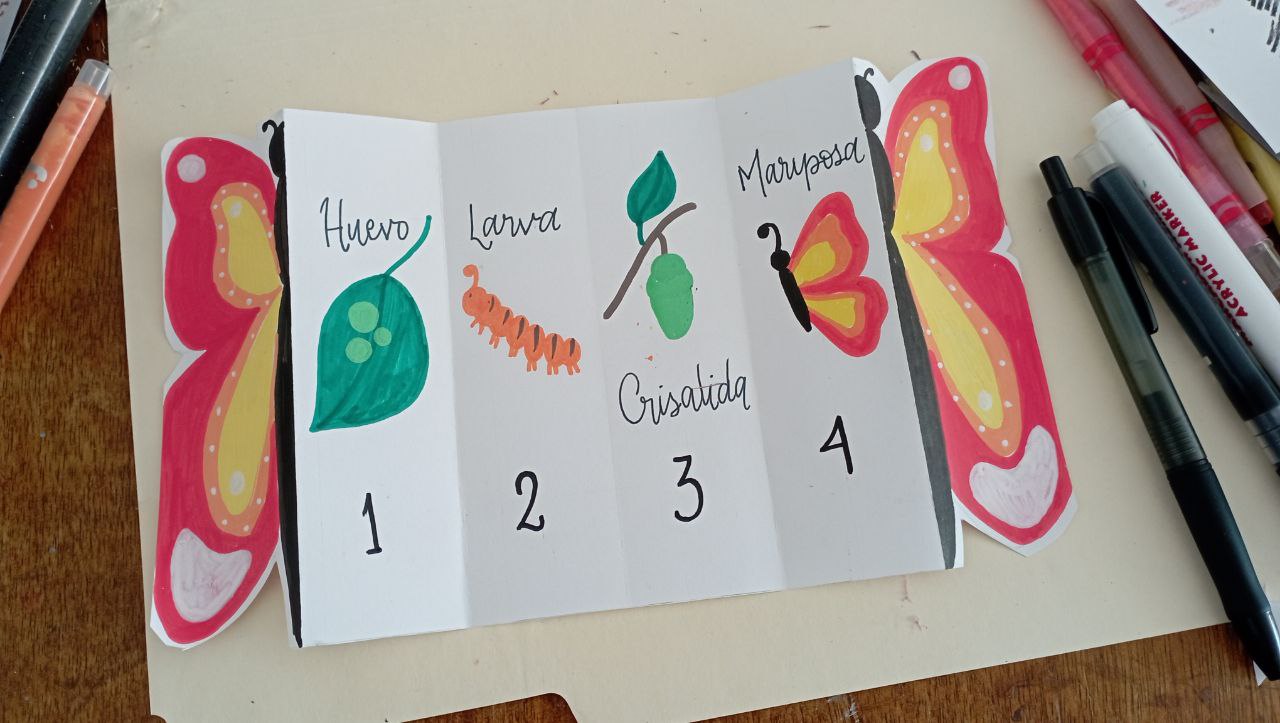
Con los títulos y subtítulos listos, era hora de trabajar con los desplegables. Como eran 5 subtemas, hice 5 desplegables con cartulina.
El primero fue una especie de acordeón con forma de lápiz, donde puse las características físicas.
El siguiente fue una especie de flor que se puede cerrar para la alimentación.
Otro fue medio círculo para hablar de los hábitats y distribución.
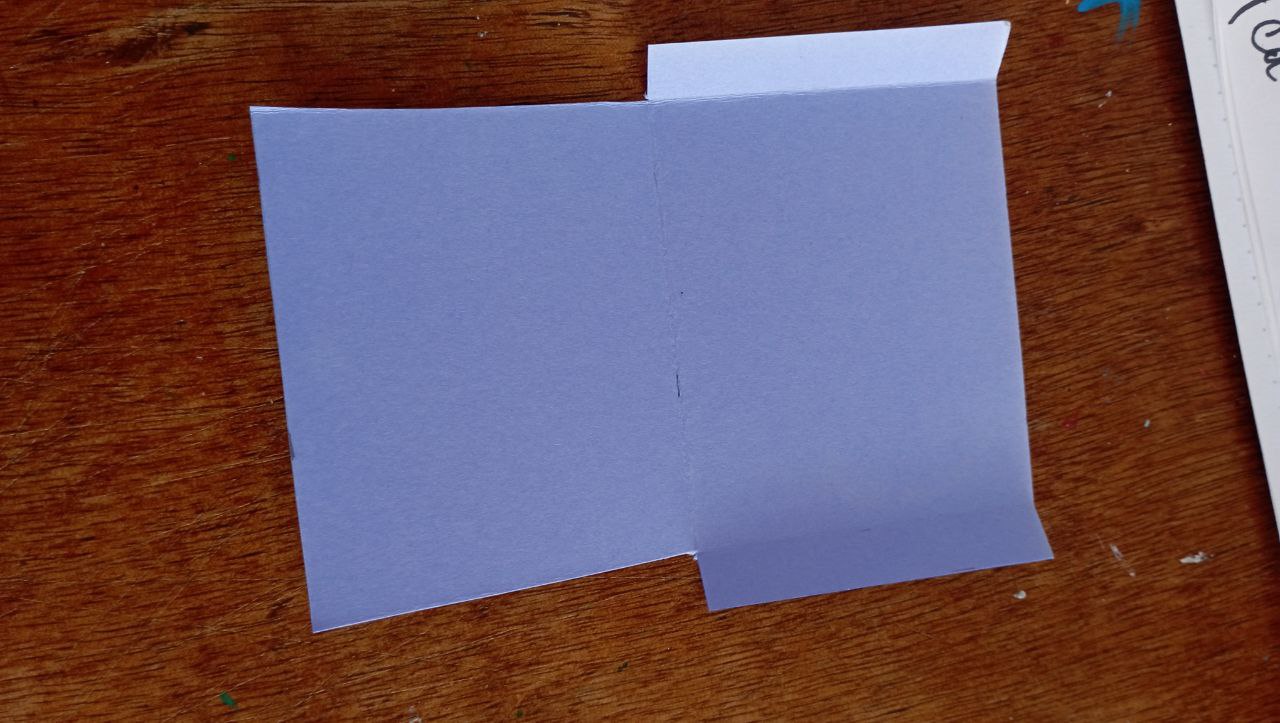
Un bolsillo para la importancia ecológica.
Y para la metamorfosis fue una tira con todos los estadios de la mariposa, que logre cerrar en las puntas con una mariposa.
Para hacer cada uno primero hice un molde en papel, intente que los de las solapas midieran 8 cm o menos para que pudieran encajar en el lapbook, mientras que el del centro si mide unos 20 centímetros, pero como era acordeón, solo unos 10 centimetros estarian pegados. Una vez estuvieron recortados, me encargué de rellenarlos con la información pertinente para poder pegarlos.
PASO 5
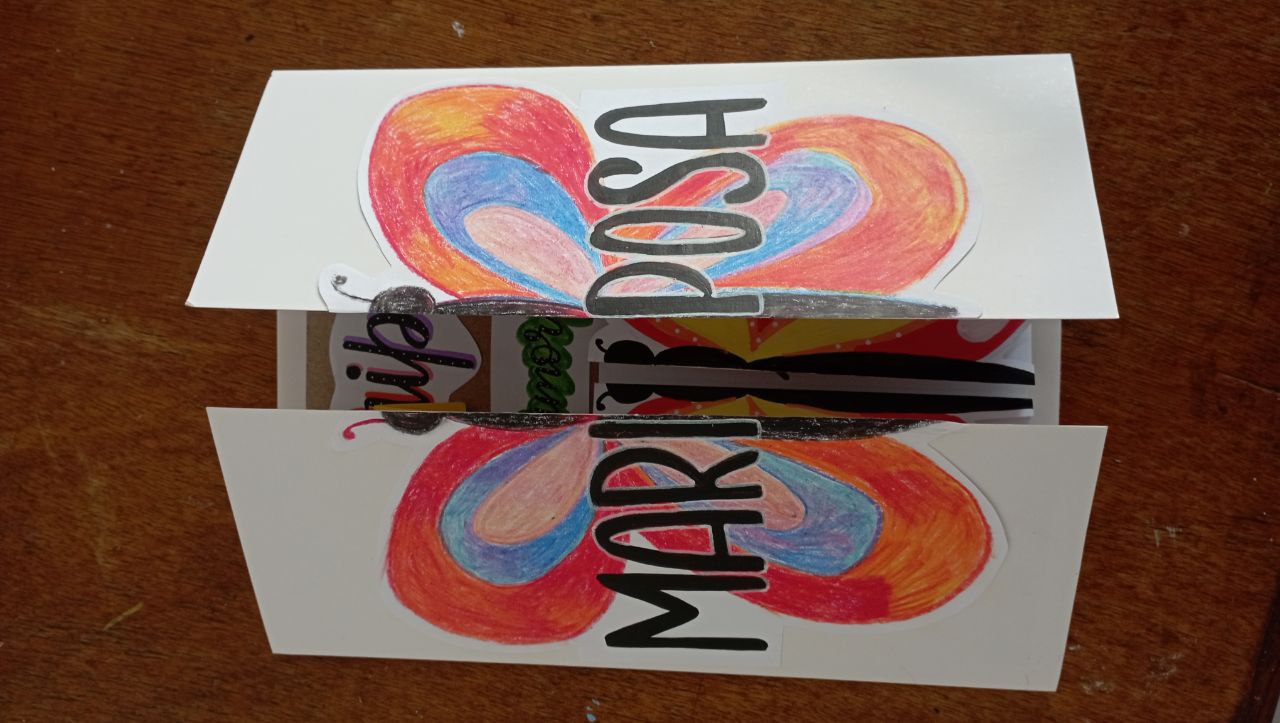
Toca hacer la portada, así que decidí hacer una mariposa que en el centro tuviera la palabra mariposa, la hice con las medidas de unos 24 cm de alto por 19 de ancho. Quería que fuera colorida, pero como no decía que colores usar ya que quería que fuera multicolor, recordé que tenía unos crayones que en cada uno tienen varios colores, así que pensé que le daría el efecto perfecto.
Para hacer las letras use un estilo sans serif y un marcador de pintura acrílica, ya que no cualquier marcador iba a cubrir a los crayones y los únicos detalles que puse fue que delineé las letras en blanco para que se diferenciarán del fondo y les puse puntos.
PASO 6
Con la imagen de la portada lista, solo me quedo pegarla haciendo lo posible en que quedará centrada. Obviamente no se podía abrir ya que la imagen sellaba la abertura, así que espere a que secara el pegamento para con ayuda de una tijera cortarlo por la mitad, siguiendo la línea de la abertura.
PASO 7
¡Lapbook de mariposas listo!
Este proyecto representó un reto por todas las formas que tuve que aprender a hacer para poder diseñar los desplegables, además de que tuve que ser cuidadosa de que las medidas cuadraran y así los desplegables no tropezaran. Del resto fue muy divertido diseñarlo, recortar, pegar y dibujar para lograr tan bonita obra. Quedaron contentos con los resultados. Cuéntame, ¿has hecho un lapbook antes?
Gracias por leerme
Con cariño, G.
English
Hi hivers! 💜
I hope you are well and happy. In schools it has become very fashionable to make lapbook to present exhibitions of various topics. I find it very curious how great they are, since there are many ways to decorate them so you can find from the simplest to the most complex full of decorations and folding figures. I had the opportunity to make one on a beautiful theme such as butterflies, so I'll tell you how the process went:
**MATERIALS**
Sulfated cardboard
Colored cardboard
Scissors
Pencil
Eraser
Ruler
Crayons, markers, colors or whatever you have on hand to draw with
Black marker
Glue stick or cold silicone
**STEP BY STEP**
STEP 1
The first thing to do is to make the base. To do this, use the cardboard cut with the measurements of 40 cm wide by 26 cm high. Trace the divisions of the flaps with the ruler: 10 cm, 20 cm and 10 cm. With the help of the same ruler fold the flaps and verify that they coincide in the center, thus closing the central part.
STEP 2
Since the background was white, I decided to put a cardboard base for each of the spaces. I found kraft colored cardboard, so I cut 3 pieces of cardboard: 2 of 8 cm wide x 24 cm high for the flaps and 1 of 18 cm wide by 24 cm high for the central part. Glue them in each place.
STEP 3
Time to make the internal titles and subtitles. For this I used white cardstock and markers. I decided on a cursive style for all the titles and subtitles, with the difference that the title was in black letters and I highlighted it with a multi-colored shadow and white dots, while the subtitles were black within a cloud of color, each one different to differentiate each subtitle.
Once they were ready, I cut them out leaving a white border and glued them in place.
**STEP 4
With the titles and subtitles ready, it was time to work with the foldouts. Since there were 5 subtopics, I made 5 foldouts with cardboard.
The first one was a kind of accordion shaped like a pencil, where I put the physical characteristics.
The next one was a kind of flower that can be closed for feeding.
Another was a half circle to talk about habitats and distribution.
A pocket for ecological importance.
And for metamorphosis was a strip with all the stages of the butterfly, which I managed to close at the ends with a butterfly.
To make each one I first made a paper mold, I tried to make the flaps ones measure 8 cm or less so they could fit in the lapbook, while the center one measured about 20 centimeters, but as it was an accordion, only about 10 centimeters would be glued. Once they were cut out, I took care of filling them with the pertinent information to be able to glue them.
STEP 5
It's time to make the cover, so I decided to make a butterfly with the word butterfly in the center, I made it with the measures of about 24 cm high by 19 cm wide. I wanted it to be colorful, but as it didn't say what colors to use since I wanted it to be multicolored, I remembered that I had some crayons that have several colors in each one, so I thought it would give the perfect effect.
To make the letters I used a sans serif style and an acrylic paint marker, since not just any marker was going to cover the crayons and the only details I put was that I outlined the letters in white so they would stand out from the background and I put dots on them.
**STEP 6
With the cover image ready, I just had to glue it, doing my best to make sure it would be centered. Obviously it could not be opened since the image sealed the opening, so I waited for the glue to dry and with the help of a scissors I cut it in half, following the line of the opening.
**STEP 7
Butterfly lapbook ready!
This project was a challenge because of all the shapes I had to learn to make in order to design the foldouts, plus I had to be careful to make sure the measurements matched so the foldouts wouldn't get tripped up. The rest was a lot of fun to design, cut, glue and draw to achieve such a beautiful work. They were very happy with the results. Tell me, have you ever made a lapbook before?
Thank you for reading me
With love, G..