Hive learner is a wonderful platform to share knowledge and experience. I found many useful programming relevant lectures here. so I decided to start an IoT automation and robotics course here. This is my first Post and I and going to describe the ESP32 Microcontroller and the way to add character LCD with esp32. before practical this, Make sure you have these pre-Require things
- Basic C/C++ programming Knowledge
- Basic Electronics Knowledge
- Arduino Nightly IDE usage
- Laptop and PC

Components
| Component | Qty | Purchase Link |
|---|---|---|
| ESP32 Microcontroller | 1 | Aliexpress |
| 20x4 LCD with IIC | 1 | Aliexpress |
| Jumper Wire | 4 | Aliexpress |
| USB cable | 1 | |
About ESP32
ESP32 is a low-cost, low-power system-on-a-chip microcontroller family featuring built-in Wi-Fi Bluetooth. it's a very popular MCU nowadays. ESP32 has 512KB ram and a dual-core processor. with all these features its cost is only about 4 to 5$. this microcontroller is very flexible and has the ability to communicate with almost all sensor devices. here is the pinout of this microcontroller

As this is my first lecture. I am not going into detail we will cover it in the later lectures
Working Steps
we are going to connect our LCD to ESP32 with IIC protocol
IIC Protocol
I2C stands for the inter-integrated controller. This is a serial communication protocol that allows low-speed devices to be connected. It is a master-slave communication method in which several slaves may be connected and controlled by a single master. Each slave device has its own address in this case.
we will also discuss it in detail in our upcoming lectures. h
ere I mentioned just a short review
so let's start today's Work.
Initially, we have to install Arduino nightly IDE for programming below I mentioned the link to download Arduino nightly
Arduino IDE download
after downloading open the Arduino nightly and install ESP32 Board
here is an easy tutorial link for board installation

After installing Board we are ready to program our microcontroller. connect microcontroller with PC and make sure driver is installed from device manager. if driver is missing you can download it from here
download Driver
After checking the driver make sure you are working on the same COM Port.
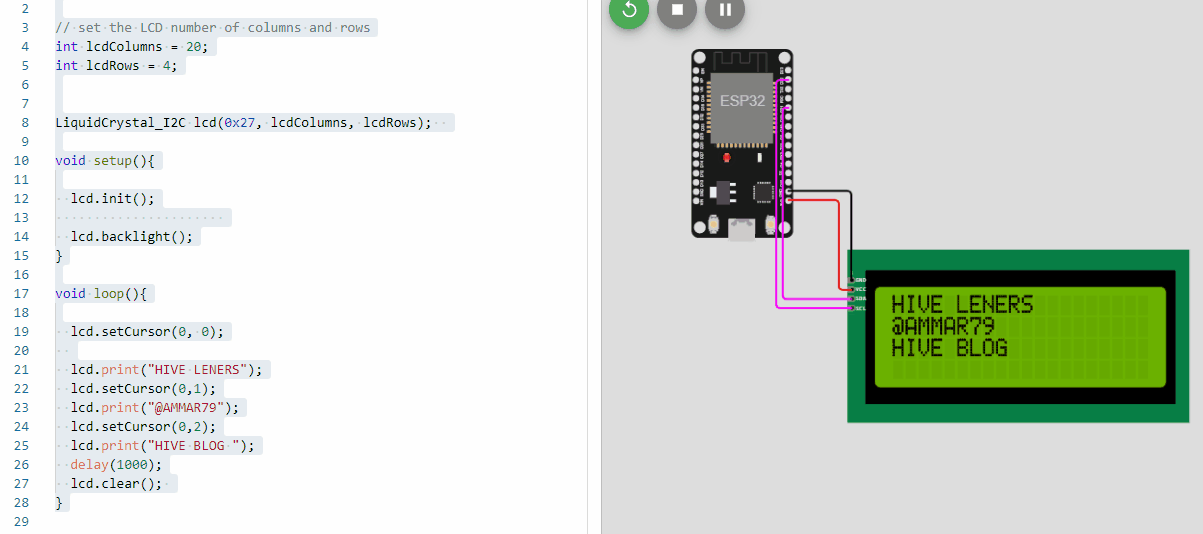
Now its time to write code
#include "LiquidCrystal_I2C.h"
int lcdColumns = 20;
int lcdRows = 4;
LiquidCrystal_I2C lcd(0x27, lcdColumns, lcdRows);
void setup(){
lcd.init();
lcd.backlight();
}
void loop(){
lcd.setCursor(0, 0);
lcd.print("HIVE LENERS");
lcd.setCursor(0,1);
lcd.print("@AMMAR79");
lcd.setCursor(0,2);
lcd.print("HIVE BLOG ");
delay(1000);
lcd.clear();
}
its very simple code lets explore it line by line
#include "LiquidCrystal_I2C.h"
here we are adding the required library Named "LiquidCrystal_I2C.h" you cannot download it from library manager in Arduino IDE
int lcdColumns = 20;
int lcdRows = 4;
LiquidCrystal_I2C lcd(0x27, lcdColumns, lcdRows);
now here we are setting the LCD parameters our LCD has 20 column and 4 rows. in the next row we are calling the function pre-defined in the library to initialize the LCD
void setup(){
lcd.init();
lcd.backlight();
this is the setup part of the code, setup is the function in Arduino which execute only when the time when we start the microcontroller.
then I called the lcd.int function to initialize the LCD Display.
lcd.backlight(); function used to turn on the LED light of the LCD
void loop(){
lcd.setCursor(0, 0);
lcd.print("HIVE LENERS");
lcd.setCursor(0,1);
lcd.print("@AMMAR79");
lcd.setCursor(0,2);
lcd.print("HIVE BLOG ");
delay(1000);
lcd.clear();
}
in the next line, we have started the Loop. which always repeats its execution. here I want to blink the text so I write the program accordingly. in the first line, I have set the LCD cursor starting point which means my cursor is on 0 lines or 0 columns which are the first row and column
next, I printed our community name "HIVE LENERS"
then again I move to the second line by setting the cursor on the second row
and write My Hive ID "@ammar79 " and same next.
here I used "Delay" which will pause the execution for one second after that the LCD will be clear and display the same text again and so in
Connecting Diagram
here is the graphic schematic diagram you have to connect the same like diagram with jumper wires
Here is the pinout
| ESP32 PIN | LCD PIN |
|---|---|
| 3.3 | VCC |
| GND | GND |
| SDA | 21 |
| SCL | 22 |
here I Connected


After Proper Connection Just Upload the code to the microcontroller with Arduino IDE
Test this online without any Equipment
if you do have not any tools or equipment then you can use an online free simulator that acts like real its a good platform for learning here is the link of an online simulator
Online Simulator
if there is any question or misunderstanding please comment Below
Thanks for your time Good bye.