✨🪄✨🪄✨🪄✨🪄✨🪄✨🪄✨🪄✨🪄✨🪄
Hola amiguit@s artesanos ,cómo están ? Que planes tienen para su carnaval? Yo estoy con algunos proyectos de decoración al estilo Harry Potter para ambientar el cumpleaños de mi hermana con esta temática , así que me tocó pensarle que cositas podía hacer yo misma y con poco material que tuviera en casa , así que recordé que podía hacer unas varitas 🪄 como las que usan los magos en Harry Potter para efectos decorativos, y como es carnaval pues sirve para que las niñas se diviertan, también pensé en hacer unas plumas decorativos para la mesa ,y para completar también hice unas plumas de varios tamaños que quedarán bien bonitos en la mesa de cumpleaños, así que aquí le dejo las fotos del paso a paso.

✨Hojas blancas recicladas
✨Baras de silicón y pistola
✨Tijeras
✨pintura marrón de tela
✨Pintura negra de tela
✨Pintura dorada al frio
✨Pigmentos dorados
✨Pigmentos morados
✨Palitos de altura
✨Papel crepé blanco
Manos a la obra
English Version
✨🪄✨🪄✨🪄✨🪄✨🪄✨🪄✨🪄✨🪄✨🪄
Hello artisan friends, how are you? What plans do you have for your carnival? I am working on some Harry Potter style decoration projects to decorate my sister's birthday with this theme, so I had to think about what things I could do myself with little material that I had at home, so I remembered that I could make some wands 🪄 like the ones the wizards use in Harry Potter for decorative effects, and since it's carnival it serves for the girls to have fun, I also thought about making some decorative feathers for the table, and to complete I also made some feathers of various sizes that will look really nice on the birthday table, so here are the step-by-step photos.
✨Recycled white sheets
✨Silicone sticks and gun
✨Scissors
✨Brown fabric paint
✨Black fabric paint
✨Cold gold paint
✨Gold pigments
✨Purple pigments
✨High sticks
✨White crepe paper
Let's get to work

 |  |  |
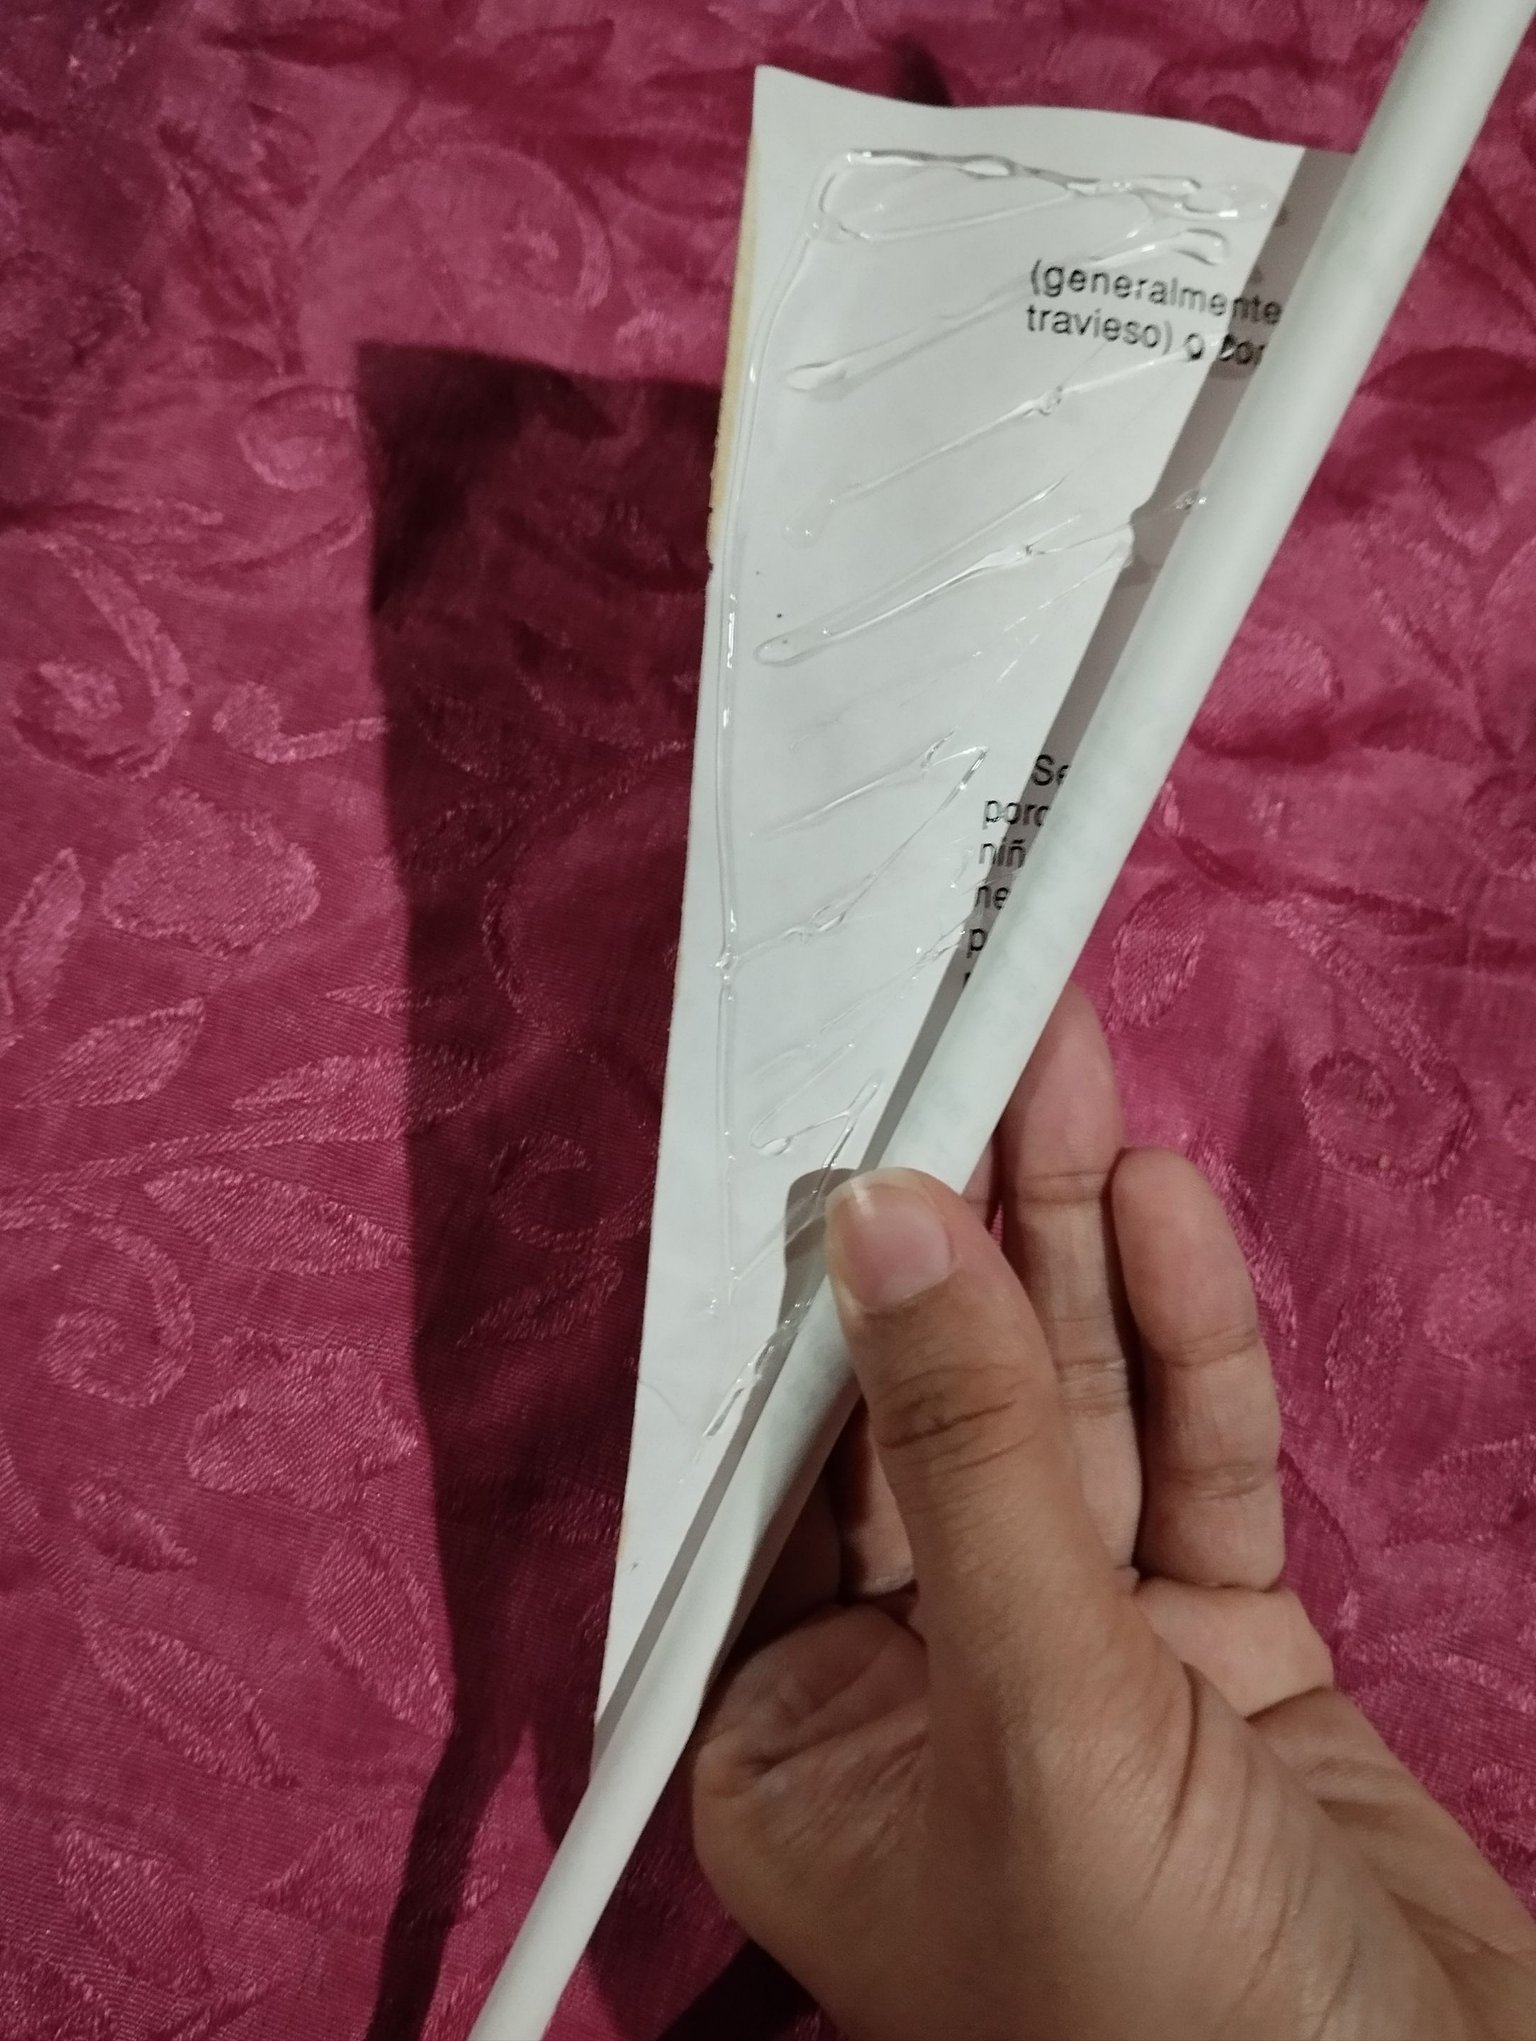 |  |
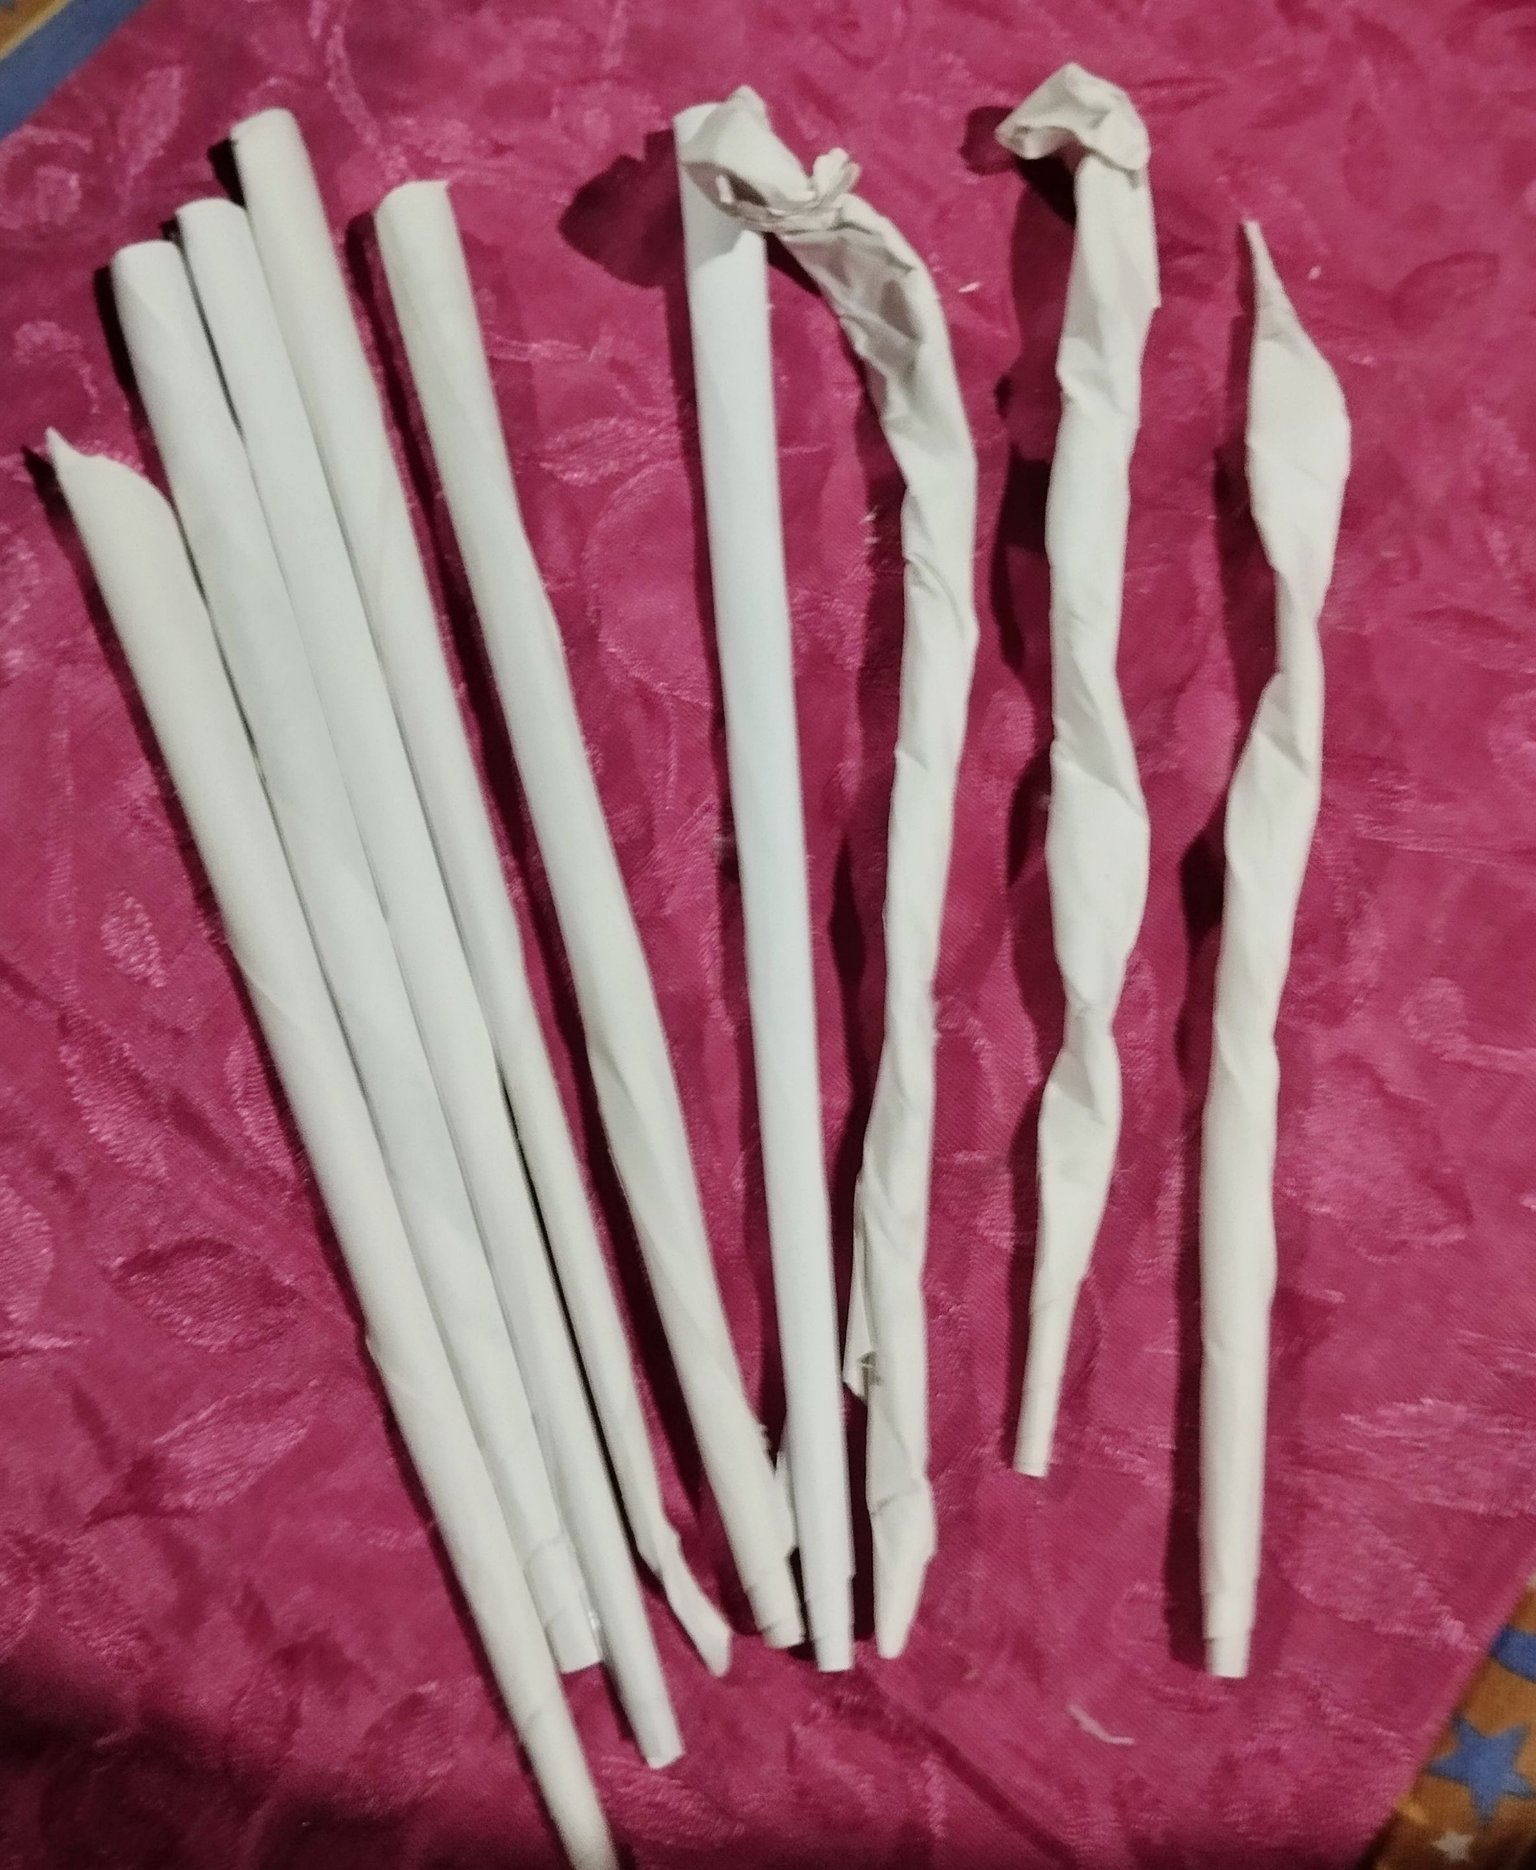
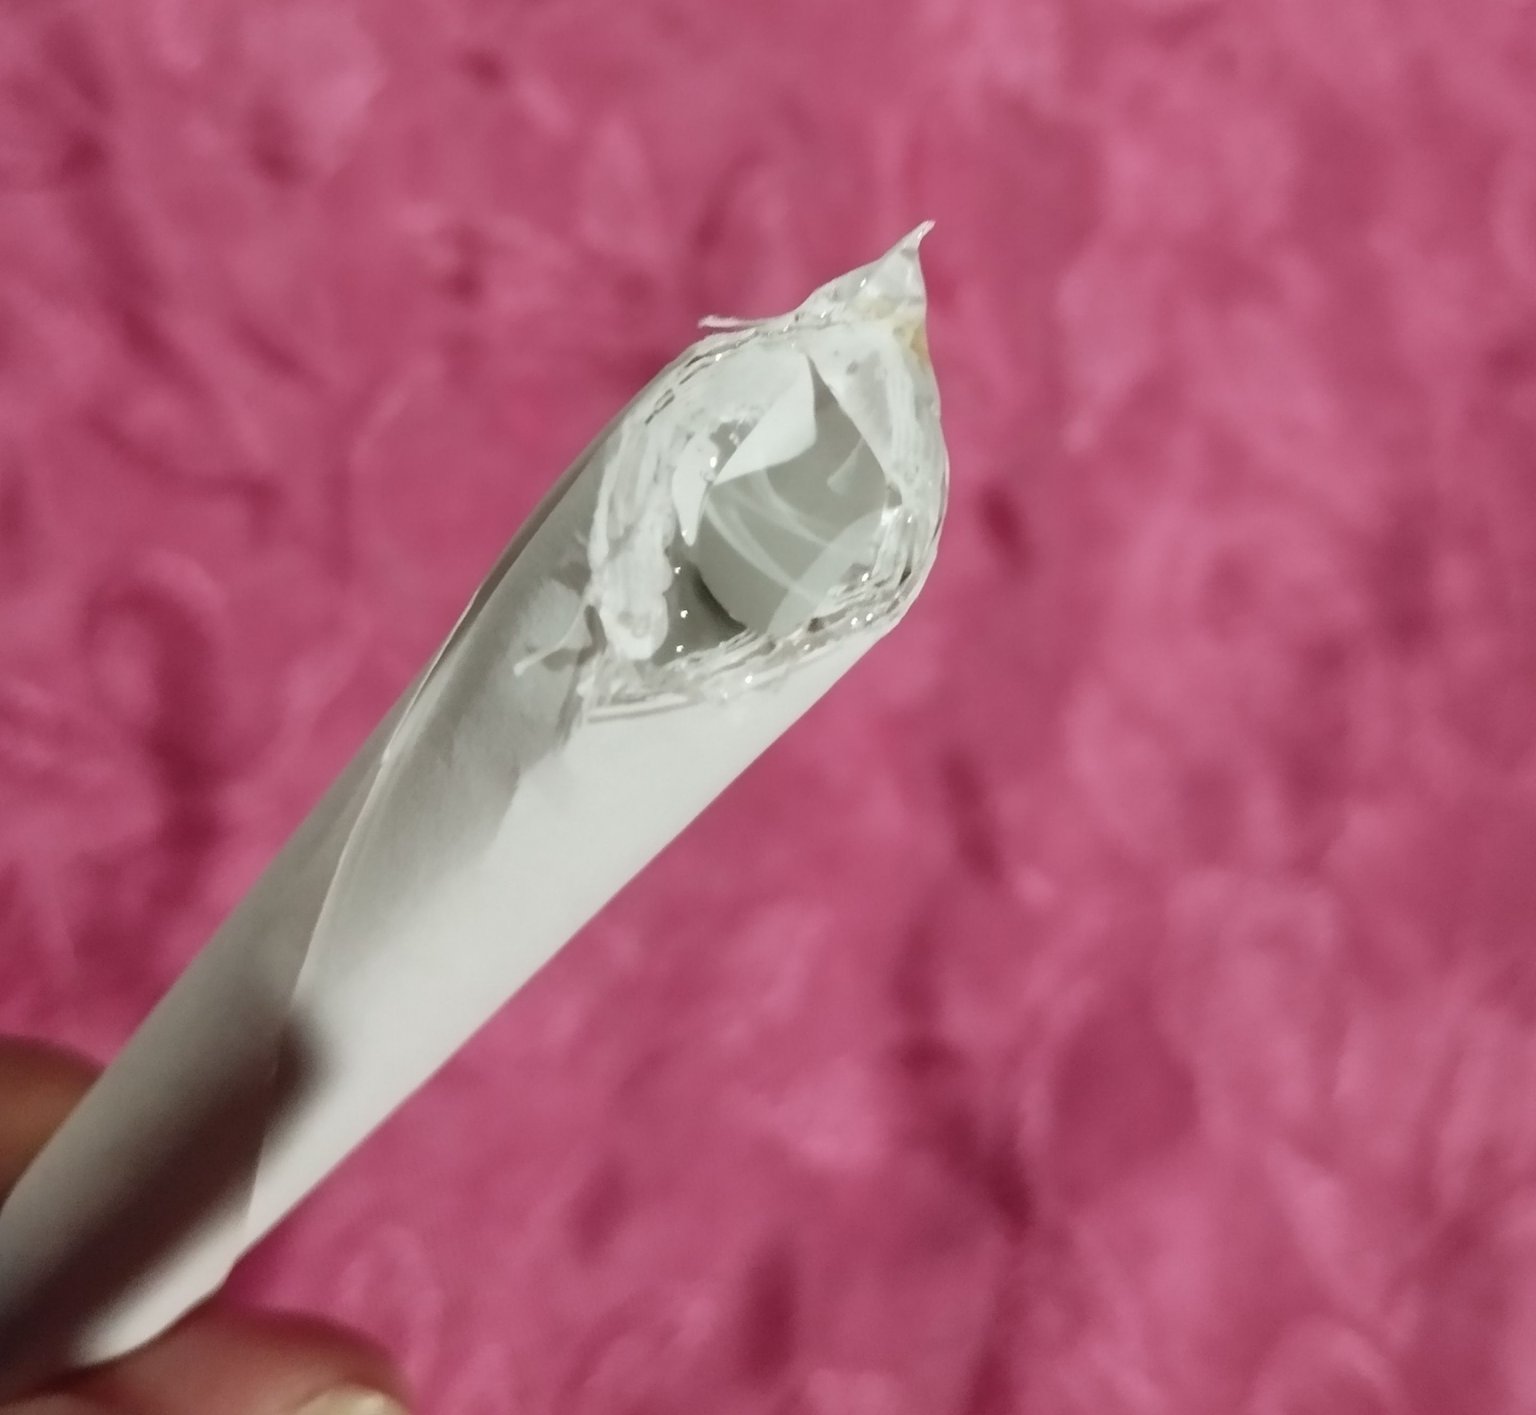
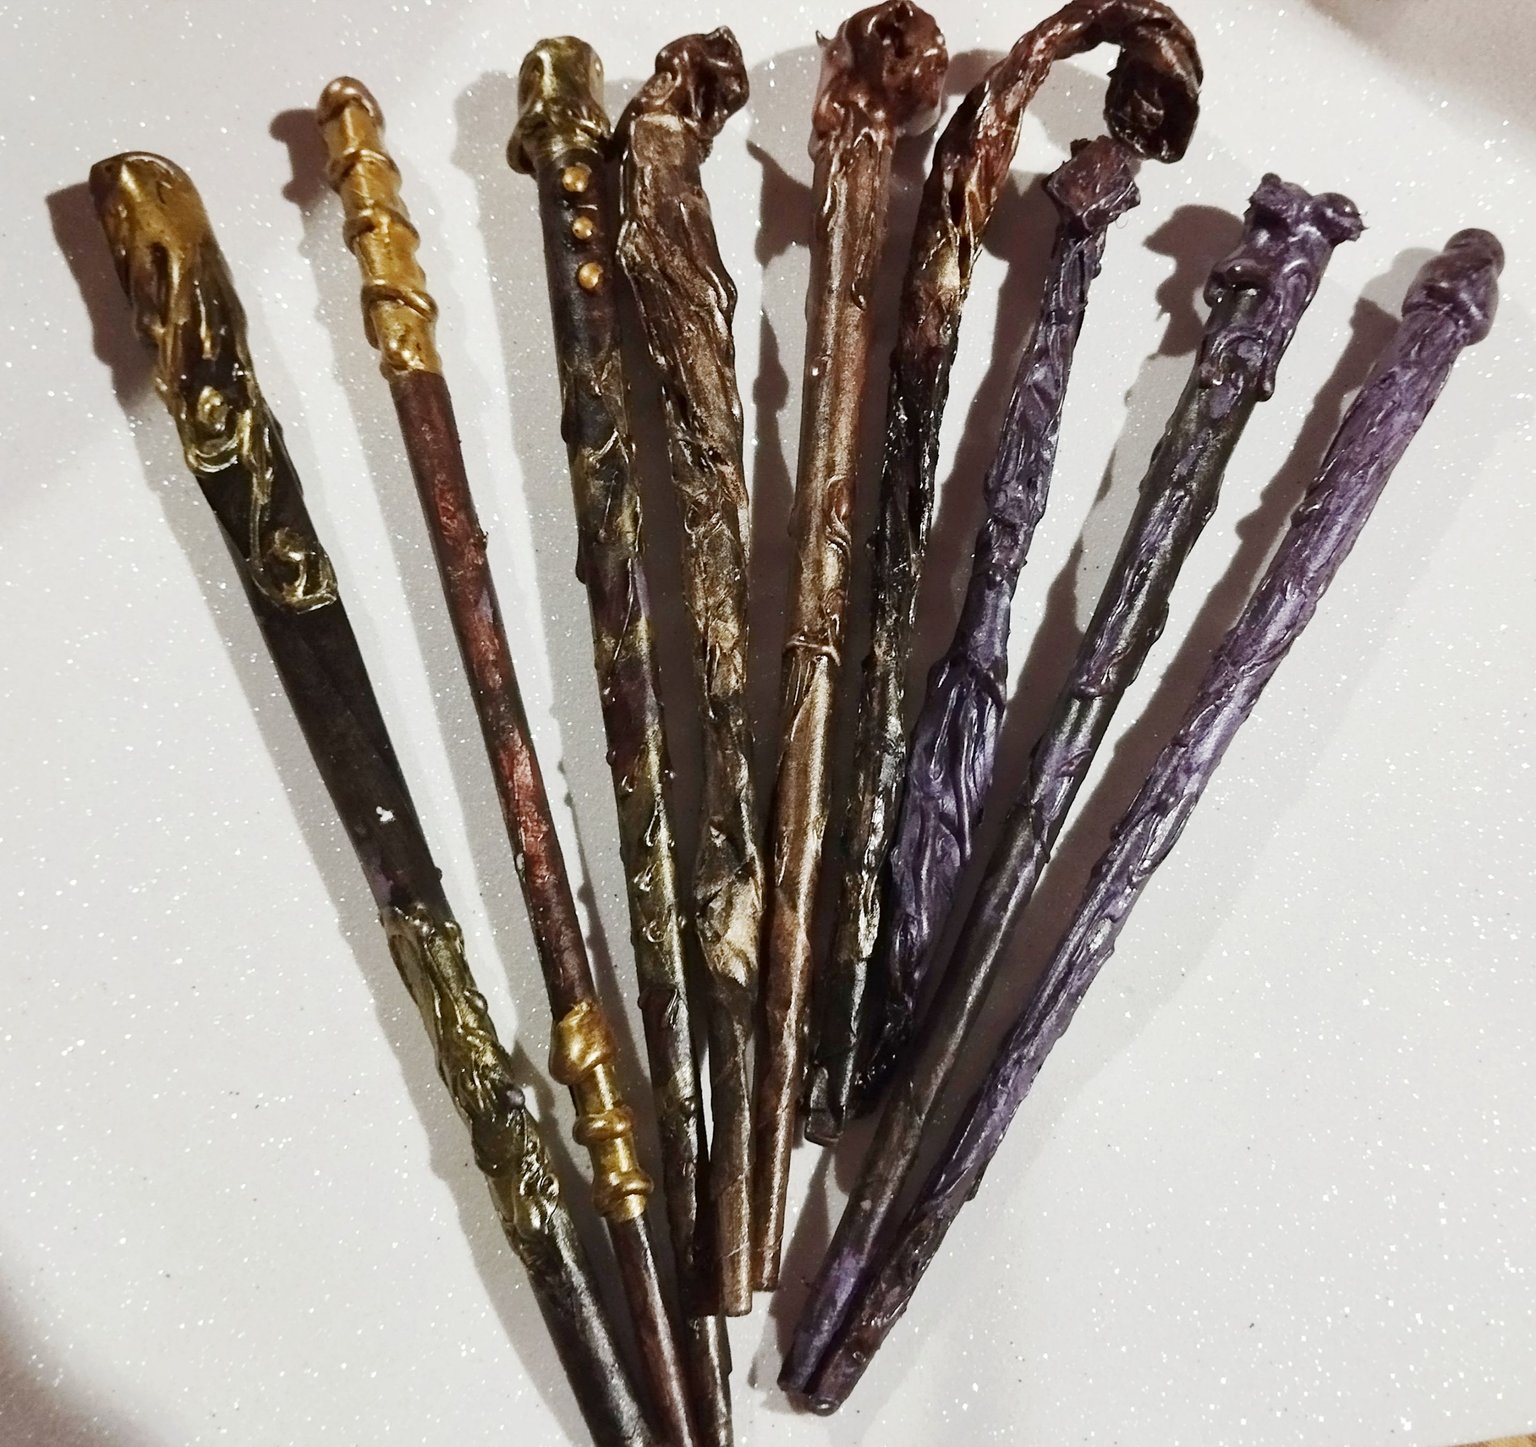
#1 Para el paso #1 tomaremos una hoja tamaño carta ,podemos usar hojas recicladas ,la idea es ir enrrollando desde una esquina ,ir enrrollando todo haciendo un cilindro tipo pitillo/pajitas , en el extremo que va quedando antes de terminar de enrrollar toda la hoja ,agregas silicón caliente para que cuando termines de enrrollar quede bien sellado,este pitillo de papel quedara más fino en la punta y más grueso en la parte superior. Hice nueve varitas de papel y tome tres y las torsí para darle un efecto más tenebroso como las caritas de los mortífagos o la de bellatrix , la idea es que tuvieran un aspecto "tenebroso".
English Version
#1 For step #1 we will take a letter-sized sheet of paper, we can use recycled sheets, the idea is to roll it up from one corner, rolling everything up making a straw-like cylinder, at the end that remains before finishing rolling the entire sheet, you add hot silicone so that when you finish rolling it is well sealed, this paper straw will be thinner at the tip and thicker at the top.I made nine paper wands and took three and twisted them to give it a more spooky effect like the faces of the Death Eaters or Bellatrix, The idea was that they had a "dark" look.
 |  |  |
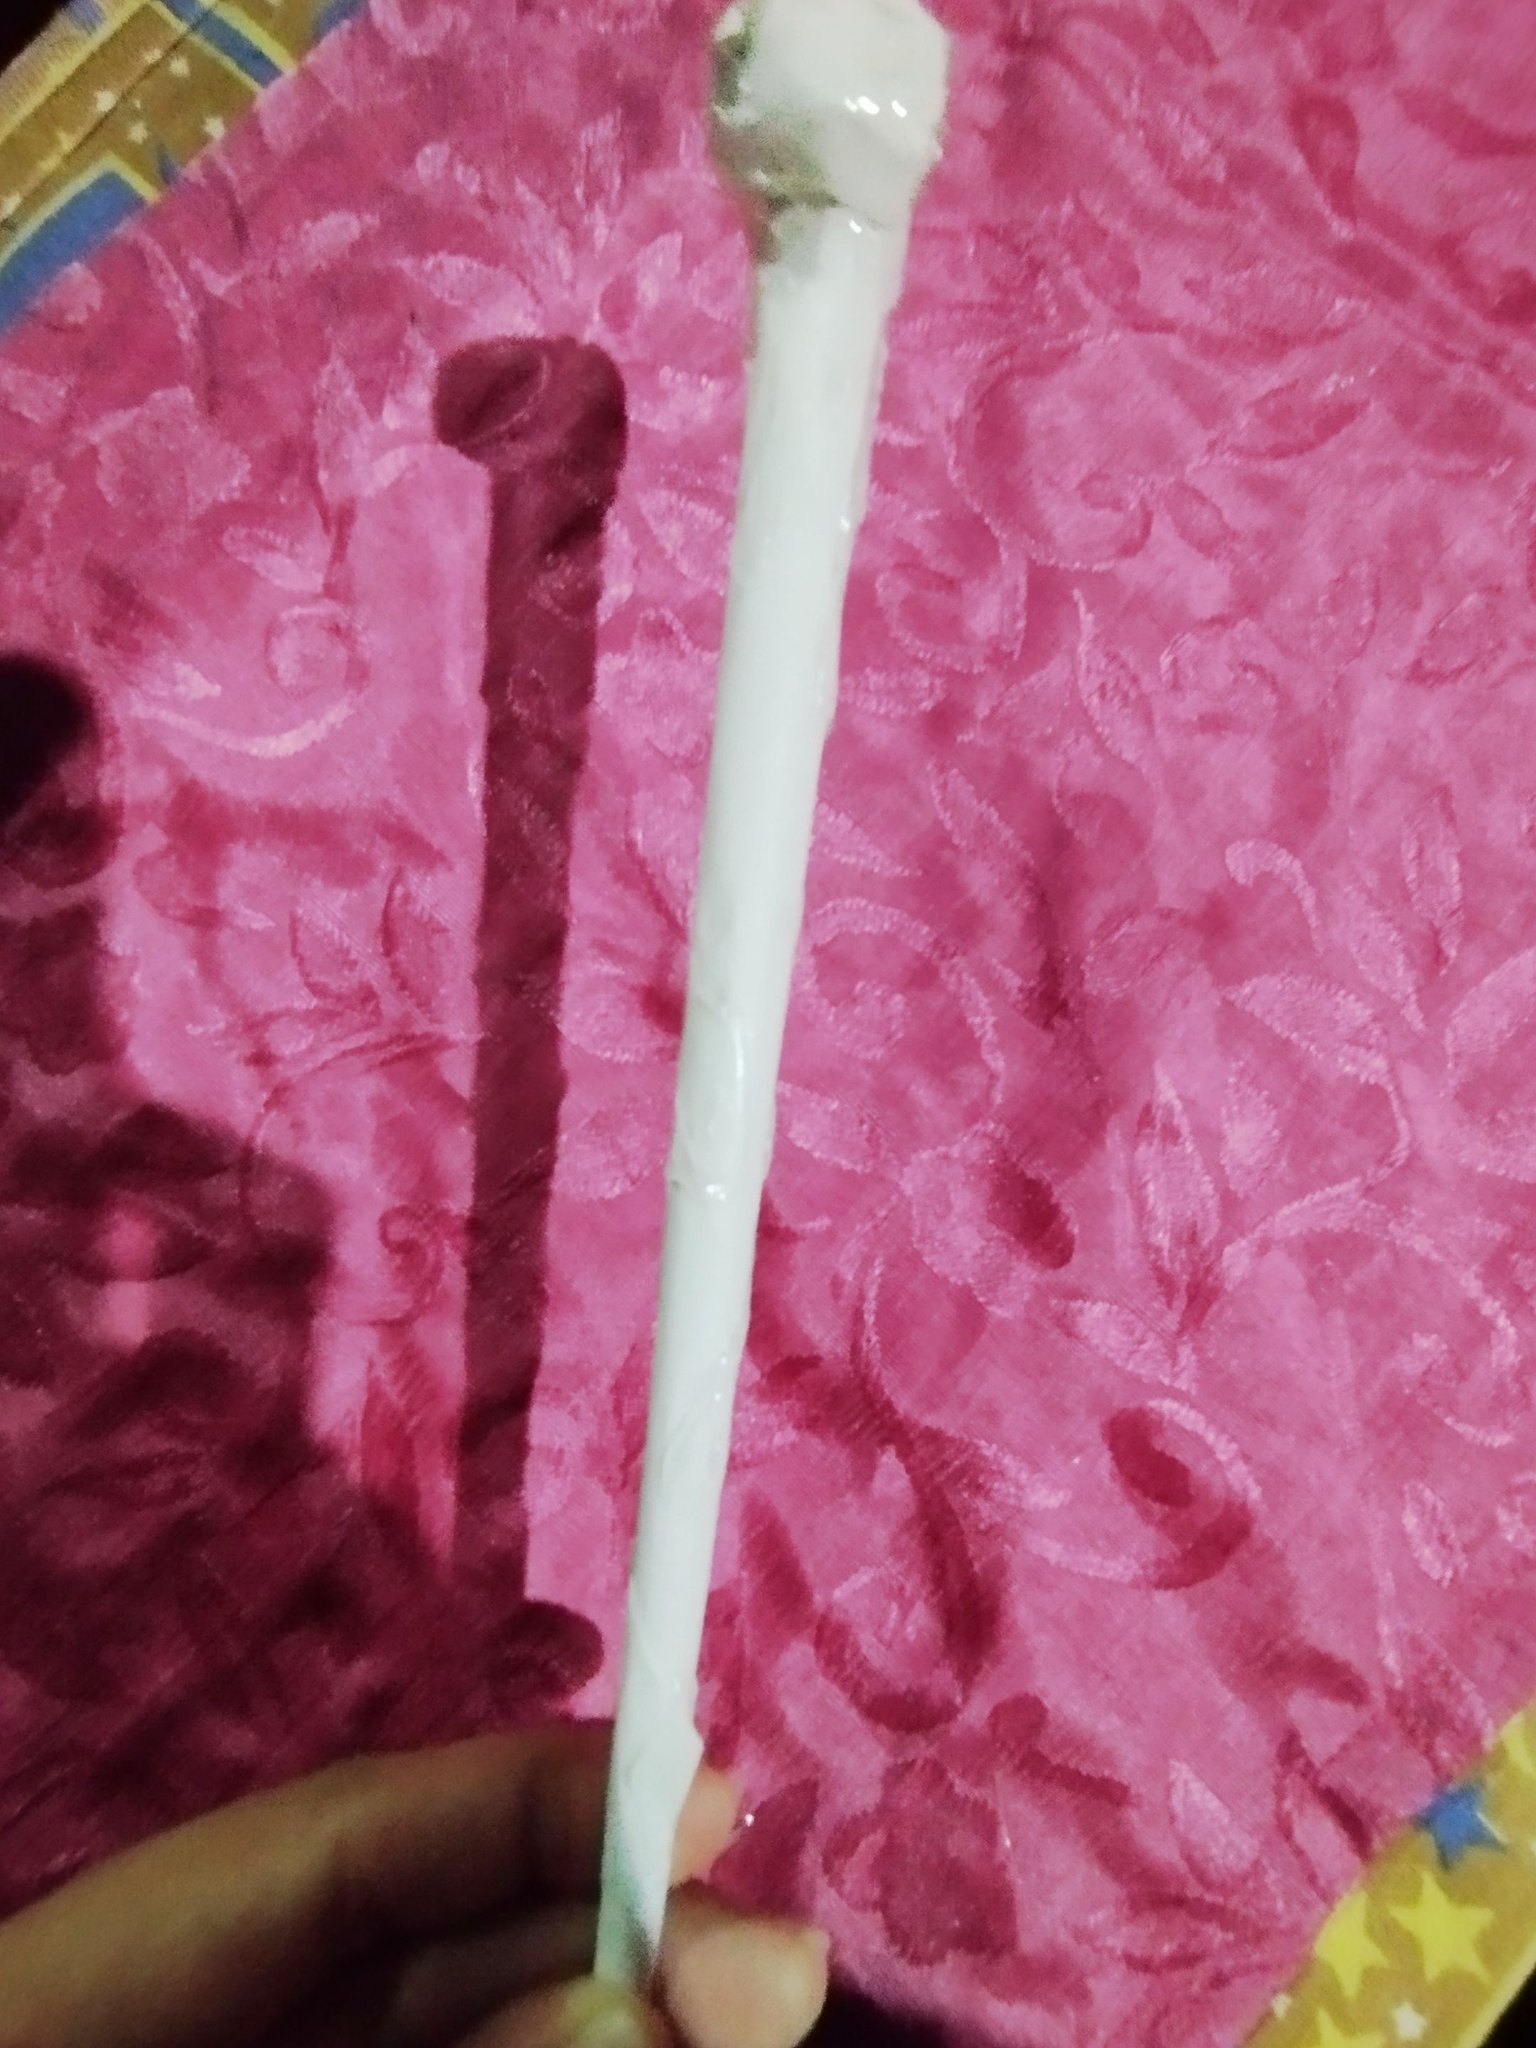 |  |  |
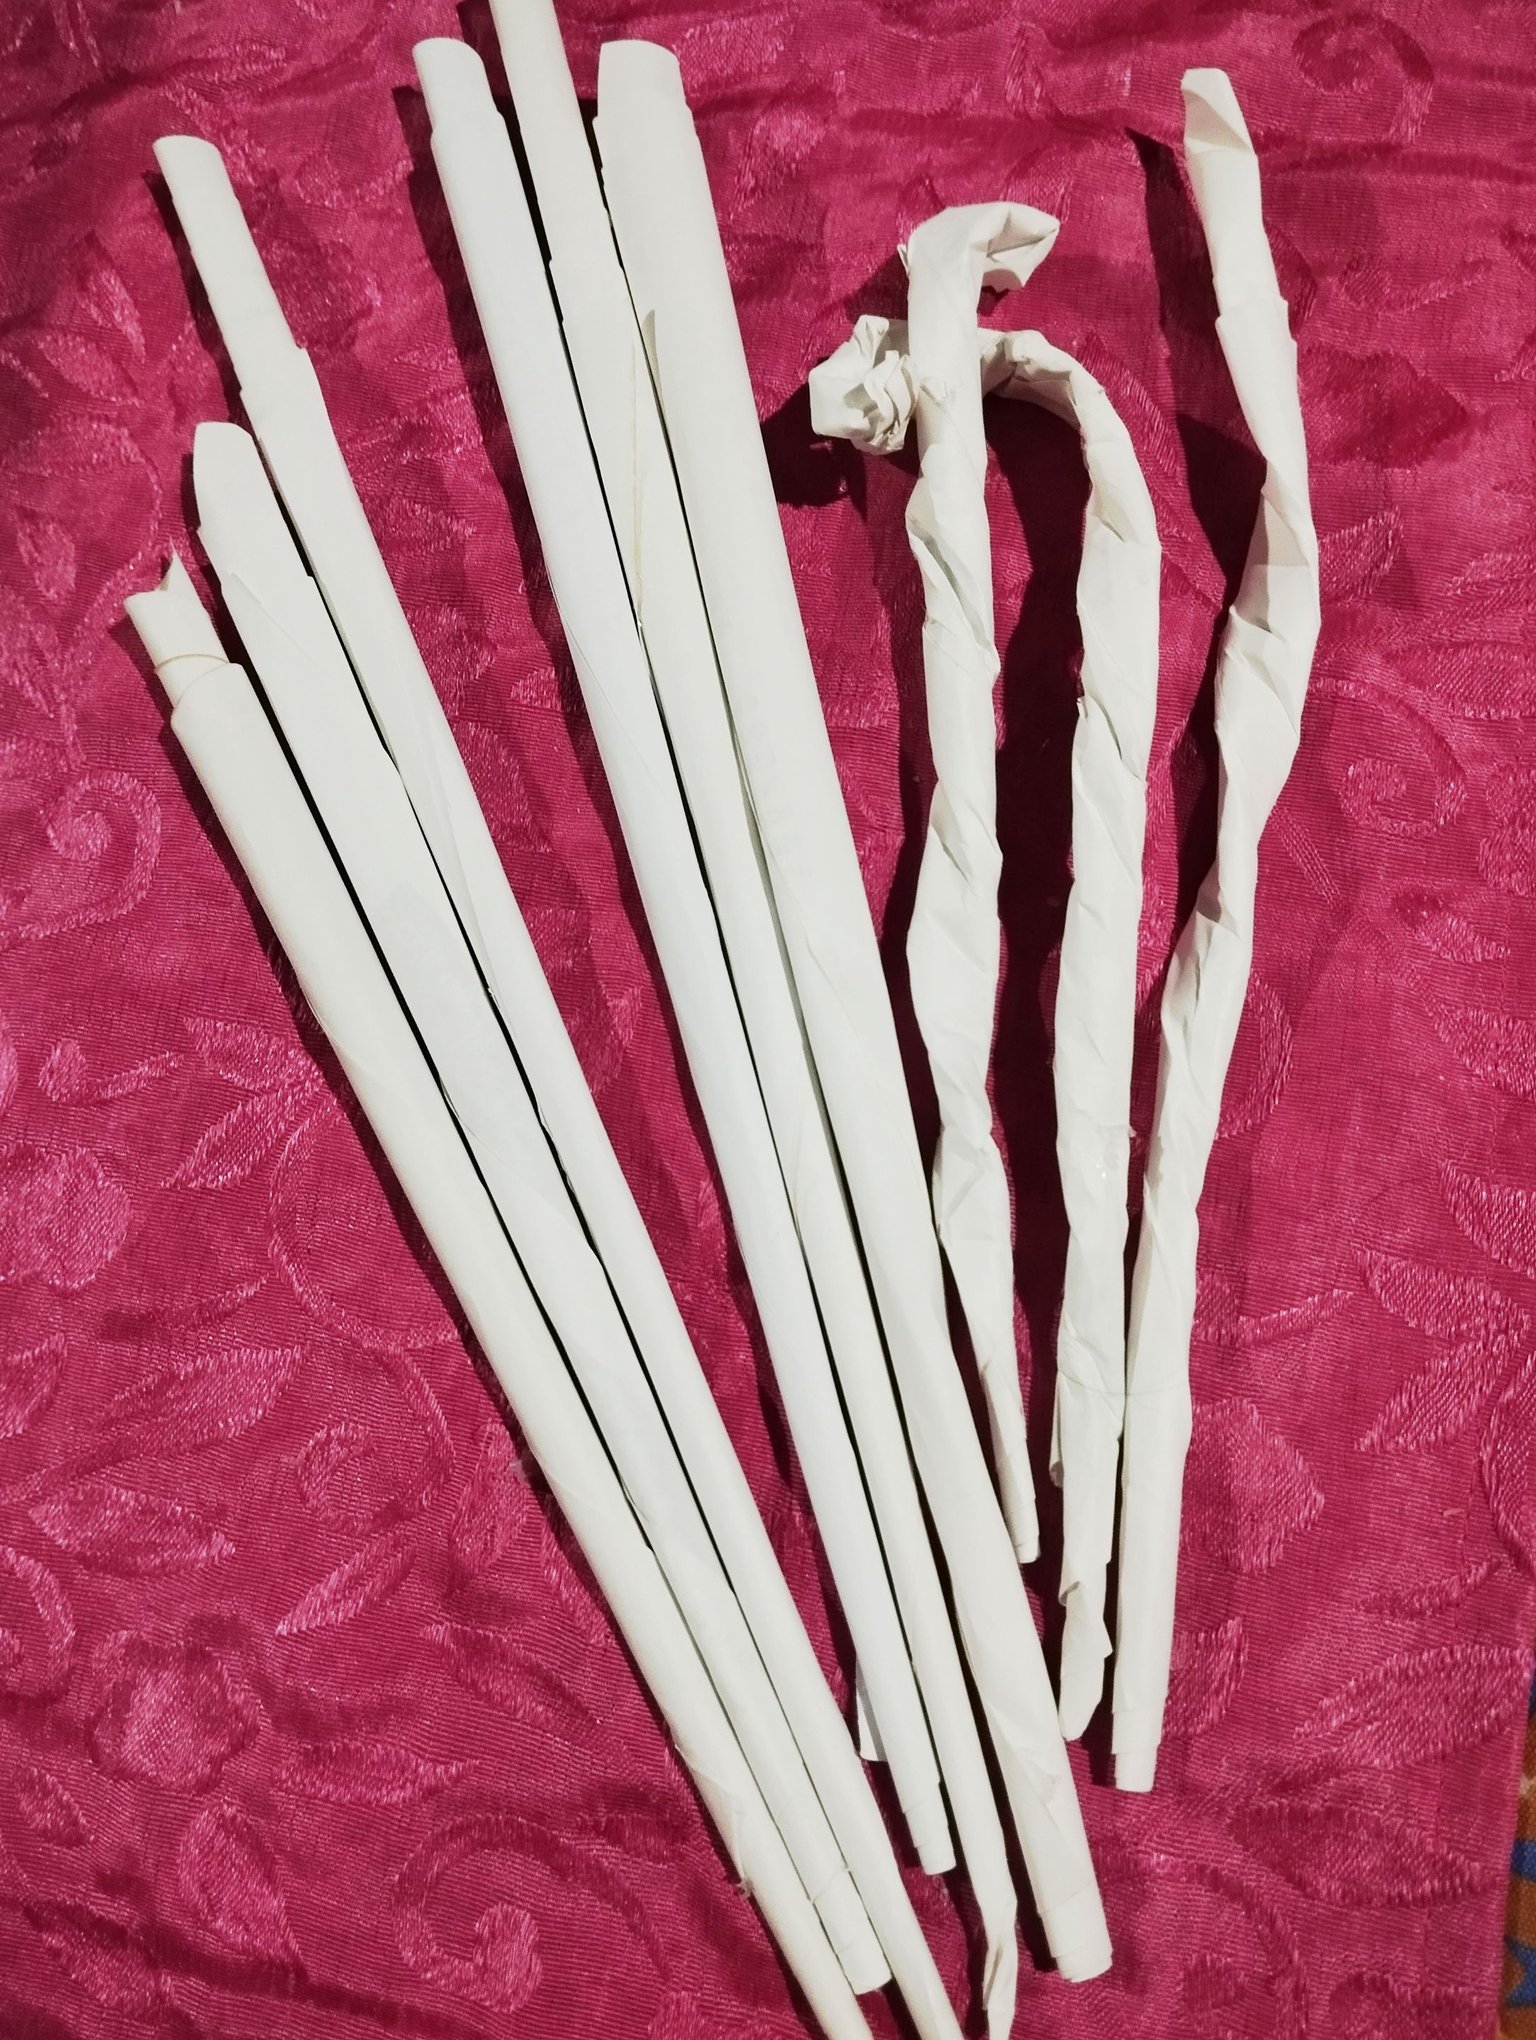
#2 luego de tener nuestras Varitas listas , corté la parte superior para quedarán más o menos de un tamaño parecido todas , luego para tapar este agujero en la parte superior, con silicón caliente lo rellené bien, puedes dejarlo así o de allí seguir con el diseño que quieras una opción que hice fue pegarle en la parte superior una bola grande que tenía de restos de silicon de estos que quedan alrededor de la pistola de silicon y pegarlo, luego agregué más silicón caliente hasta darle esa forma de bolita en la parte superior de la varita, otro diseño que hice fue colocar una cuenta ,bolita para bisutería grande para darle ese efecto redondeo en la parte superior, también a otra lo que hice fue que sellé la parte superior pero hice una unos diseños con el silicón de anillos a lo largo de la varita, también a otra le hice unos diseños de arabescos ,y otra como si se estuviera chorreando el metal en la varita de madera, cada diseño dependerá de tu creatividad , si no puedes buscar referencias de la varita de cada personaje que también es una opción, yo aquí quería agregar bastante textura en el cuerpo de las varitas para que se vean mucho mas bonitas o darle más realce al diseño, como a las varitas que hice con diseño retorcido a esta le puse silicón a lo largo y forte con la punta de la pistola de silicón para darle una textura como de madera tallada.
English Version
#2 after having our wands ready, I cut the top so they would be more or less the same size, then to cover this hole at the top, with hot silicone I filled it well, you can leave it like that or from there continue with the design you want, one option I did was to glue a large ball that I had made of silicone remnants of these that are left around the silicone gun on the top and glue it, then I added more hot silicone until it gave it that ball shape at the top of the wand, another design I did was to place a bead, a large jewelry ball to give it that rounded effect at the top, also to another what I did was that I sealed the top but I made some designs with the silicone rings along the wand, also to another I made some arabesque designs, and another as if the metal was being dripped on the wooden wand, each design will depend on your creativity, if you can't look for references for the wand of each character which is also a option, here I wanted to add a lot of texture to the body of the wands to make them look much prettier or to give more prominence to the design, like the wands I made with a twisted design, I put silicone along its length and applied it with the tip of the silicone gun to give it a texture like carved wood.
 | 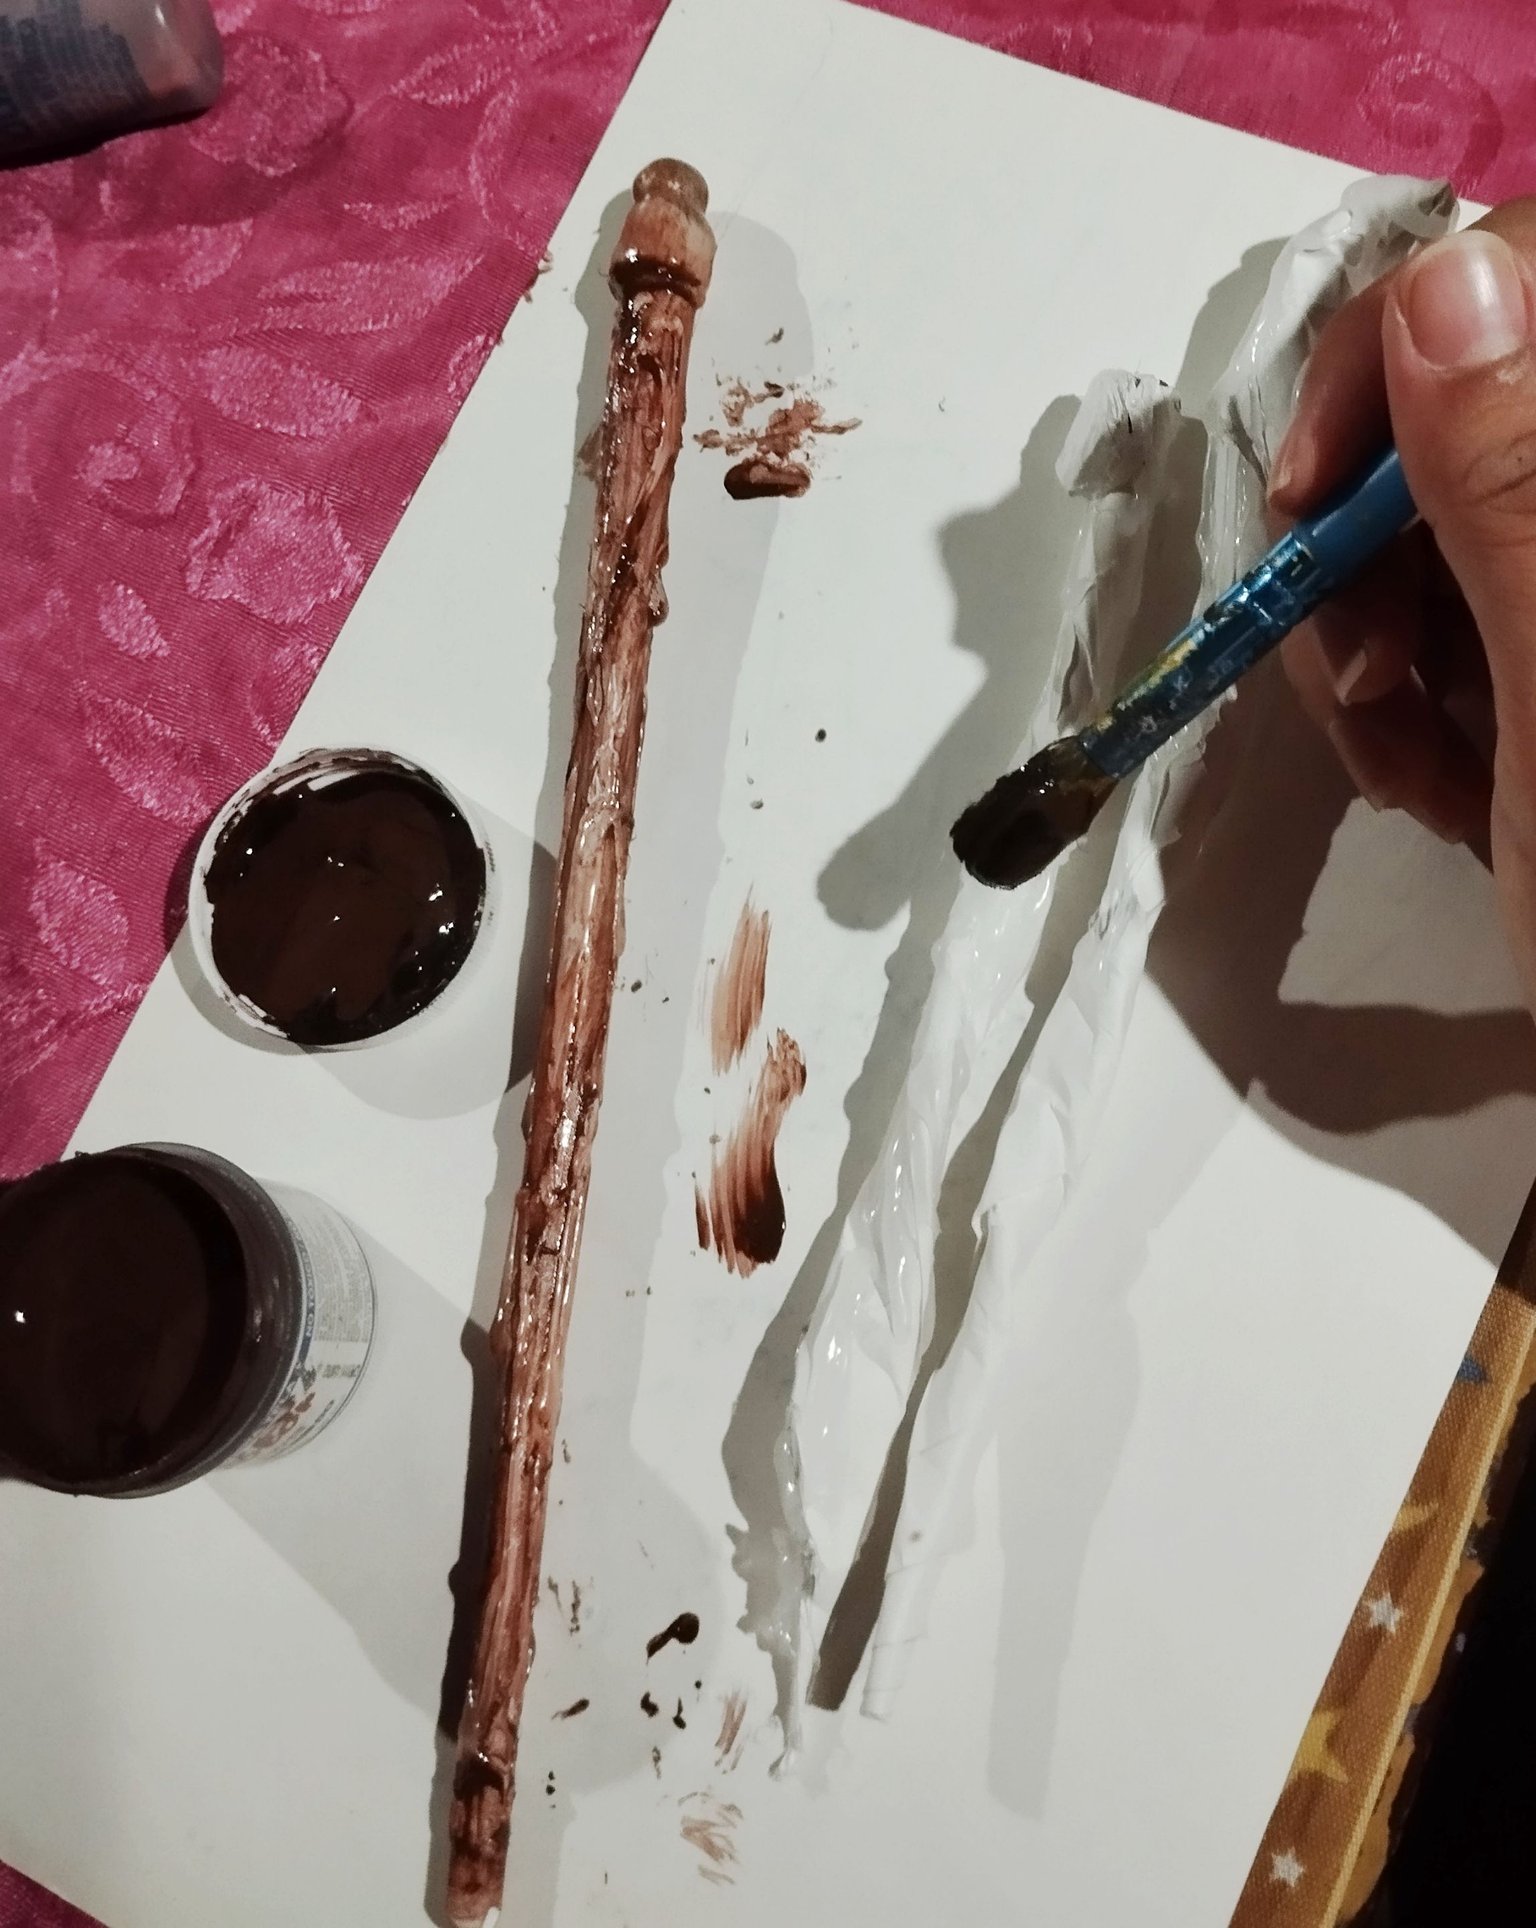 | 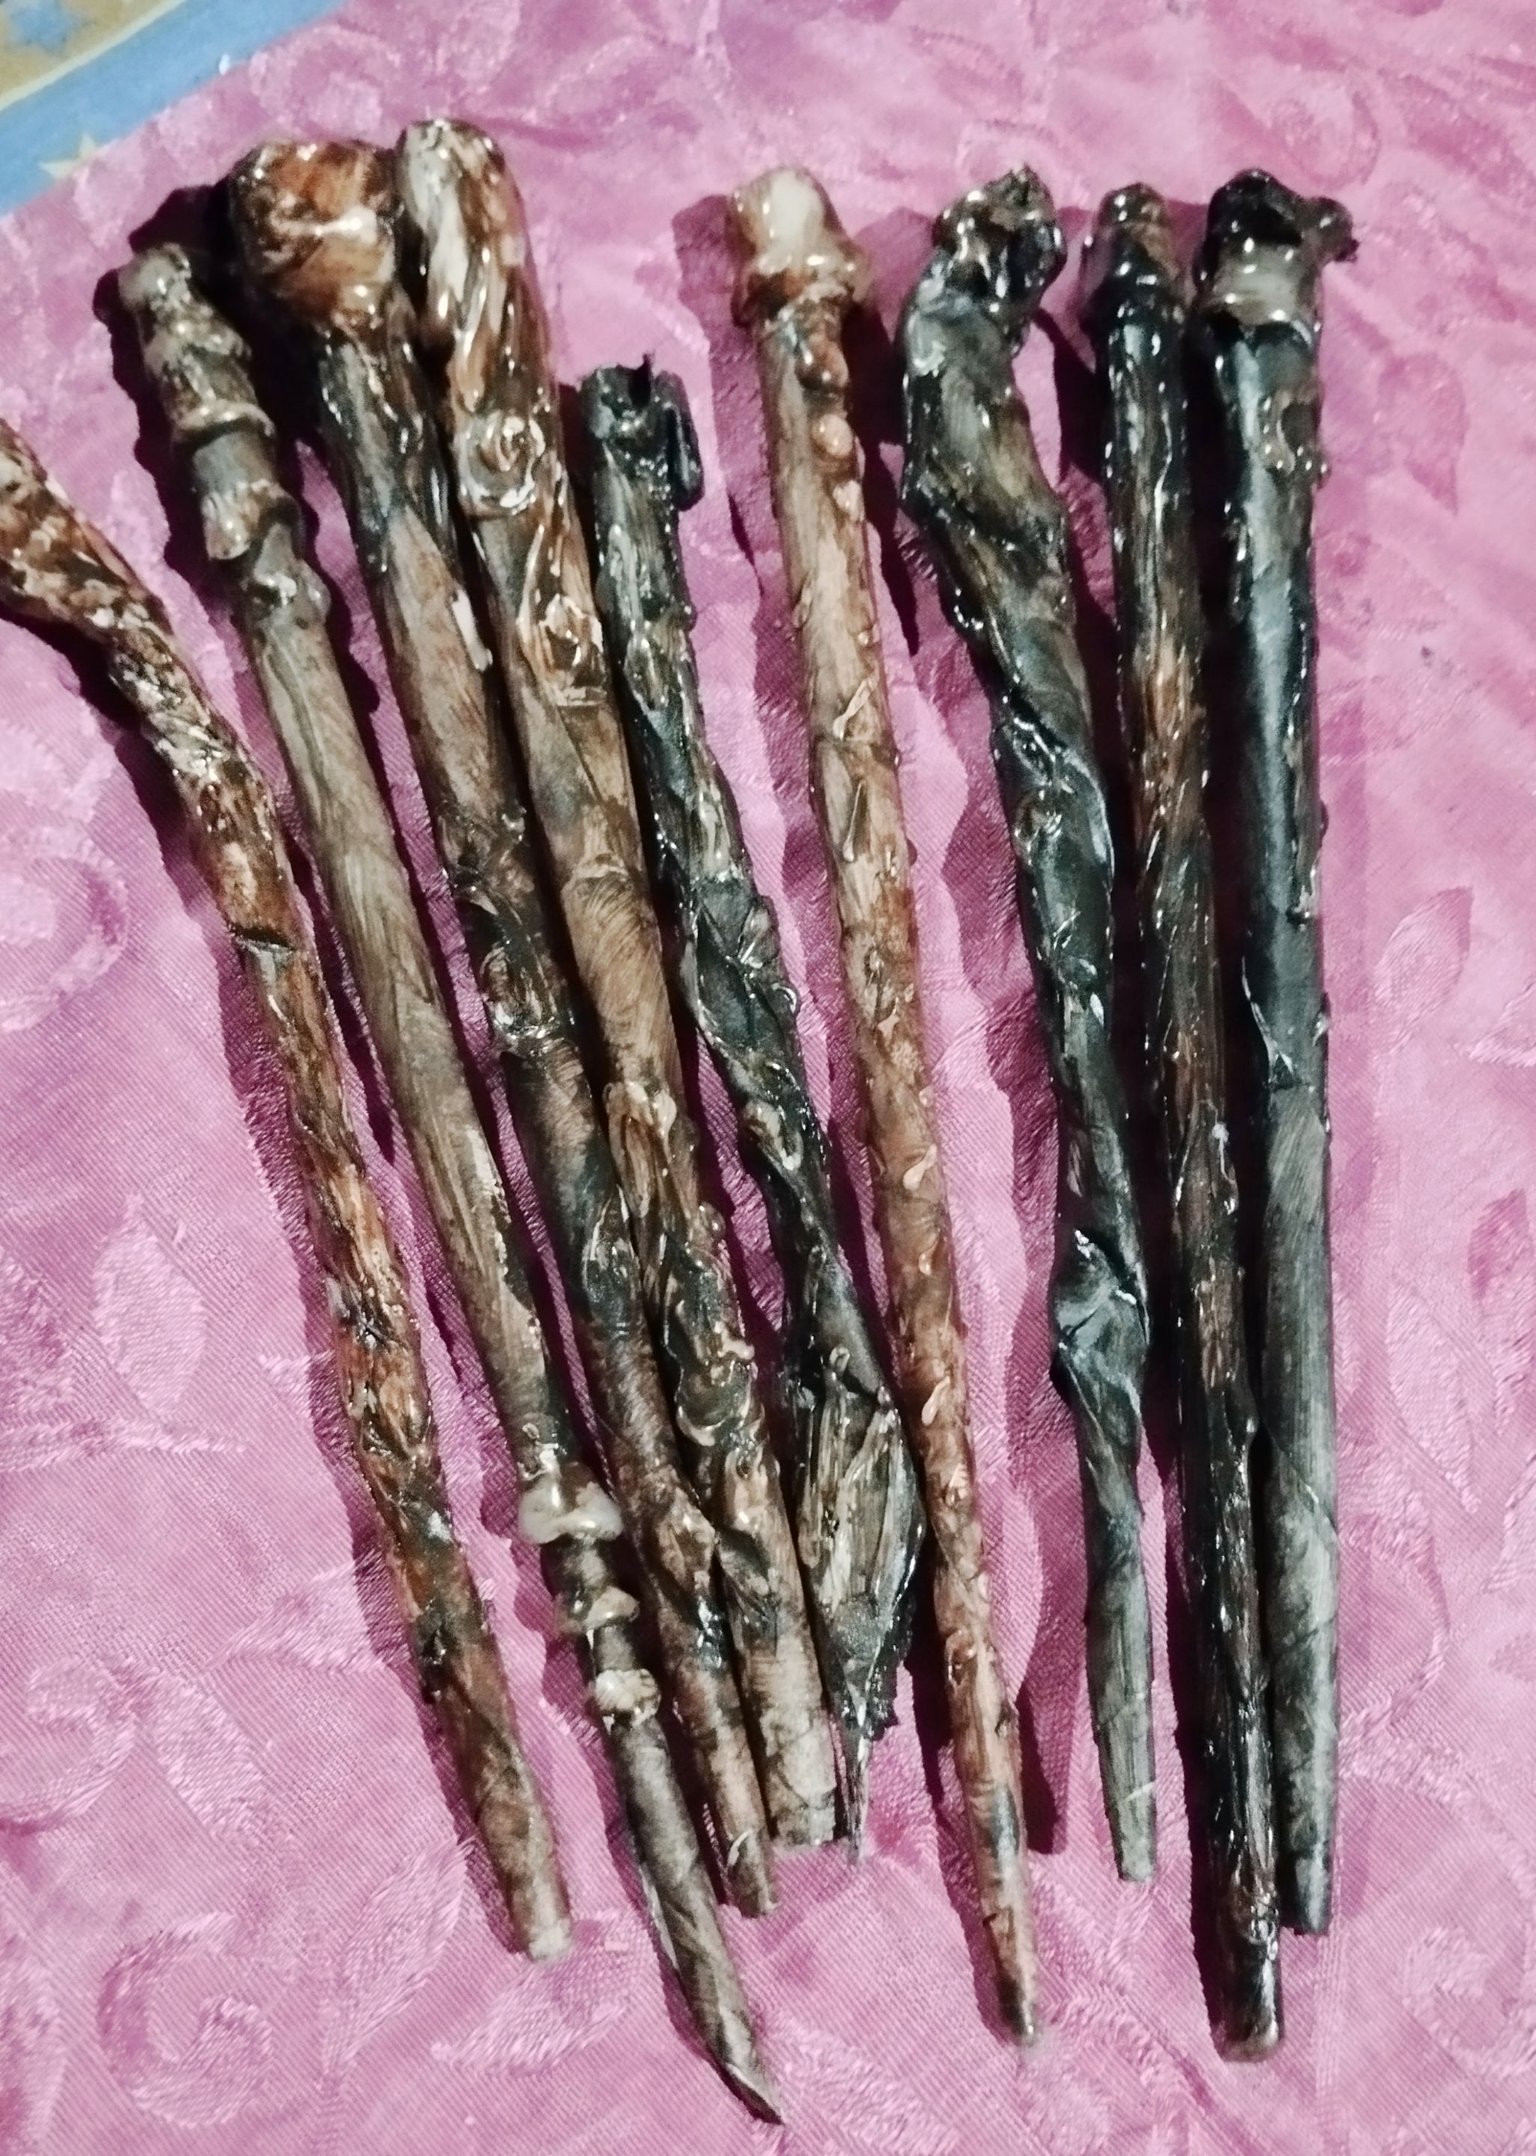 |  |
#3 Luego de tener todos los diseños de varitas con silicón , ya tenemos la base y ahora toca pintarlas , para esto usé una pintura marrón de tela ,se me hizo que podría cubrir mucho mejor el silicón caliente y deja un acabado más brillante, para que no quedará de marrón uniforme usé un poco de pintura negra de tela también y las medio mezcle sin no dejarlo completamente homogénea si no mezclado a medias ,y con un pincel hancho aplique la pintura como moteando el cuerpo de la varita hasta cubrirla completamente, importante tapar todos los huequitos para que quede bien uniforme todo, la tercera foto es como queda con una sola capa de pintura y la cuarta foto es como queda luego de una segunda capa de pintura, dejando tres varitas con más colorcito negro para que fueran las de aspectos de "mortífagos".
English Version
#3 After having all the wand designs with silicone, we already have the base and now it's time to paint them, for this I used a brown fabric paint, it seemed to me that it could cover the hot silicone much better and leaves a shinier finish, so that it would not be uniform brown I used a little bit of black fabric paint as well and half mixed them without leaving it completely homogeneous but half mixed, and with a wide brush apply the paint like speckles the body of the wand until it is completely covered, it is important to cover all the little holes so that everything is uniform, the third photo is how it looks with a single coat of paint and the fourth photo is how it looks after a second coat of paint, leaving three wands with more black color so that they would be the "Death Eater" aspects.
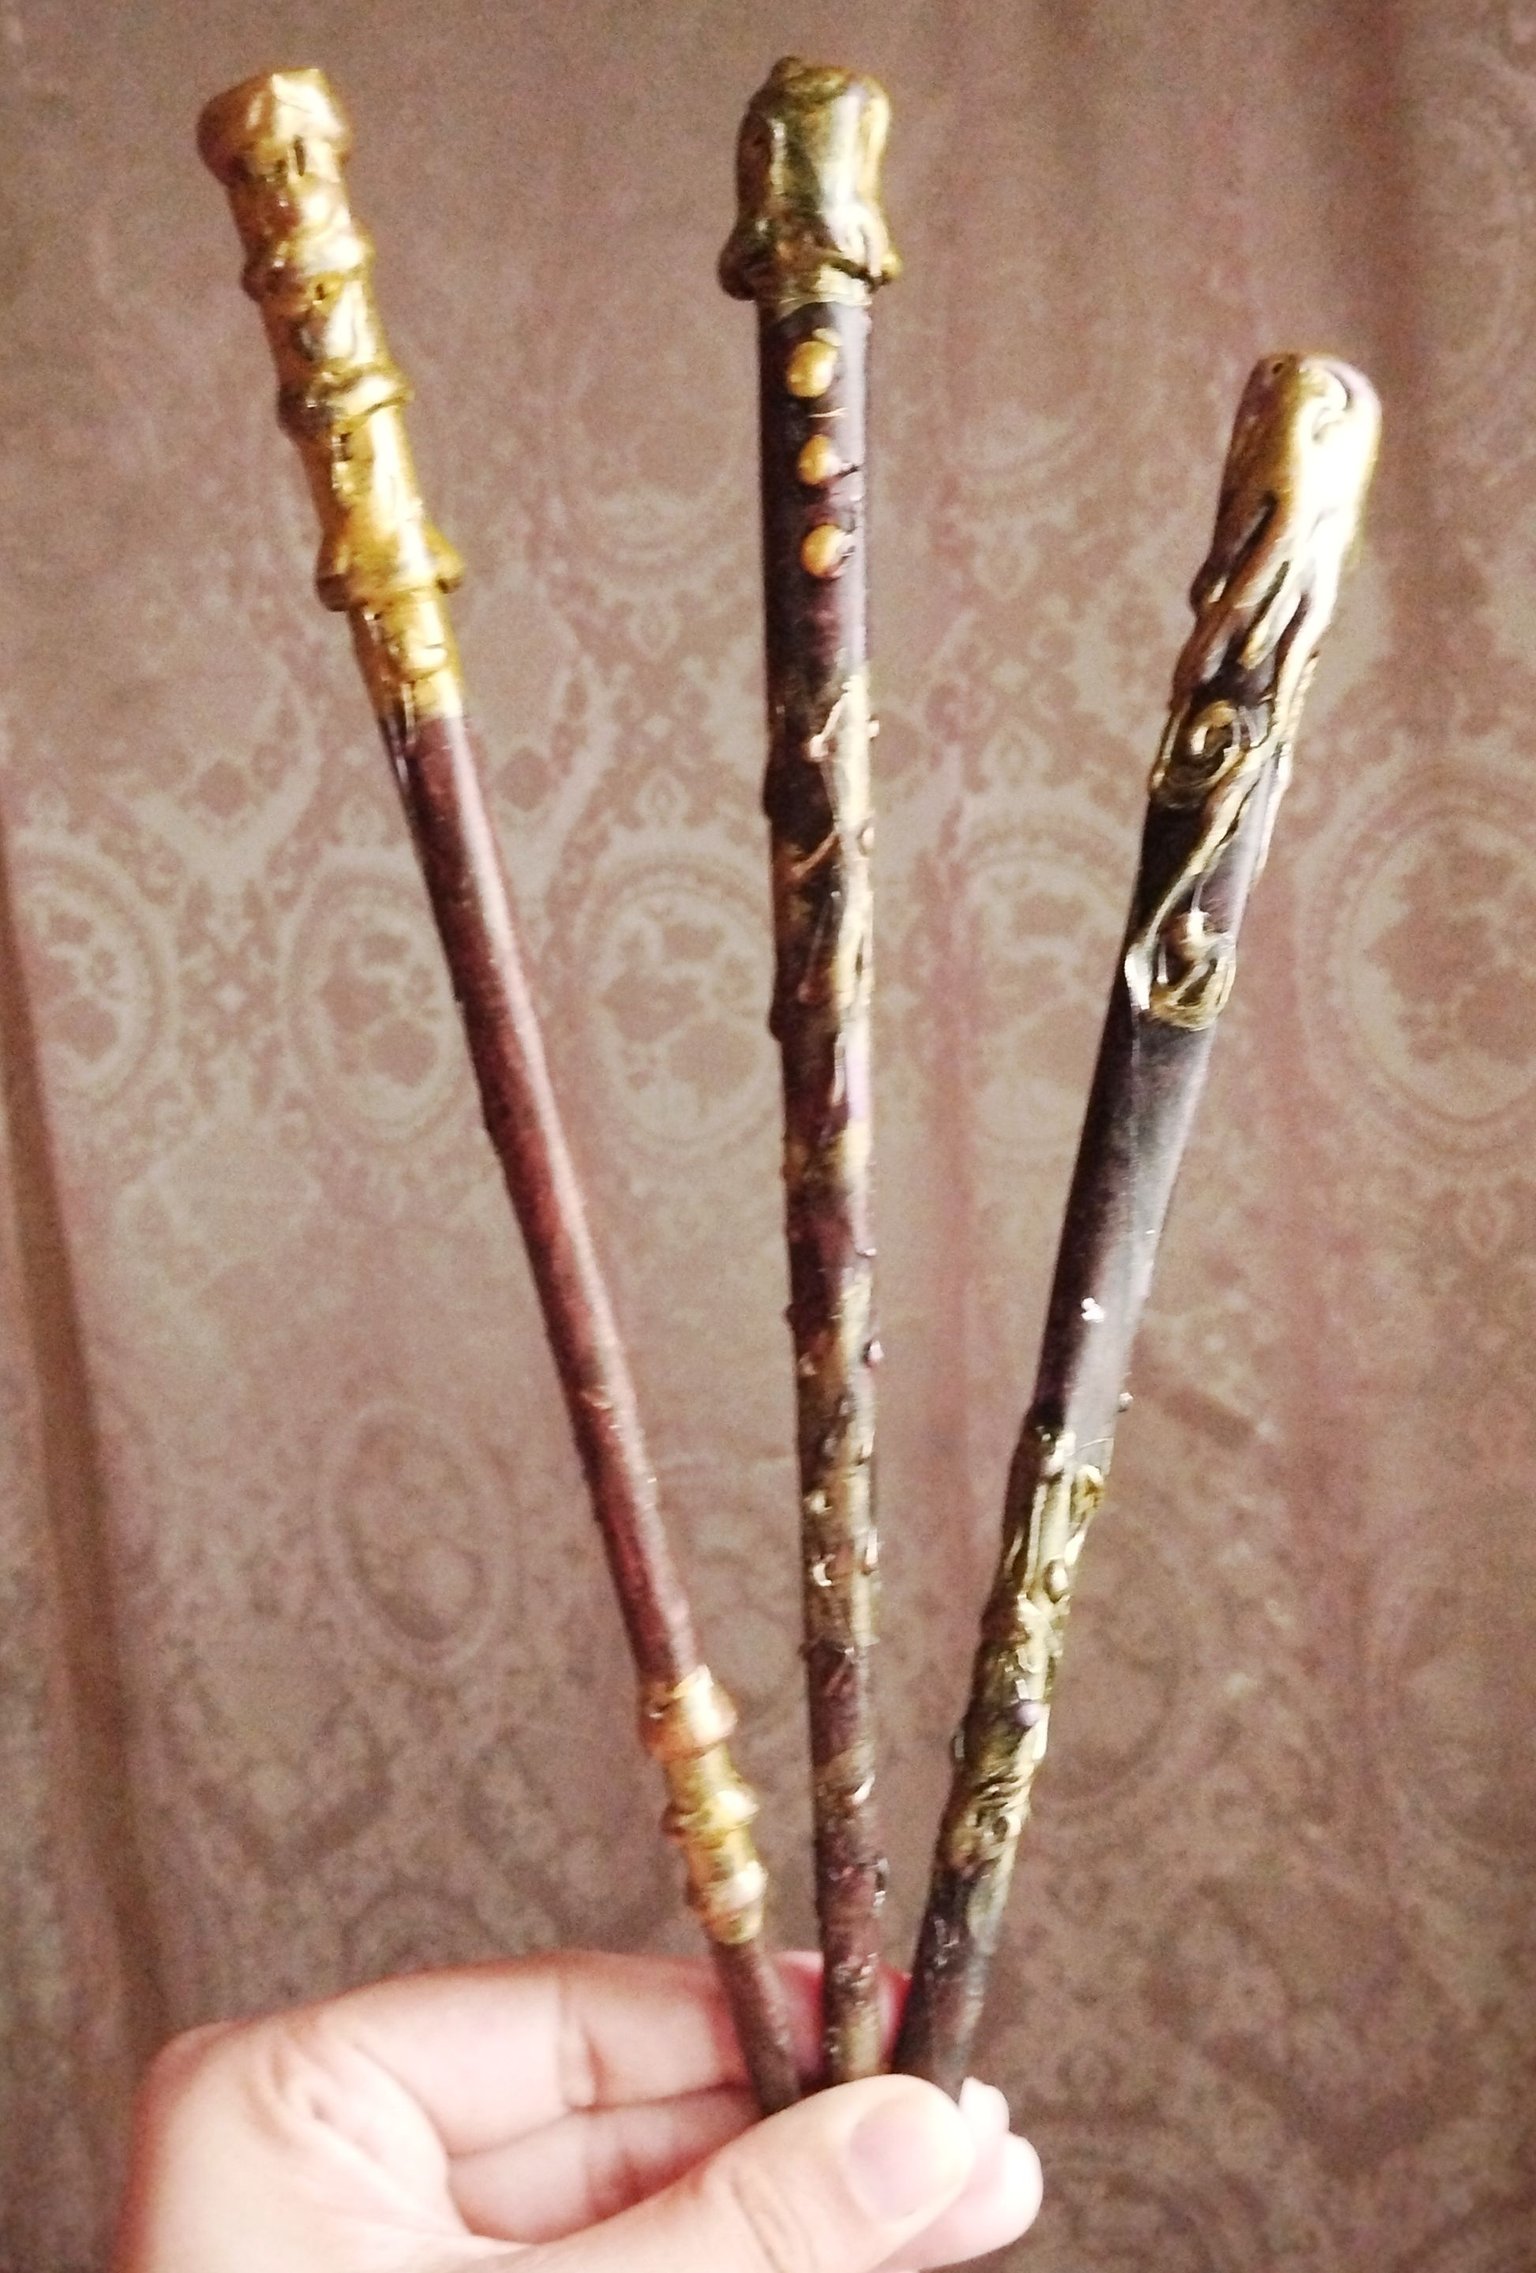 | 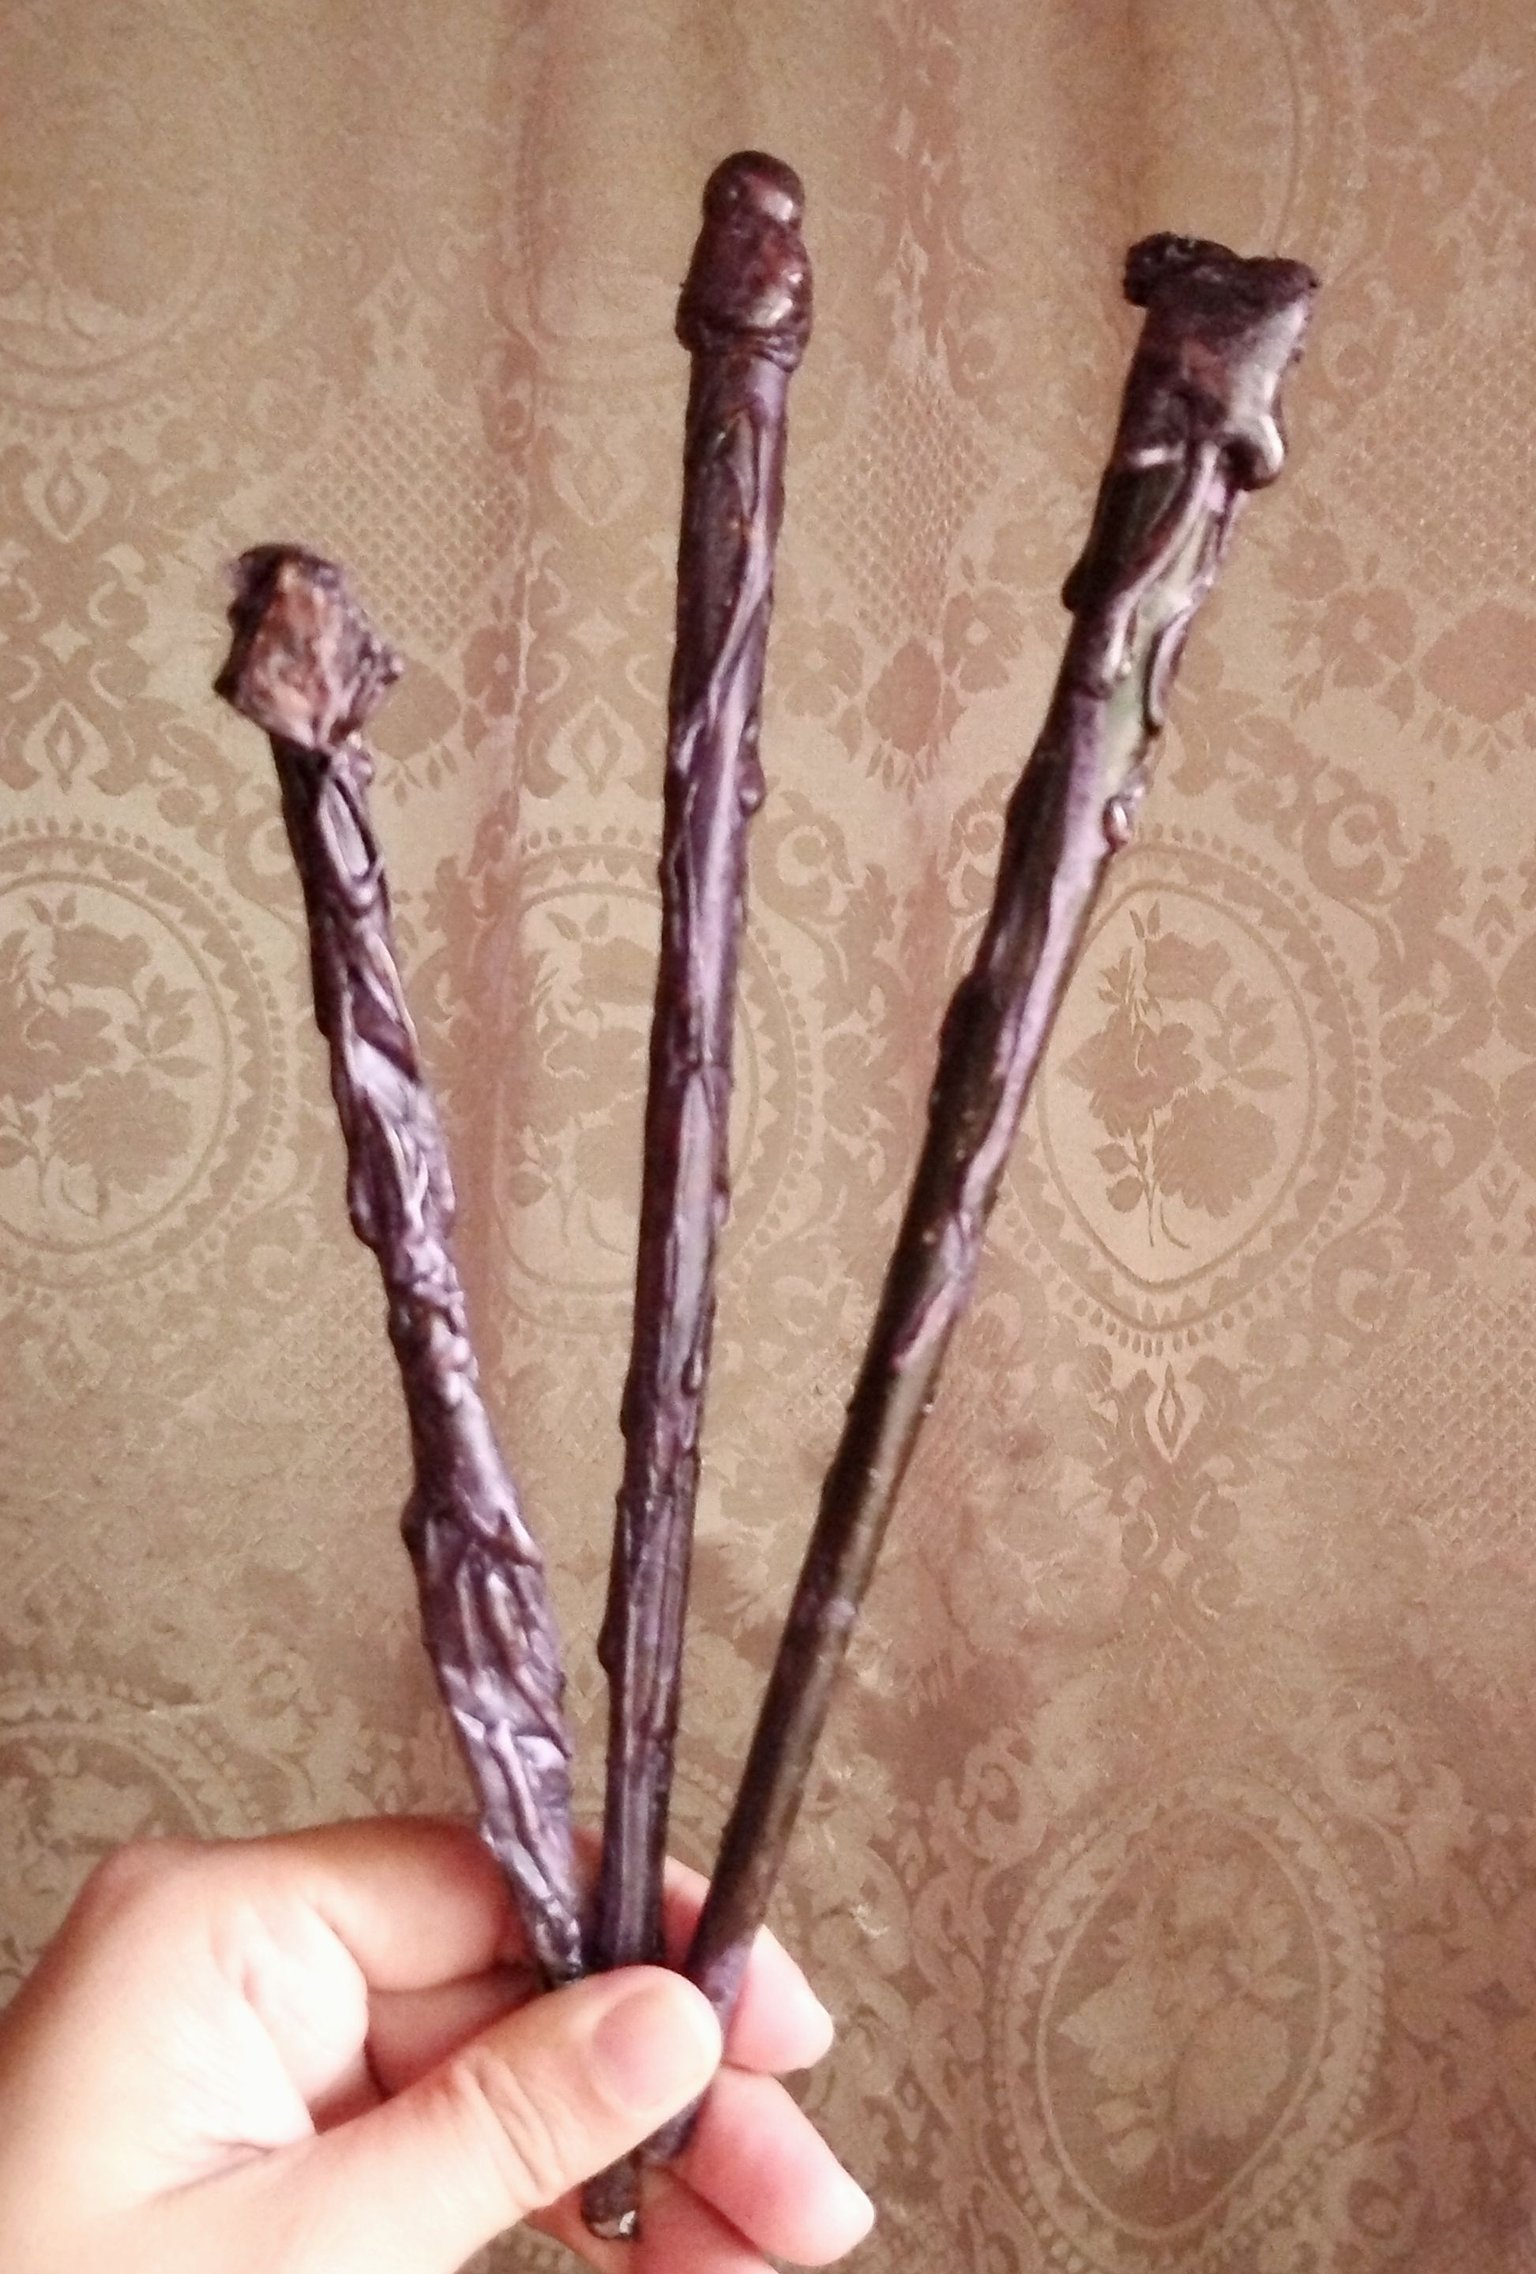 | 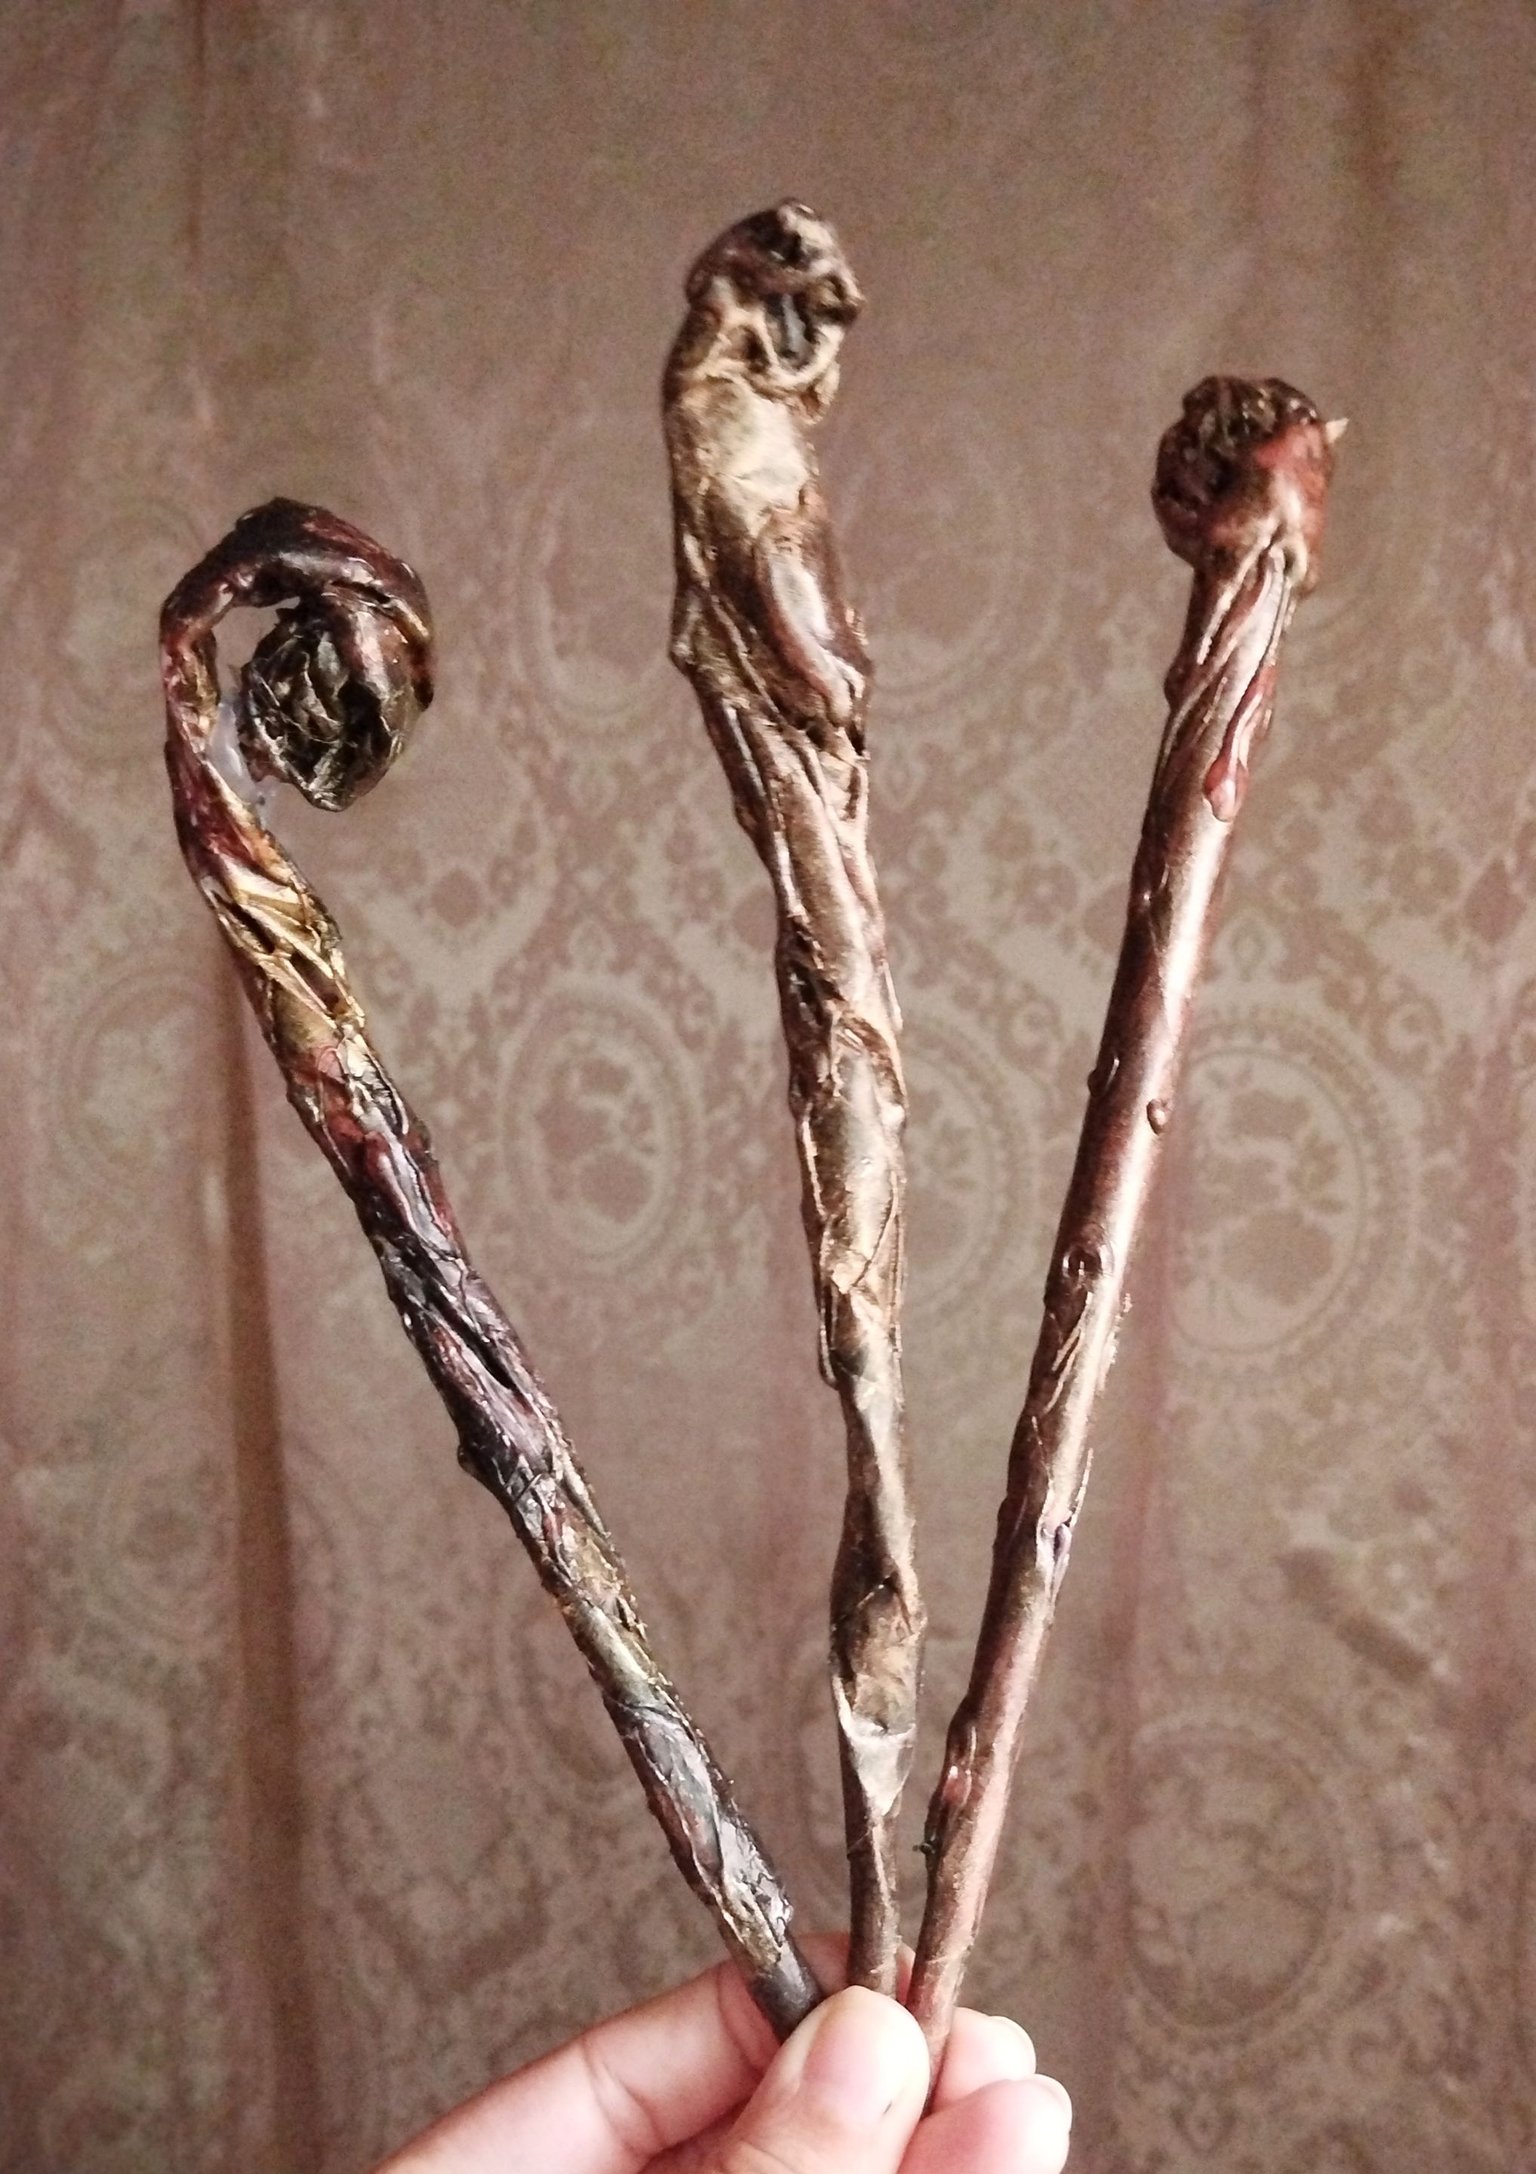 |
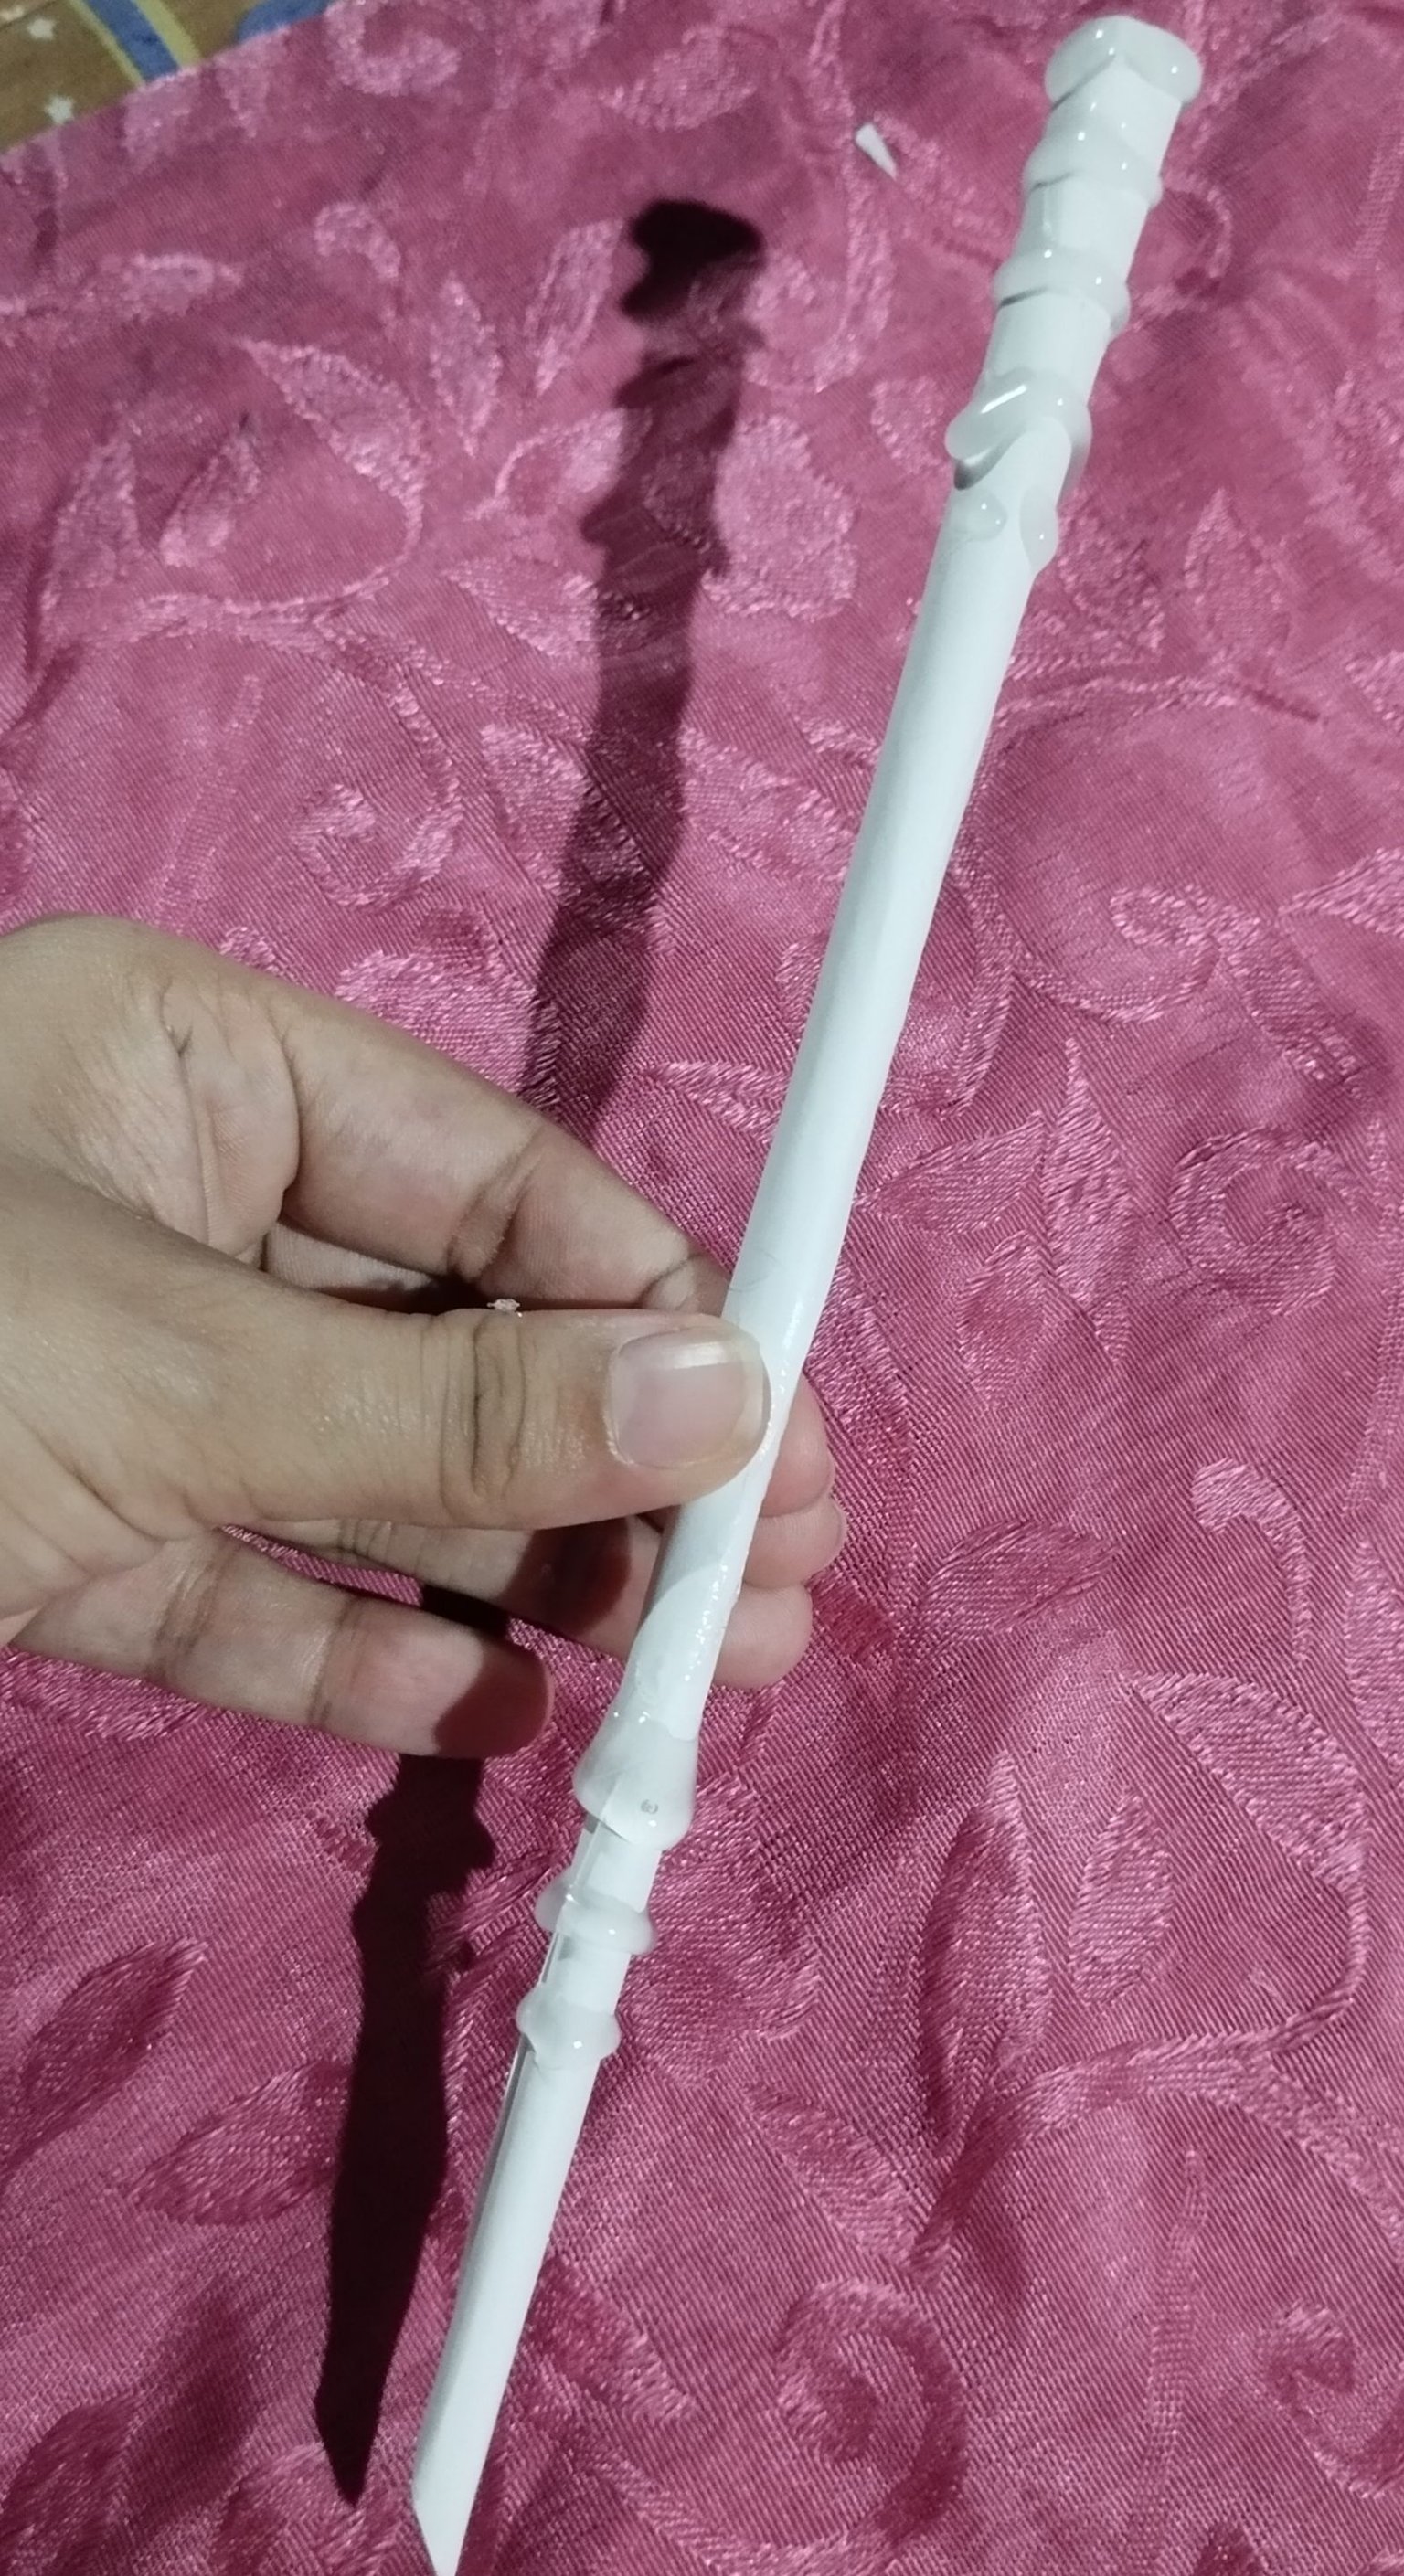
#4 Luego de tener las varitas en marrón y negro , usé tres elementos para decorarlas , pintura dorada , hice tres con cada diseño, las tres primeras varitas con el cuerpo marrón pero con detalles en pintura dorado en las elevaciones de diseño con silicón, estás las quería hacer para que se vieran un poco más elegantes.Para la segunda serie seguí con las base marrón-negro ,y usé una acuarela dorada que hice con sombras de maquillaje, y pinte todos el cuerpo de las varitas para darle un acabado metálico en los detalles, también a los que estaban retorcidos y con textura y la me parece que quedó con una apariencia de metal derretido que me parece muy bonito. Y para el tercera serie de varitas, mas oscuras le agregue una acuarela metálica morada que hice también con maquillaje, estas me las imaginé más como para las varitas de los mortífagos o algo así 🪄.
English Version
#4 After having the wands in brown and black, I used three elements to decorate them, gold paint, I made three with each design, the first three wands with a brown body but with gold paint details on the silicone design elevations, I wanted to make these to look a little more elegant. For the second series I continued with the brown-black base, and I used a gold watercolor that I made with makeup shadows, and I painted the entire body of the wands to give it a metallic finish in the details, also to those that were twisted and textured and it seems to me that it looked like melted metal that I think is very nice. And for the third series of wands, darker ones, I added a purple metallic watercolor that I also made with makeup, I imagined these more like the Death Eater wands or something like that 🪄.
 |  |  |
 | 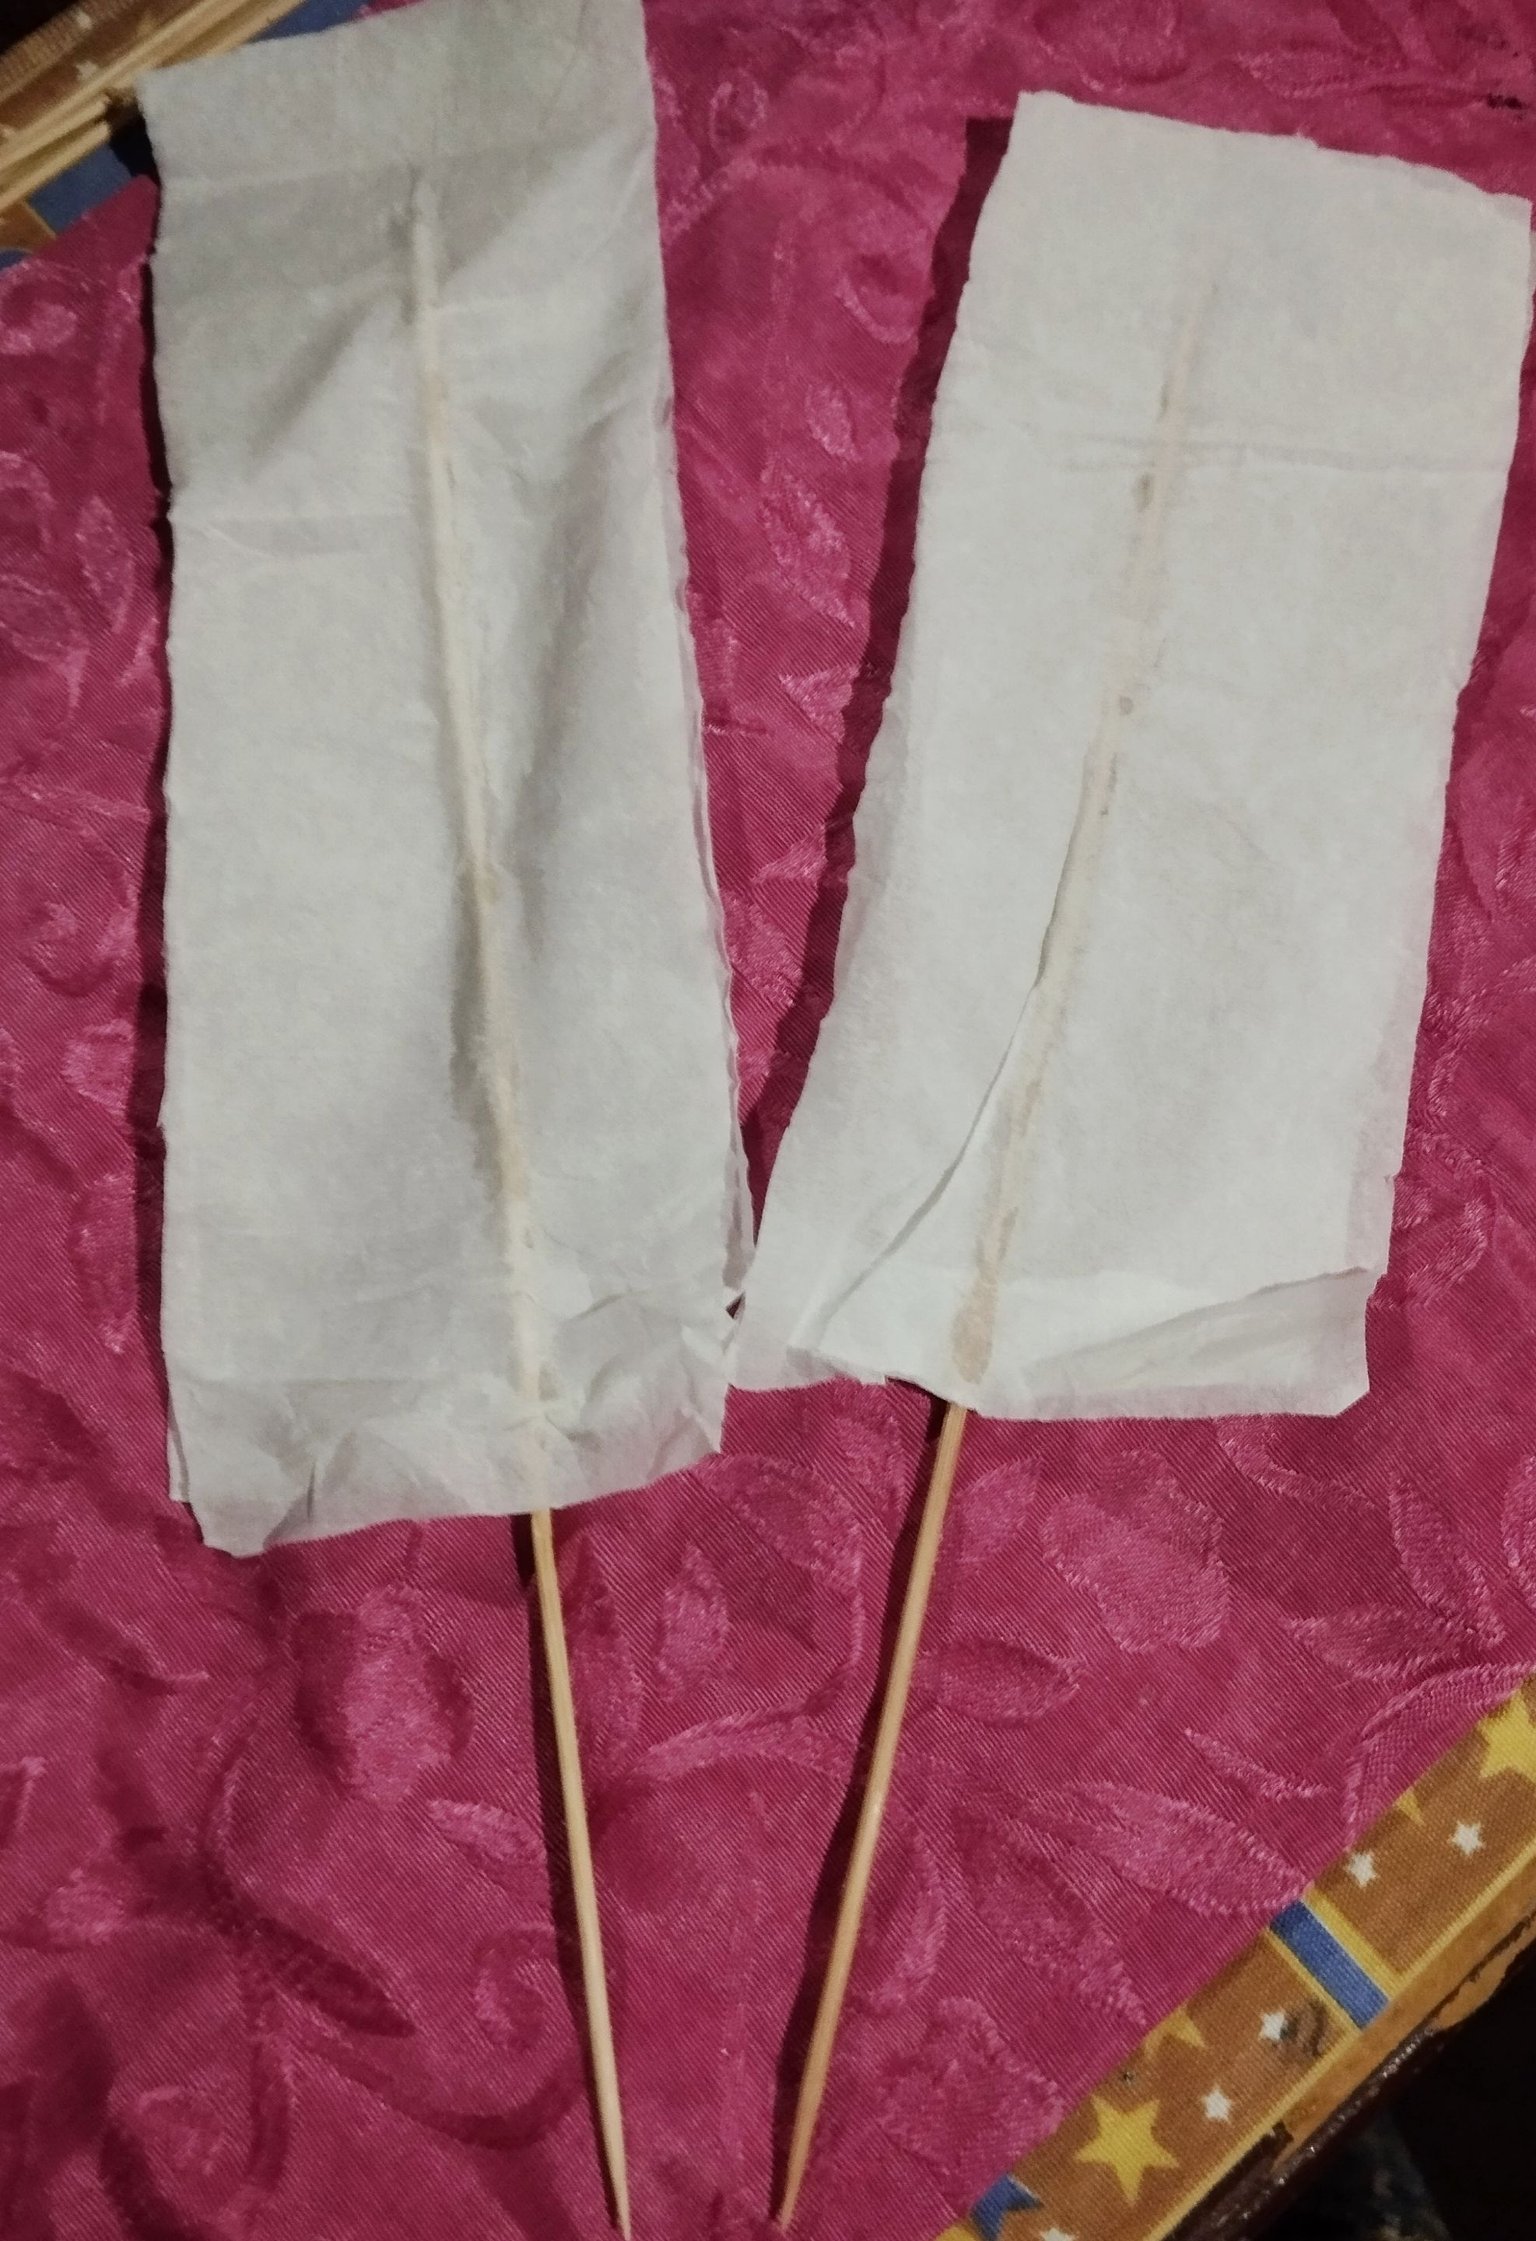 |  |
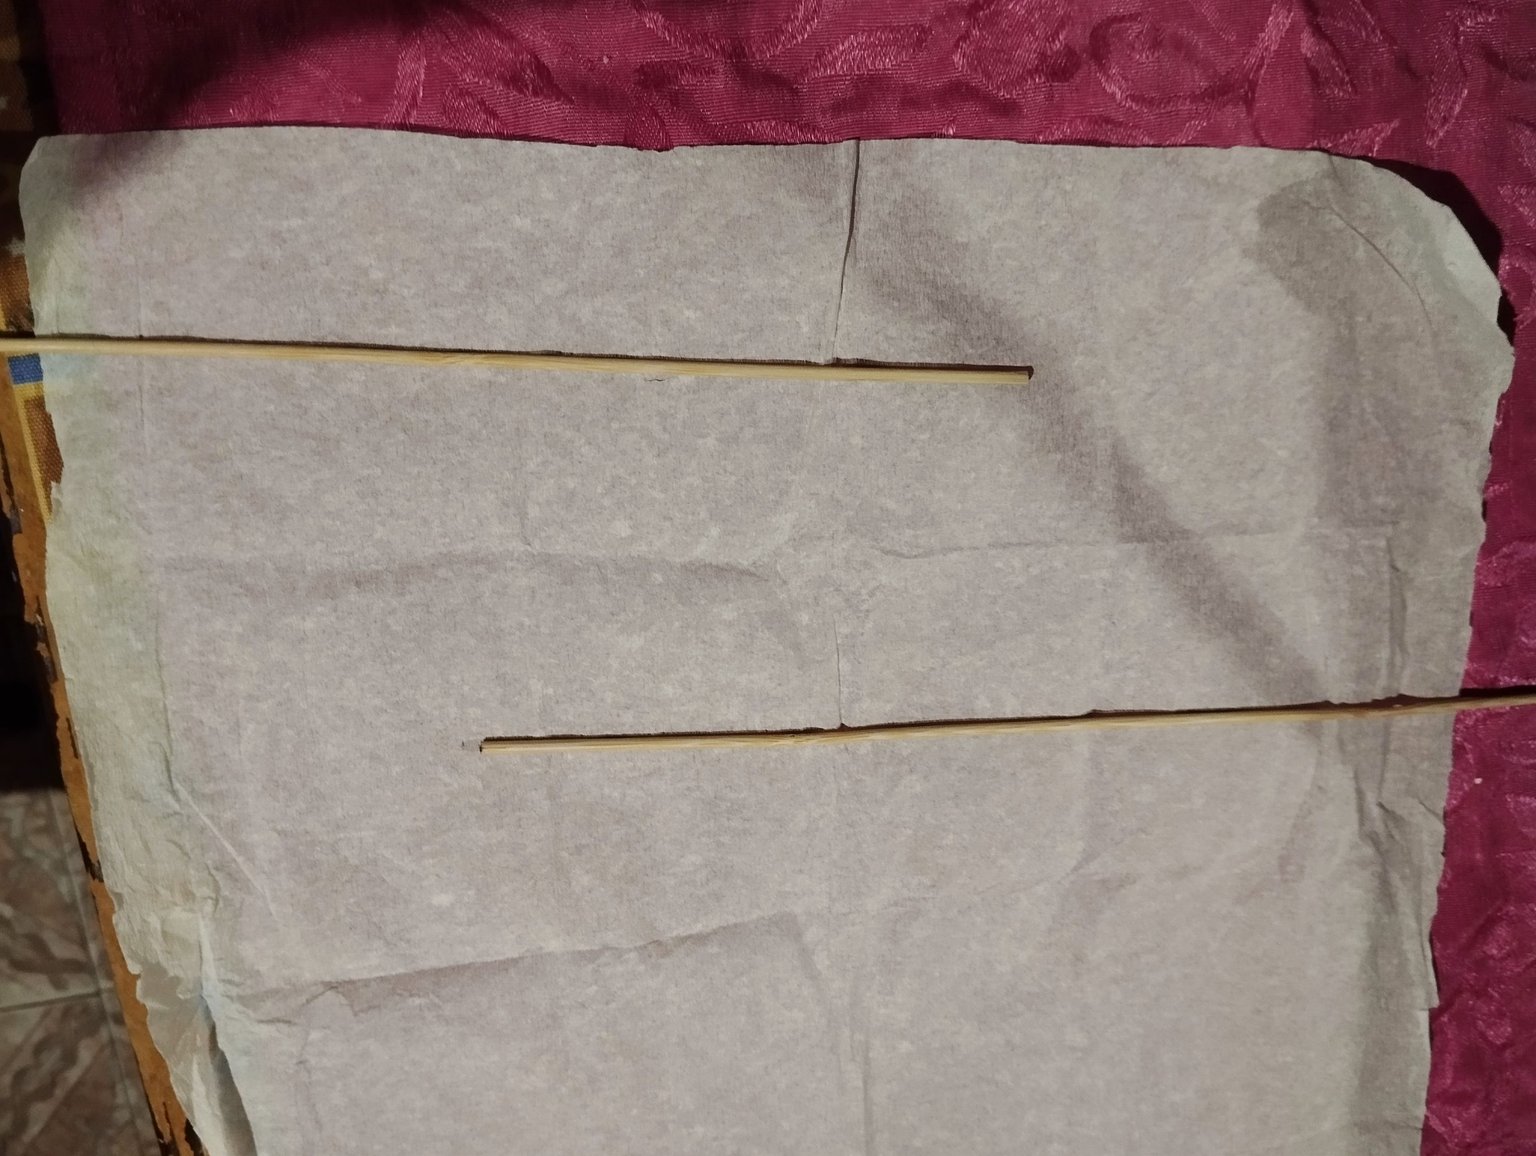
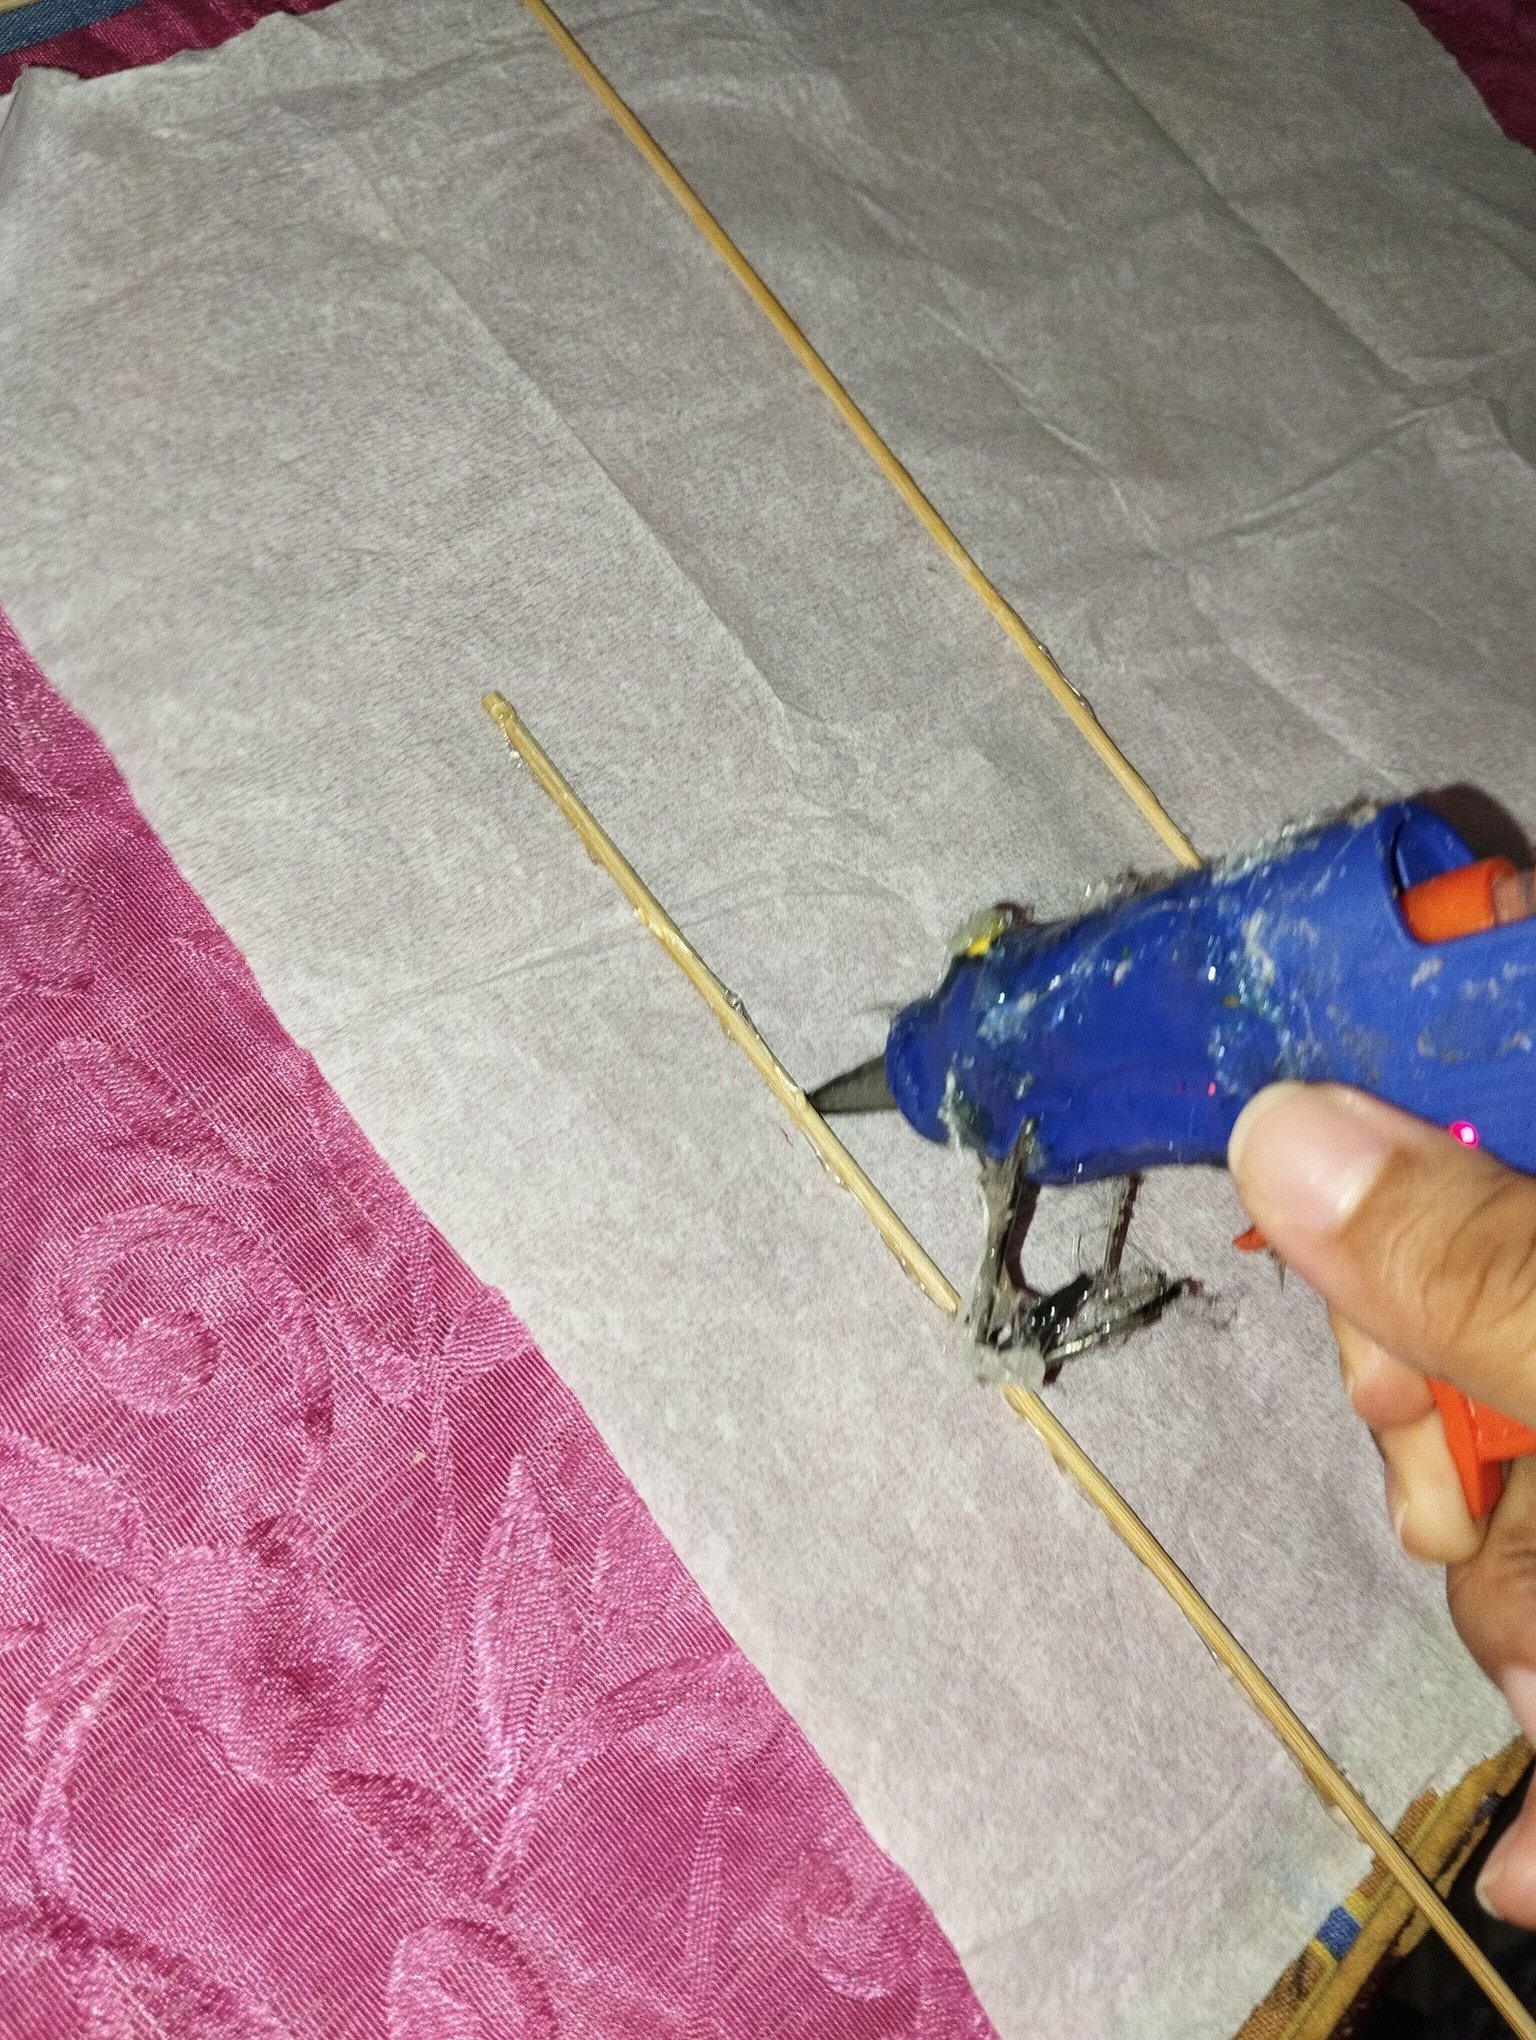
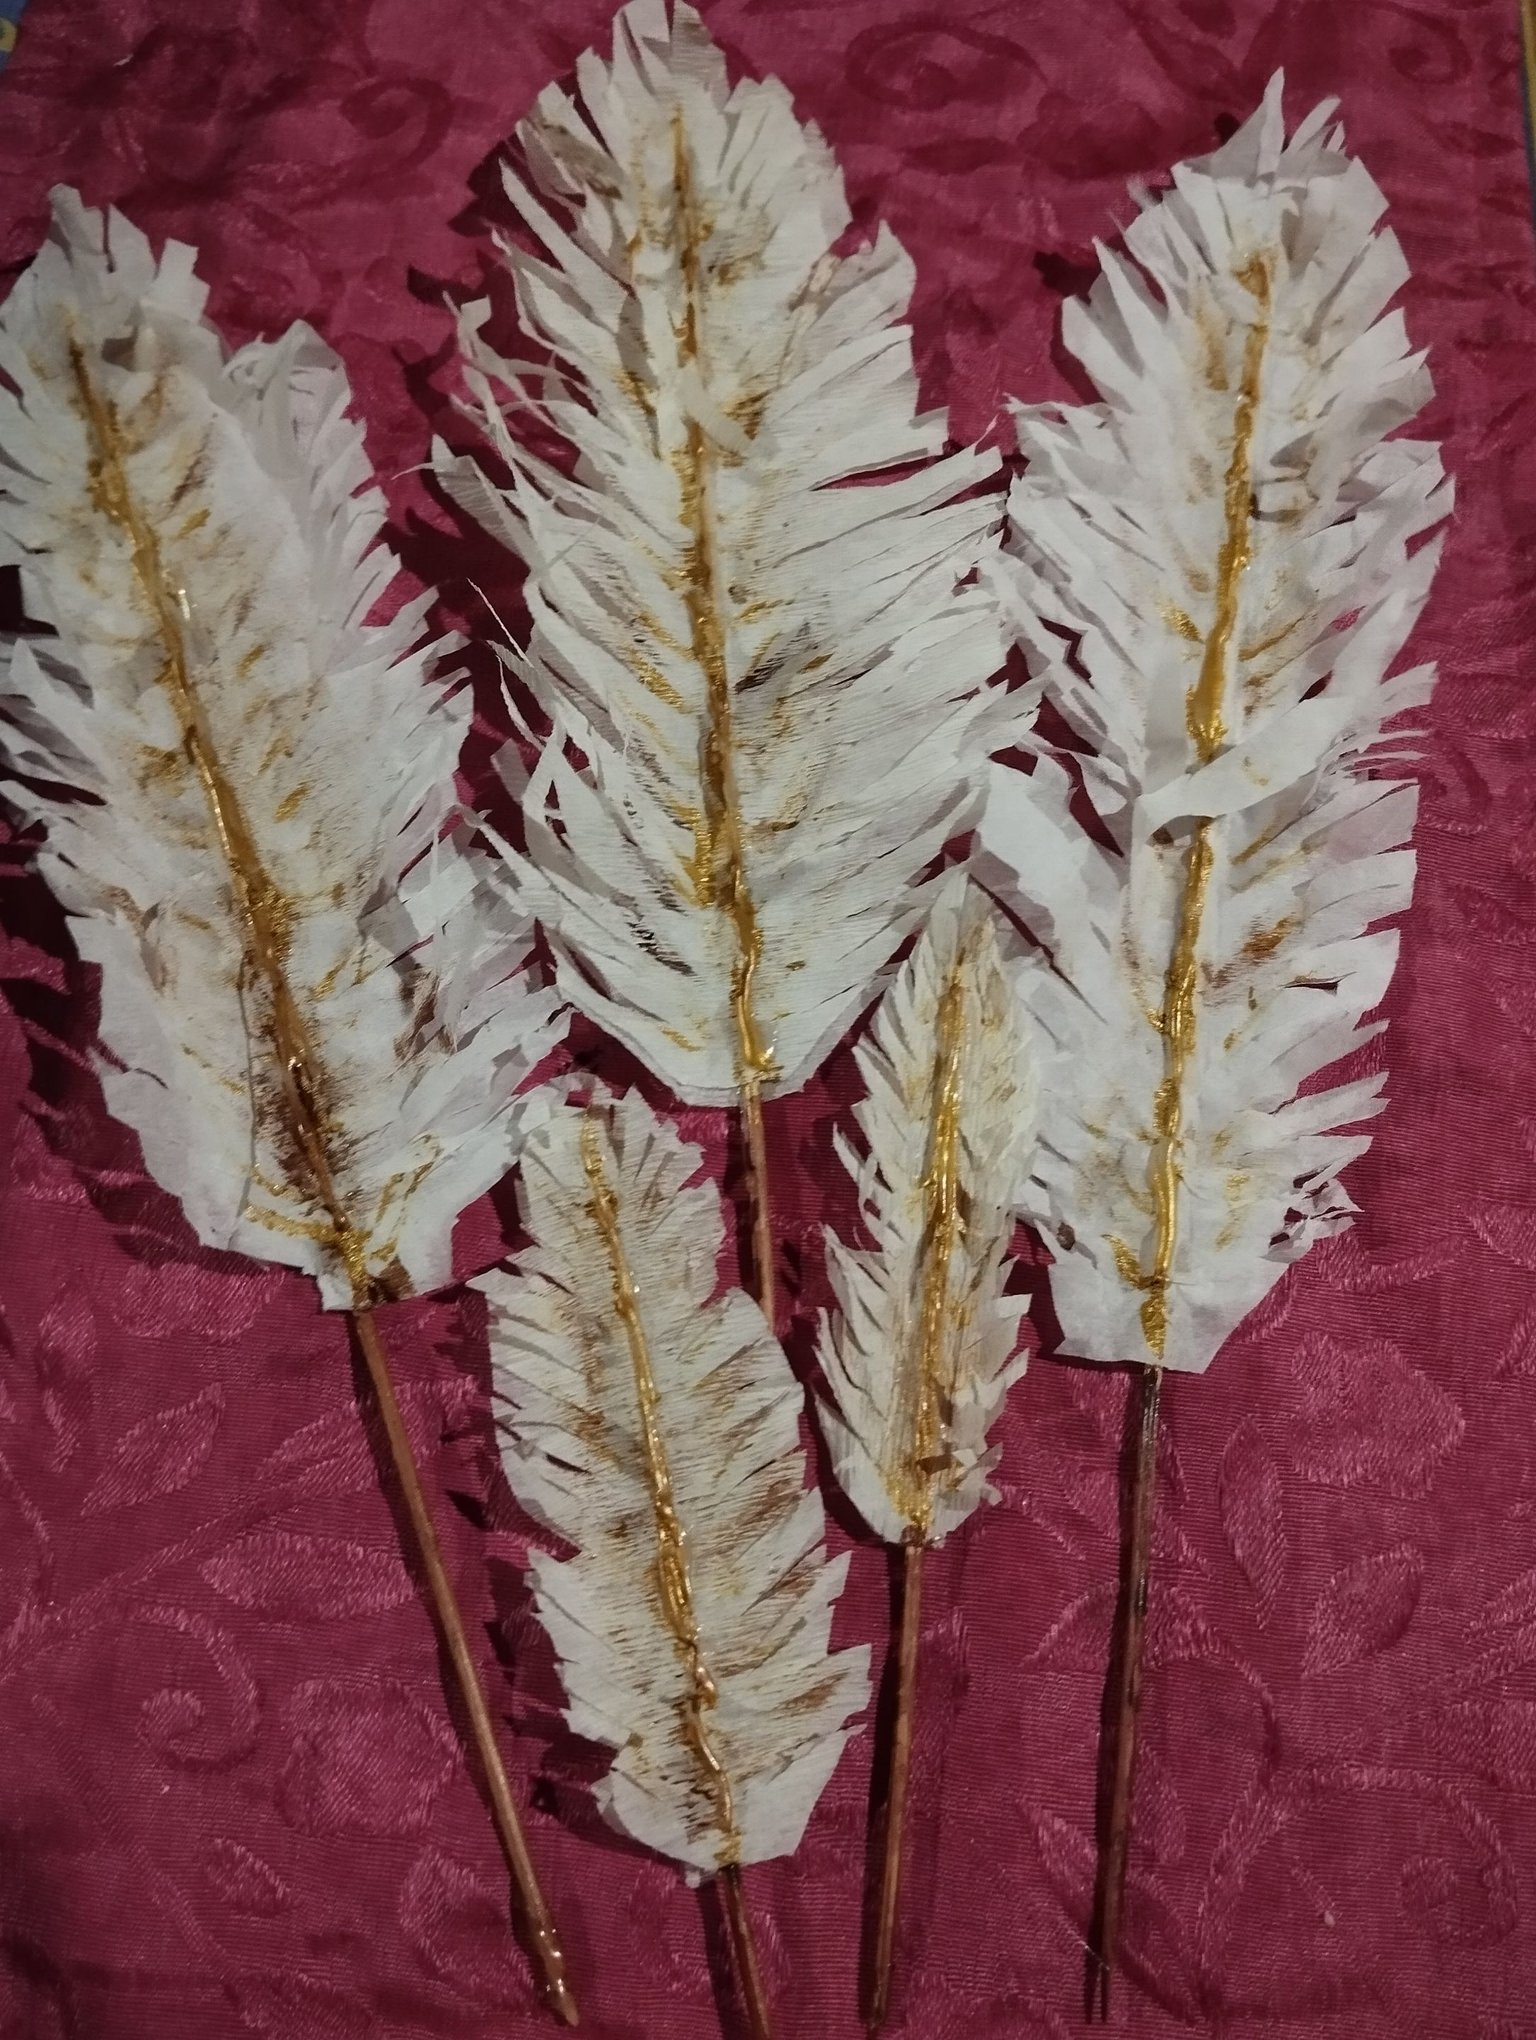
#5 Para hacer las plumas de diseño ,usé un cuadrado de papel de seda blanco, puse dos palitos de altura en la mitad de un solo lado del cuadrado, pegué los palitos de altura con silicón en el papel , y luego en la vista del frente de los palitos de altura apliqué silicón , doblé la mitad del papel de manera que se pegará los palitos y que este papel quede por encima de los palitos ,como si fuera un sándwich ,luego de tener los dos palitos pegados, se cortan por el medio dejando dos rectángulos con un palito de altura, y este rectángulo se dobla a la mitad de manera que los extremos de los lados se enfrenten para sacar la forma simétrica de la pluma.
English Version
#5 To make the designer feathers, I used a square of white tissue paper, put two tall sticks in the middle of one side of the square, glued the tall sticks with silicone to the paper, and then on the front view of the tall sticks I applied silicone, folded half of the paper so that the sticks would stick together and this paper would be on top of the sticks, as if it were a sandwich, after having the two sticks glued, they are cut in half leaving two rectangles one stick high, and this rectangle is folded in half so that the ends of the sides face each other to get the symmetrical shape of the feather.
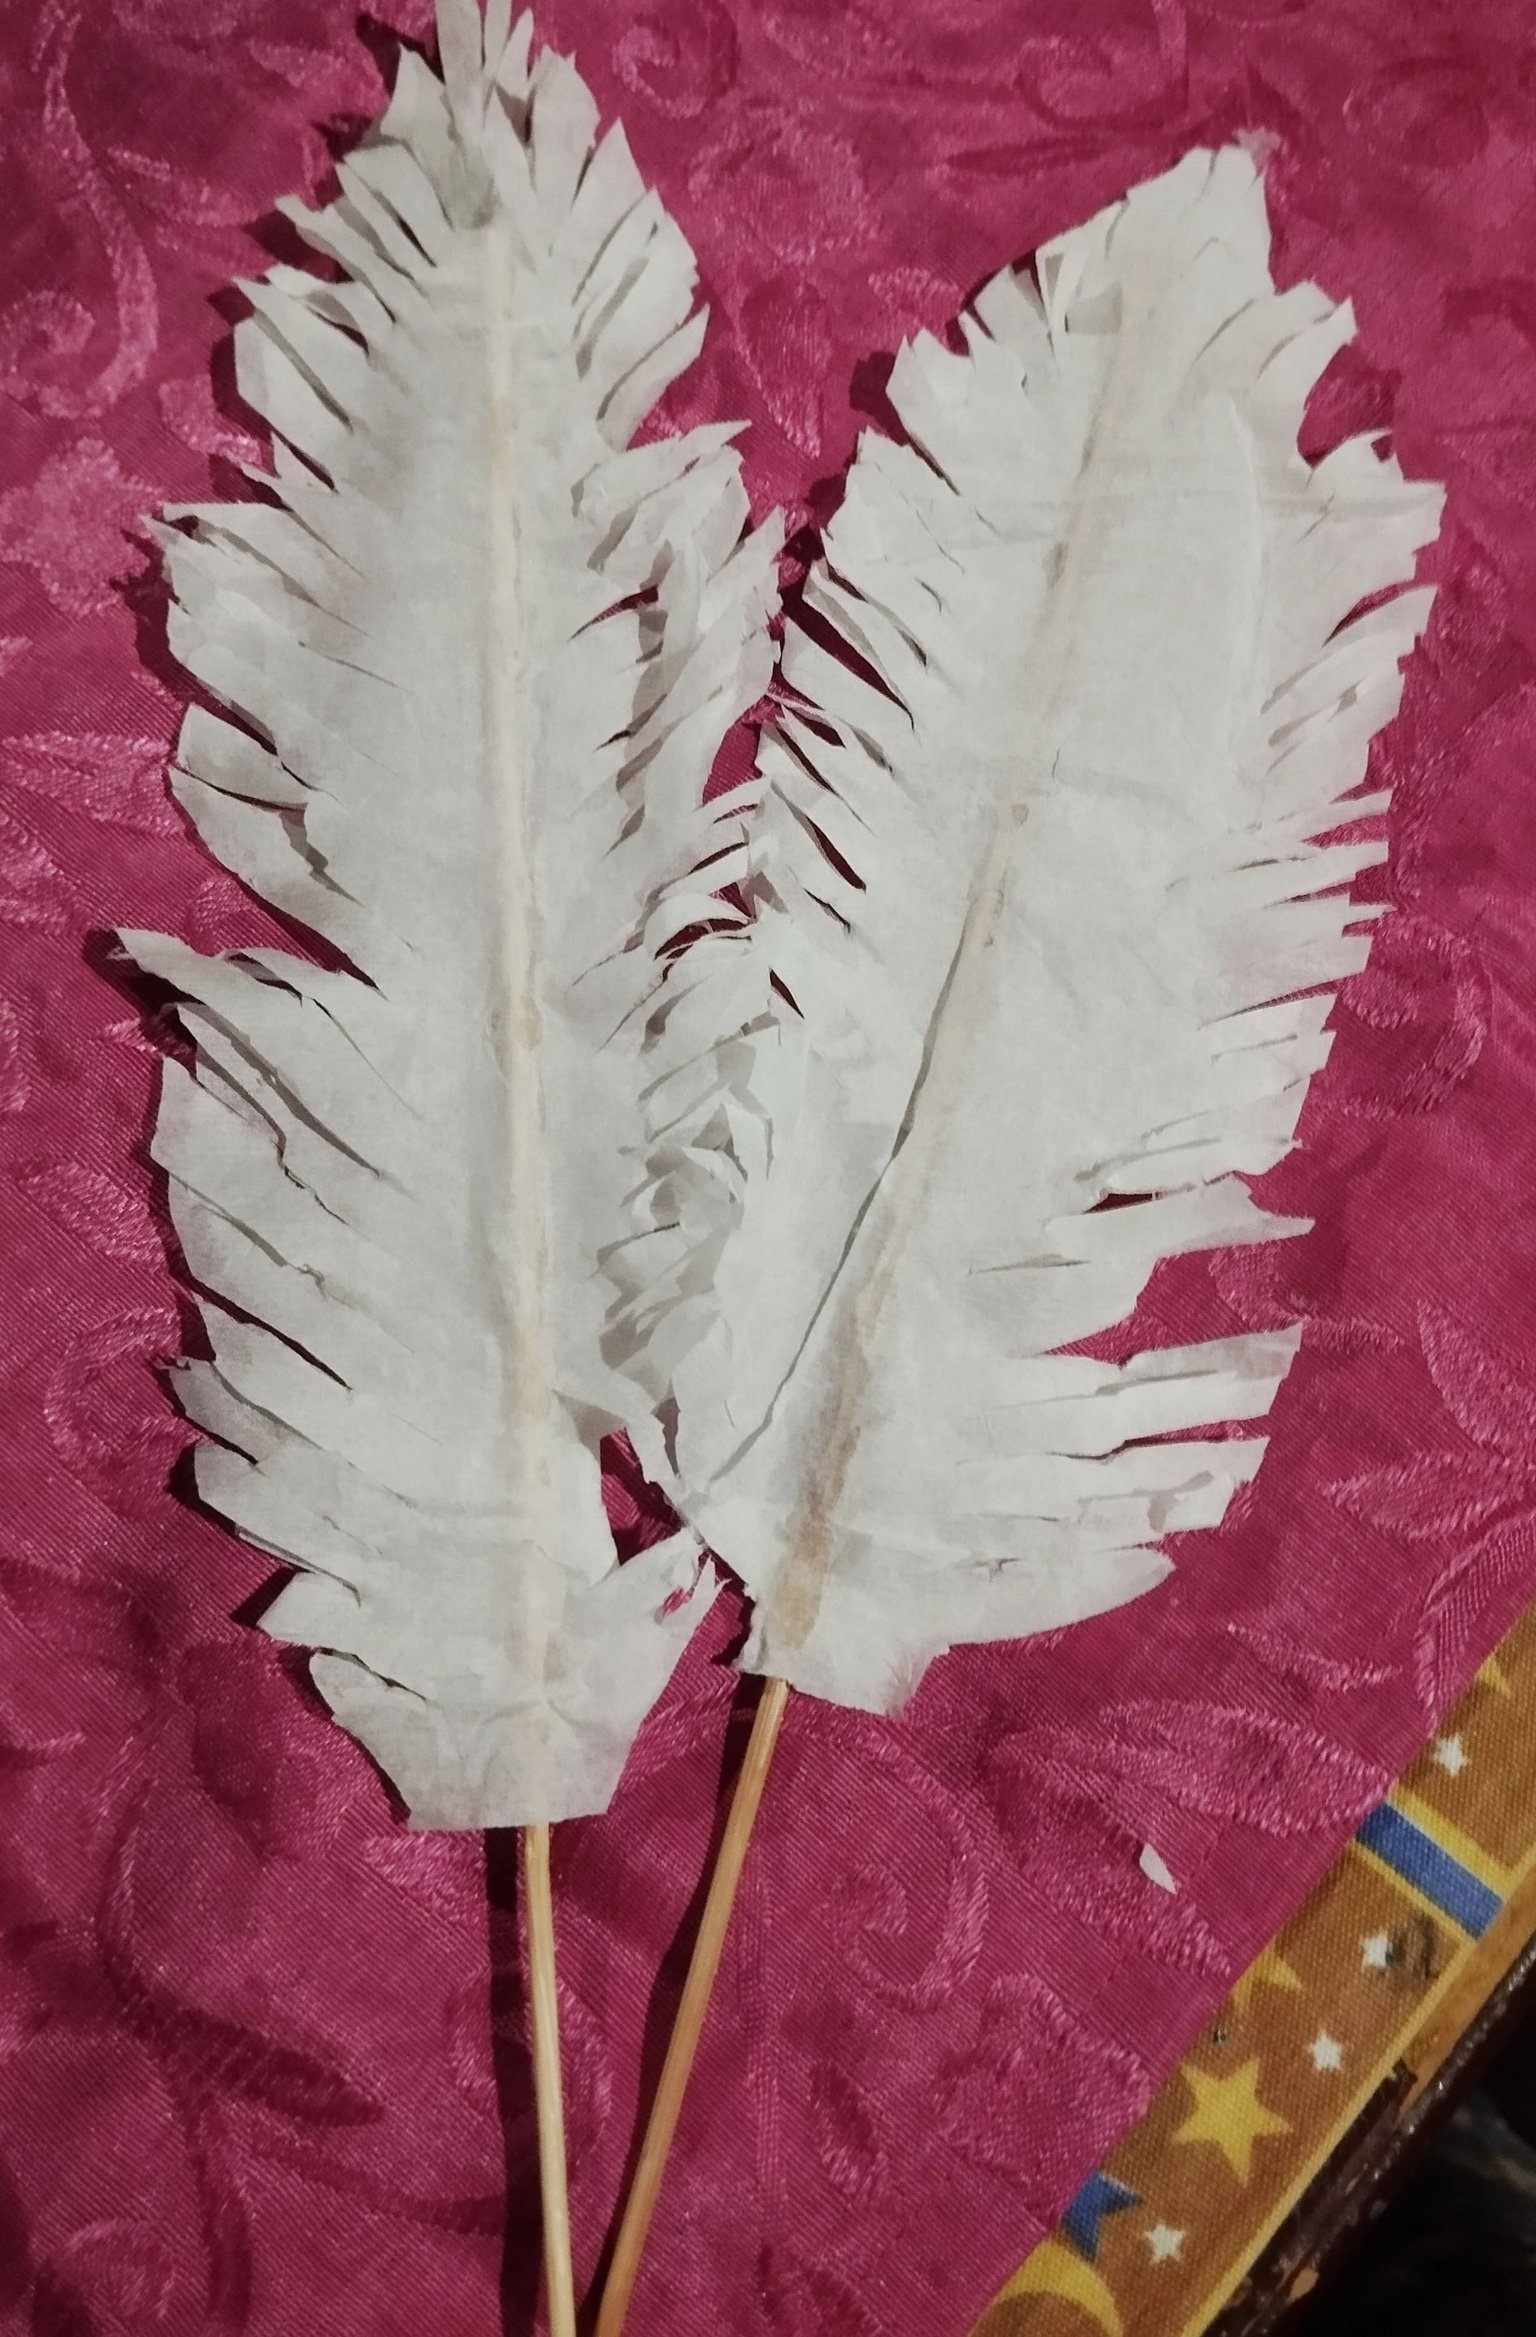 | 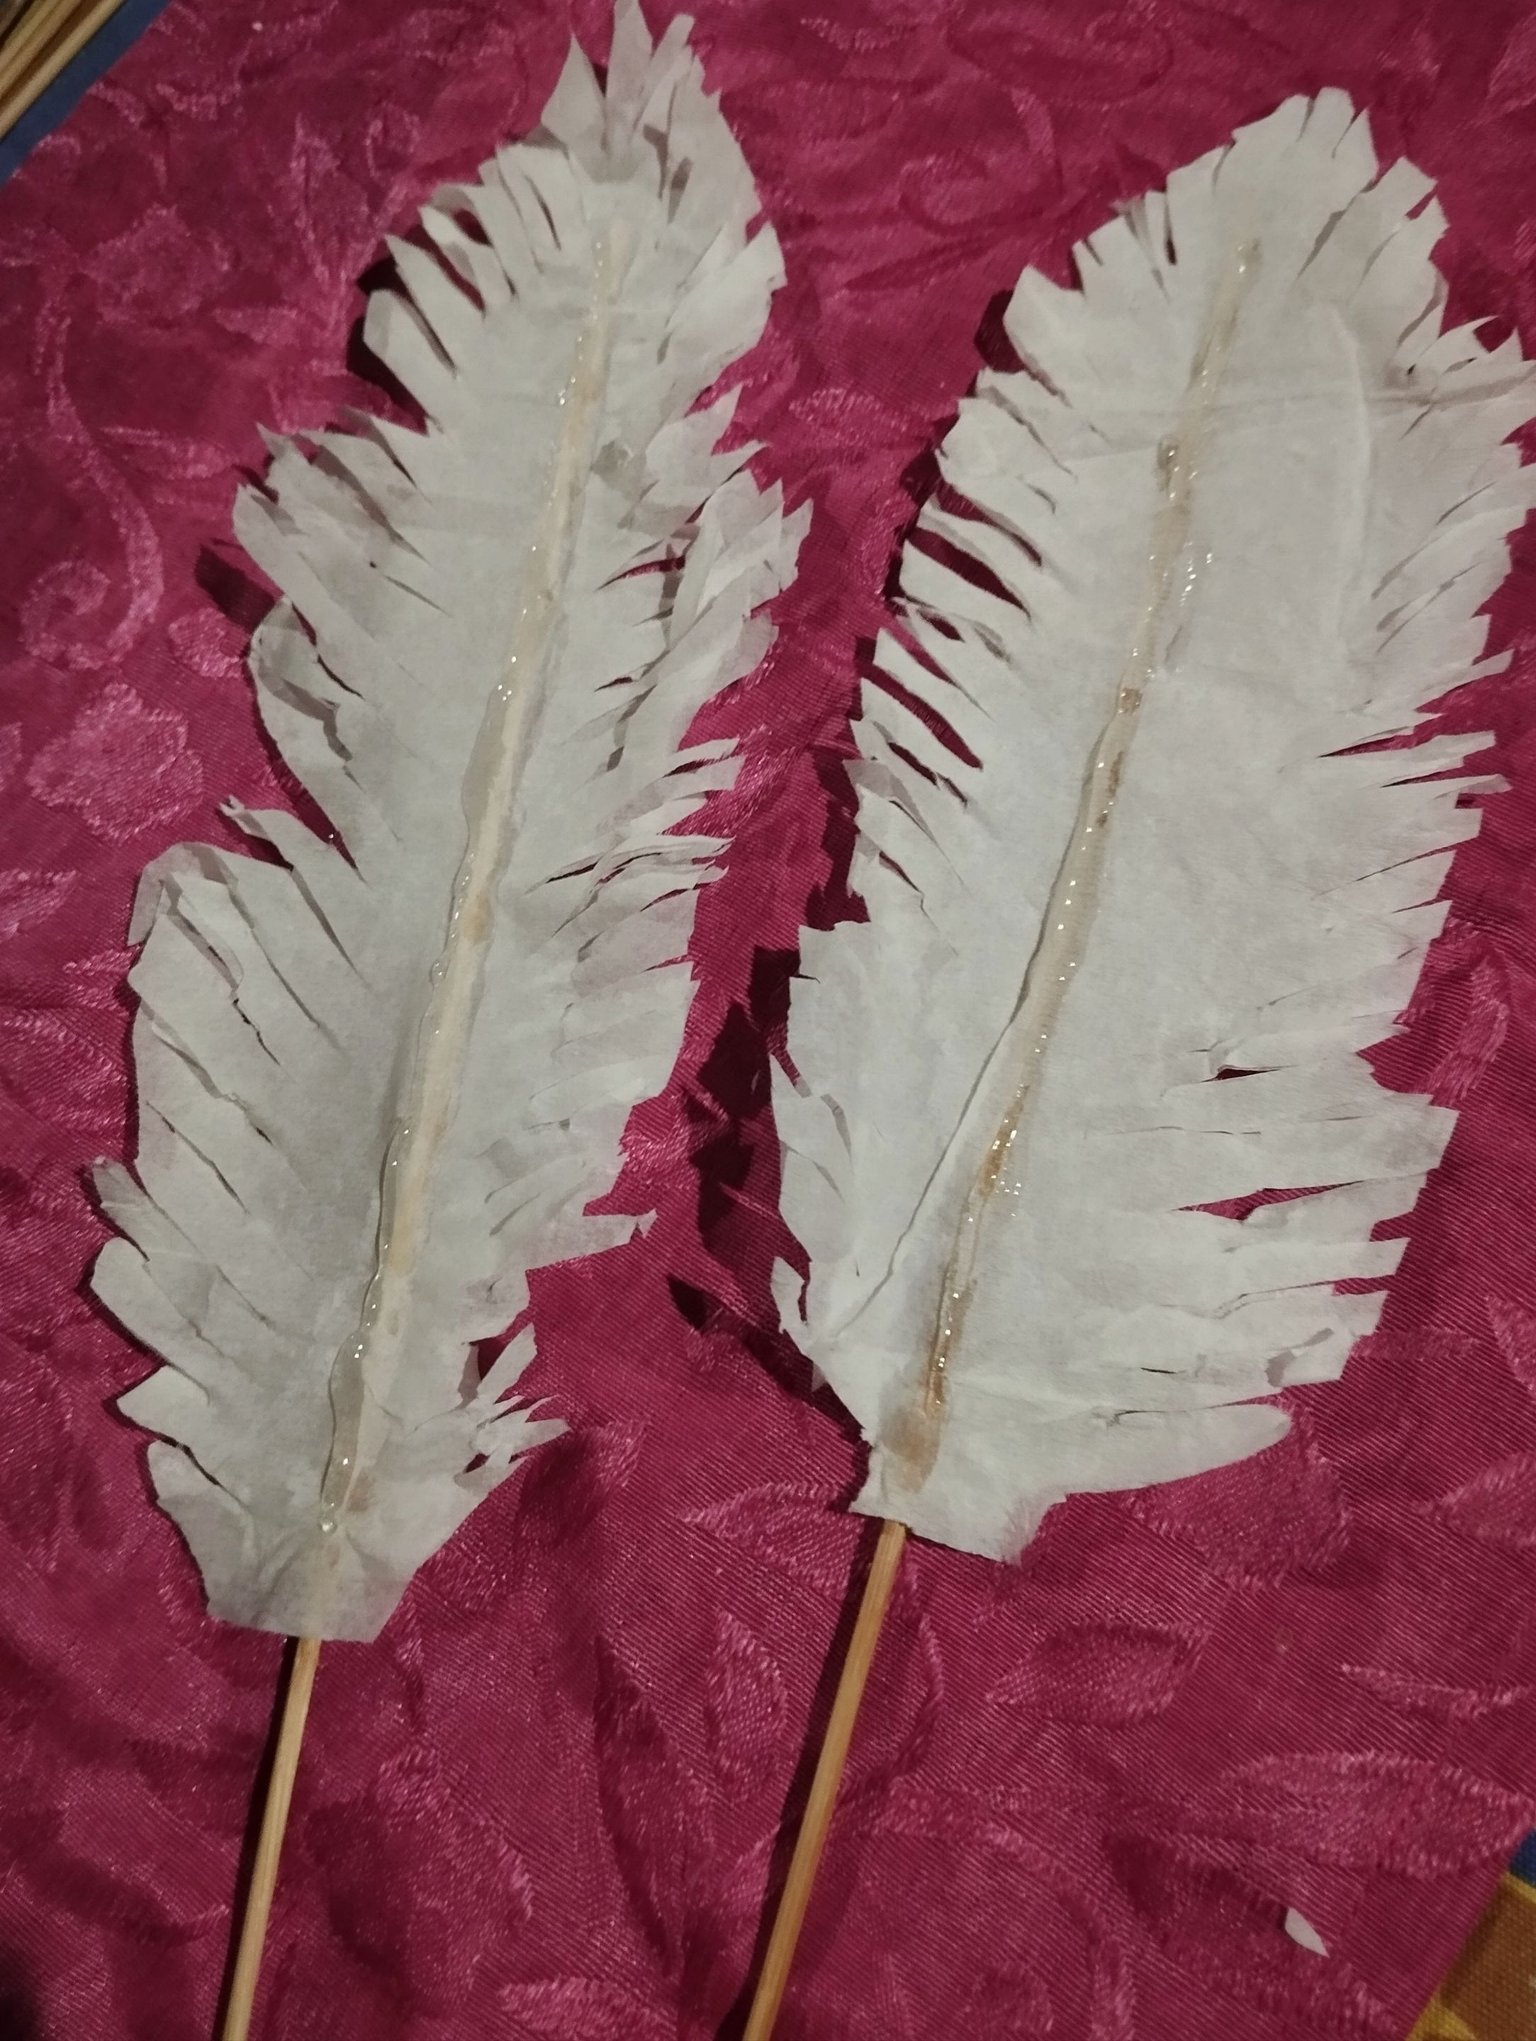 | 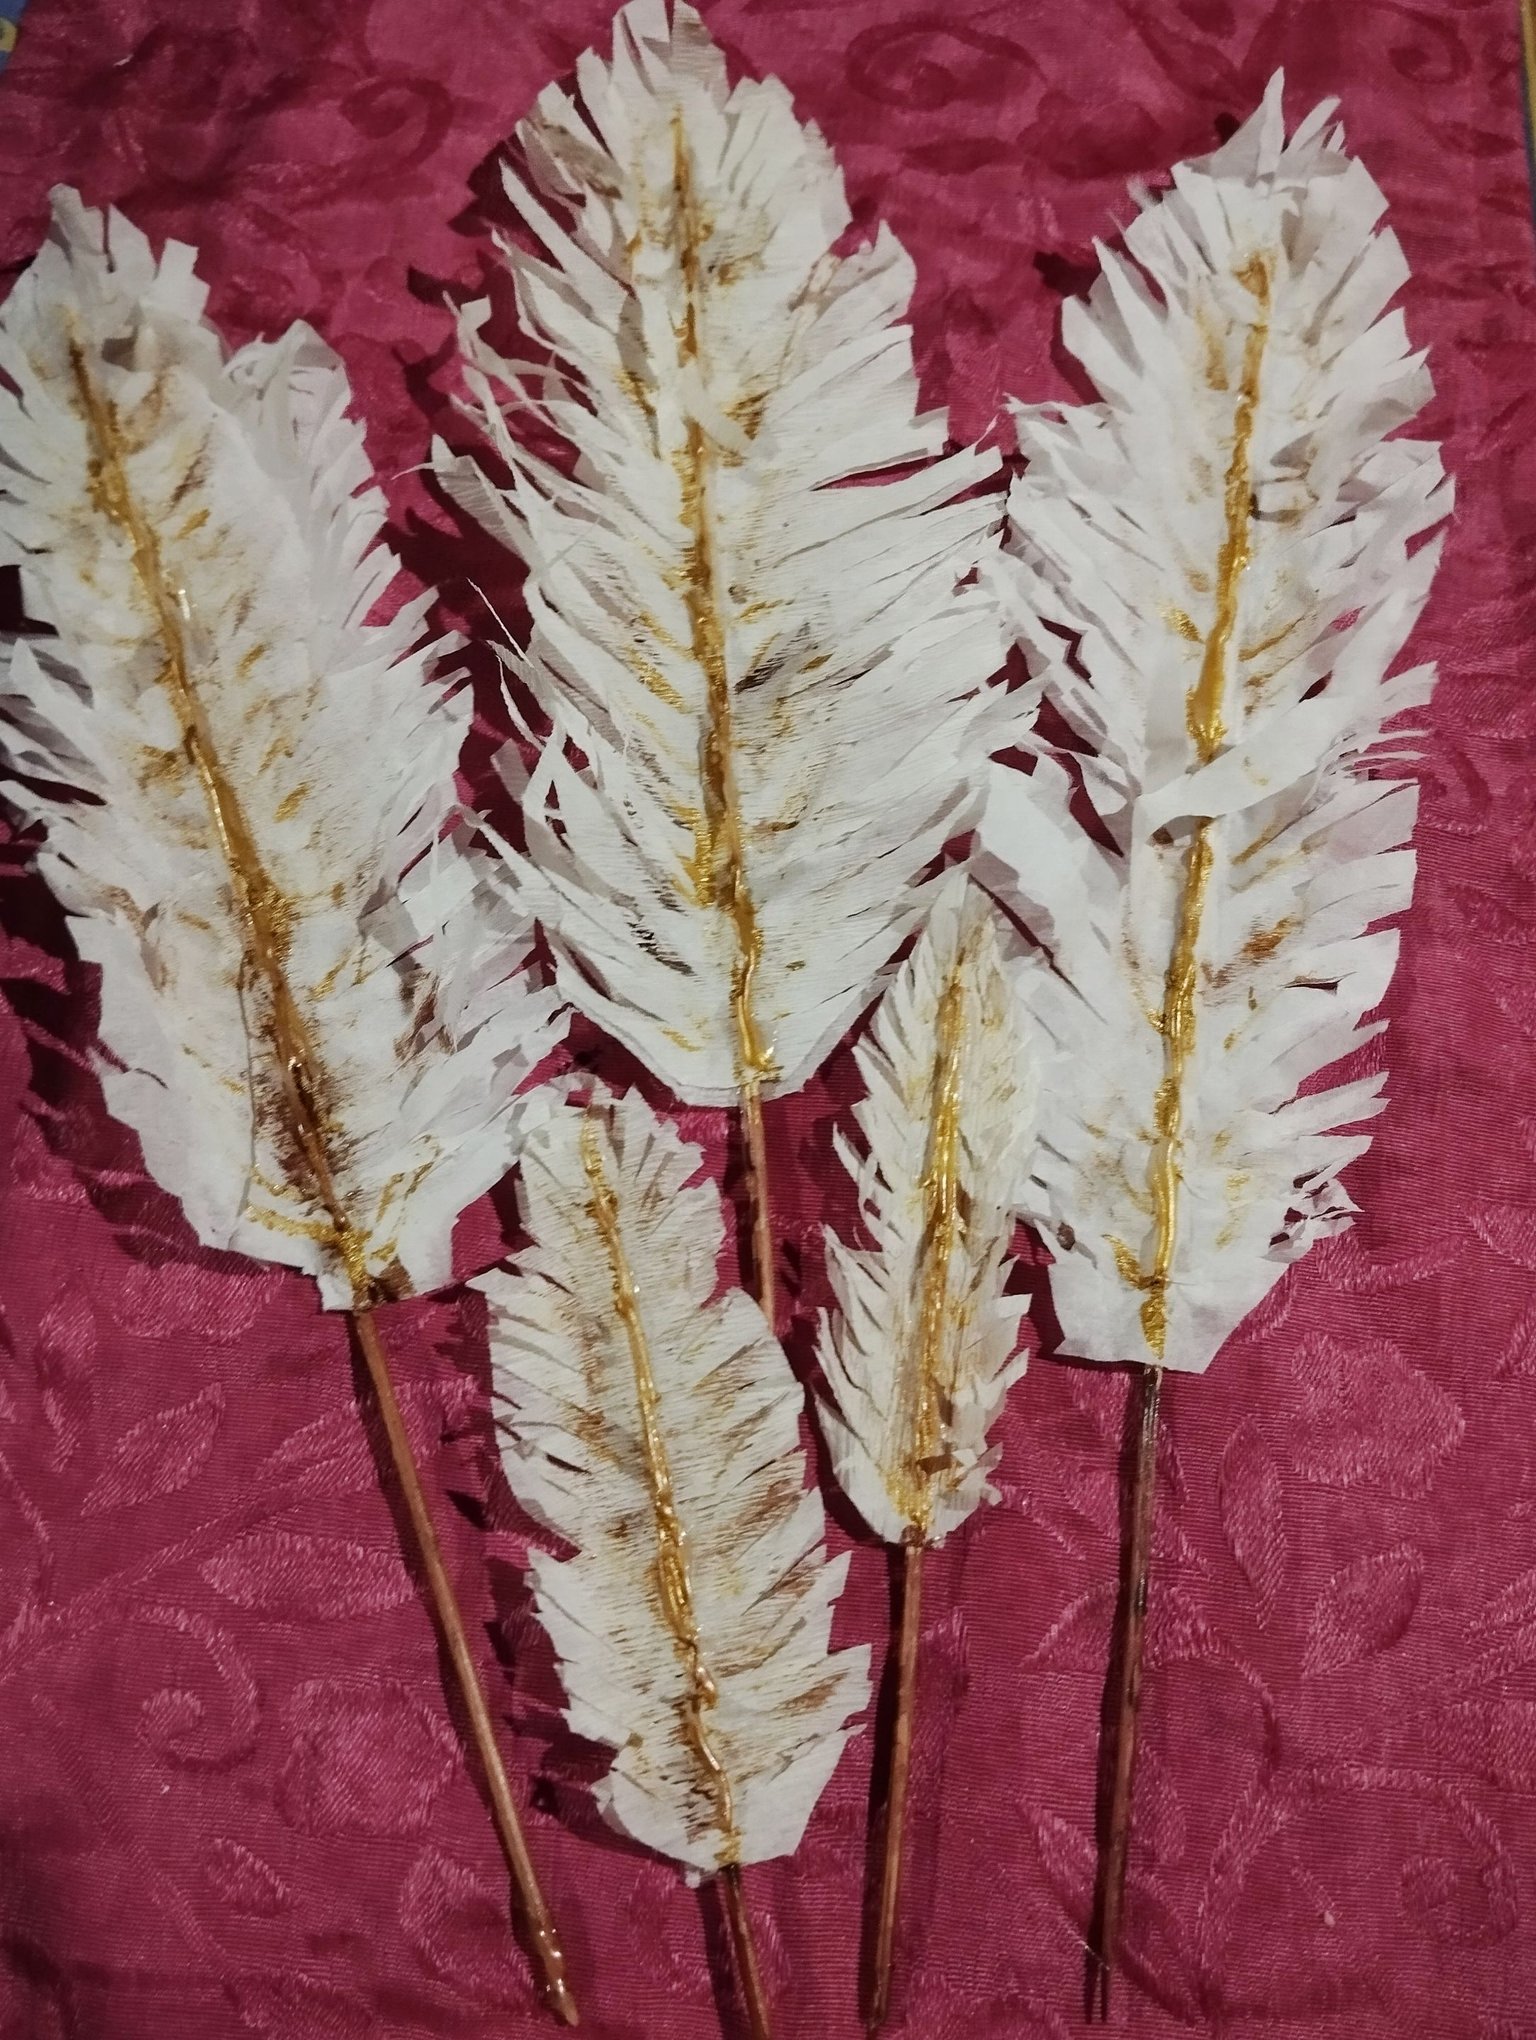 |
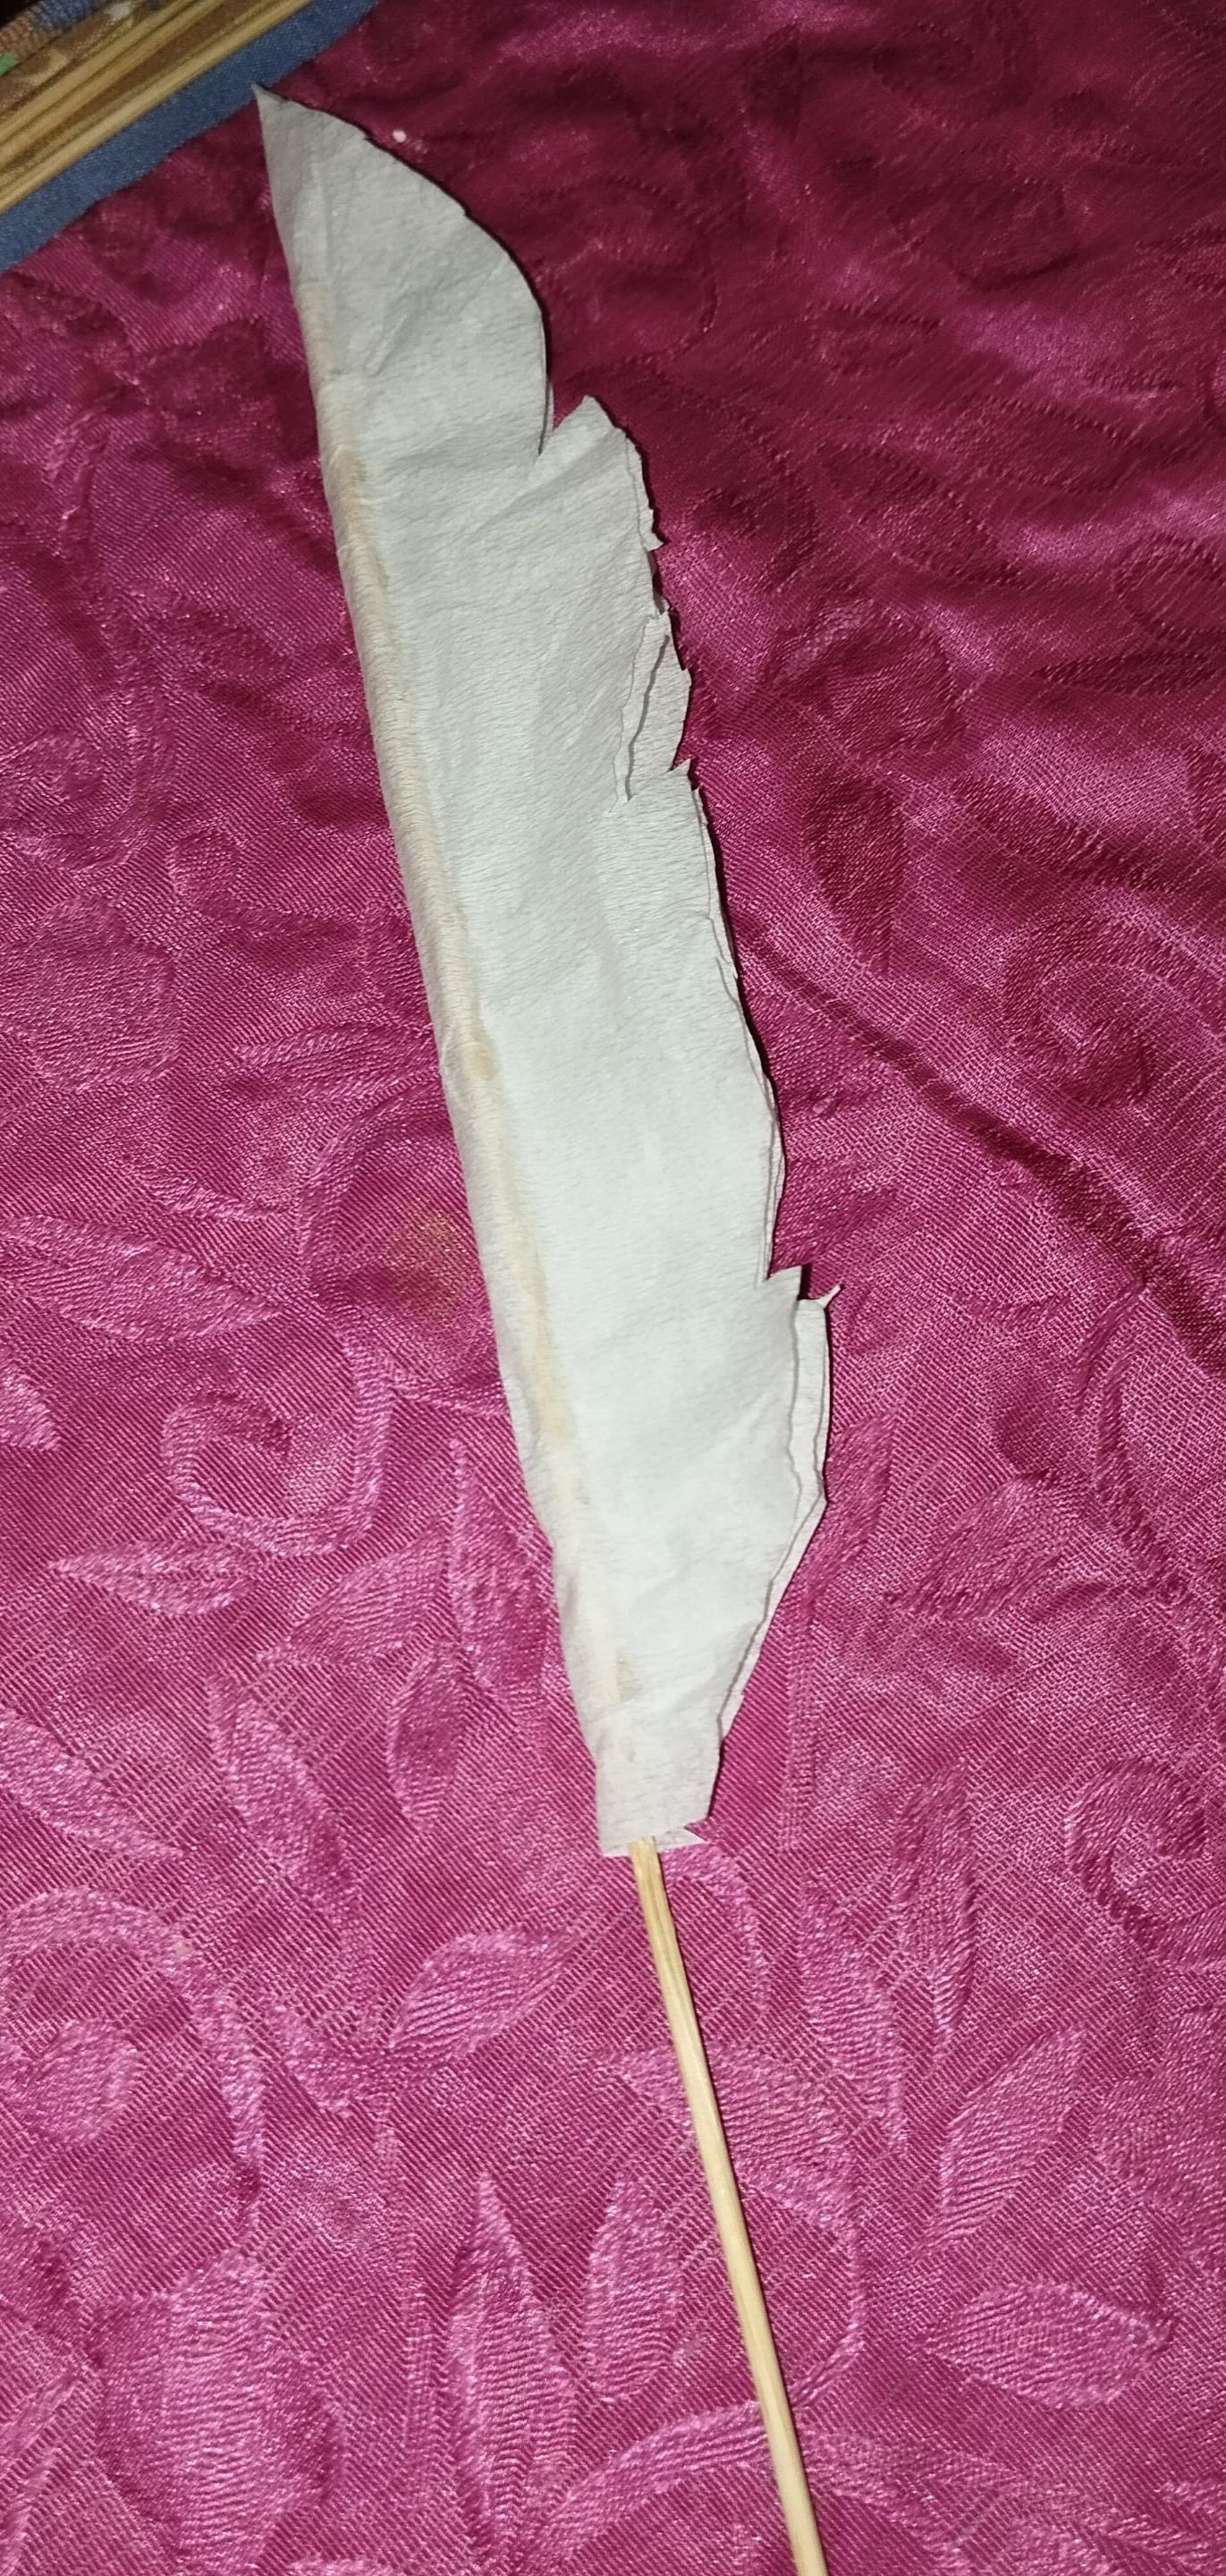
#6 Luego de tener la forma de la pluma, corté tiras en todo el cuerpo de la pluma para darle movimiento, luego aplique una linea de silicón en el medio de la línea del medio donde quedó el palito de altura , este para que se denote más la línea del Medio.Luego con con el pincel pinte la línea media de la pluma con dorado, y con el pincel seco hice líneas, en toda la pluma ,y luego con pintura marrón hice algunas líneas también para darle más dinamismo y pinté el palito que sobresale abajo de color marrón. Hice más plumitas de varios tamaños y con otro papel tipo crepe.
English Version
#6 After having the shape of the feather, I cut strips all over the body of the feather to give it movement, then I applied a line of silicone in the middle of the middle line where the tall stick was, this so that the middle line is more noticeable. Then with the brush I painted the middle line of the feather with gold, and with the dry brush I made lines, all over the feather, and then with brown paint I made some lines too to give it more dynamism and I painted the stick that sticks out below brown. I made more feathers of various sizes and with another crepe-type paper.
 |  |


Y listo este sería el resultado de nuestras manualidad , Aquí les dejo un gif con los detallitos de las varitas 🪄✨ para que puedan ver como quedan de bonitos , así que sí eres fan de Harry Potter y te quieres hacer tu varita personalizada, para tu cosplay o por decoración aquí las tienes , la verdad quedaron genial porque se sienten como si fueran plásticas con la pintura de tela , así que que ya sabes puedes practicar tus AlohomorA.
Muchas gracias por leerme!🤭💜✨Que me dicen se harían sus varitas?, estaba viendo referencias de las varitas y las varitas mas bonitas que ví fue la de Narcisa Malfoy está súper bonita y elegante!.
Fotos tomadas por mí en mi equipo Redmi note 12 editadas en Pics art y gif realizado en app creador de GIFs texto traducido en Google traductor.
English Version
** And ready this would be the result of our crafts, Here I leave you a gif with the details of the wands 🪄✨ so you can see how pretty they are, so if you are a Harry Potter fan and you want to make your own personalized wand, for your cosplay or for decoration, here you have them, the truth is they looked great because they feel like they were plastic with the fabric paint, so you know you can practice your AlohomorA.**
Thank you very much for reading me! 🤭💜✨What do you think, would you make your own wands? I was looking at references for wands and the prettiest wands I saw were Narcissa Malfoy's, it's super pretty and elegant!.
Photos taken by me on my Redmi note 12 device edited in Pics art and gif made in the GIF creator app, text translated in Google translator.